65
BETA RULES PREVIEW This document is a beta preview of the forthcoming WARMACHINE: MKIV tabletop miniatures game rules. It is a work-in-progress and all contents are subject to change.
| Date post: | 10-Nov-2023 |
| Category: |
Documents |
| Upload: | khangminh22 |
| View: | 2 times |
| Download: | 0 times |
BETA
RULES
PREVIEW
This document is a beta preview of the forthcoming WARMACHINE: MKIV tabletop miniatures game rules.
It is a work-in-progress and all contents are subject to change.
CONTENTSRULES BASICS . . . . . . . . . . . . . . . . . . . . . . . . . . . . 1
Summary of Play. . . . . . . . . . . . . . . . . . . . . . . . 1 Dice and Rounding . . . . . . . . . . . . . . . . . . . . . . 2 General Guidelines . . . . . . . . . . . . . . . . . . . . . . 2
MODELS . . . . . . . . . . . . . . . . . . . . . . . . . . . . . . . . . 5
Model Profiles . . . . . . . . . . . . . . . . . . . . . . . . . . 6
GAMEPLAY. . . . . . . . . . . . . . . . . . . . . . . . . . . . . . 11
The Game Round . . . . . . . . . . . . . . . . . . . . . . . 11 The Player Turn . . . . . . . . . . . . . . . . . . . . . . . . 11 Activating Models . . . . . . . . . . . . . . . . . . . . . . 11 Movement . . . . . . . . . . . . . . . . . . . . . . . . . . . . . . 12 Combat Actions . . . . . . . . . . . . . . . . . . . . . . . .17 Line of Sight & Targeting . . . . . . . . . . . . . . .18 Point of Origin . . . . . . . . . . . . . . . . . . . . . . . . . .21 Measuring Range . . . . . . . . . . . . . . . . . . . . . . .21
COMBAT . . . . . . . . . . . . . . . . . . . . . . . . . . . . . . . . 22
Making Attacks . . . . . . . . . . . . . . . . . . . . . . . 22 Attack Roll . . . . . . . . . . . . . . . . . . . . . . . . . . . . 22 Melee Attacks . . . . . . . . . . . . . . . . . . . . . . . . . 23 Ranged Attacks . . . . . . . . . . . . . . . . . . . . . . . 27 Arcane Attacks . . . . . . . . . . . . . . . . . . . . . . . 30 Damage . . . . . . . . . . . . . . . . . . . . . . . . . . . . . . . . 30 Special Combat Situations. . . . . . . . . . . . . 33
WARCASTERS & FOCUS . . . . . . . . . . . . . . . . 35
Warcaster Special Rules . . . . . . . . . . . . . . . 35
WARJACKS . . . . . . . . . . . . . . . . . . . . . . . . . . . . . 37
Warjack Special Rules . . . . . . . . . . . . . . . . . 37 Colossals. . . . . . . . . . . . . . . . . . . . . . . . . . . . . . . 37 Customization . . . . . . . . . . . . . . . . . . . . . . . . . 38 Autonomous Warjacks . . . . . . . . . . . . . . . . 38
WARLOCKS & FURY . . . . . . . . . . . . . . . . . . . . 39
Warlock Special Rules . . . . . . . . . . . . . . . . . 39
WARBEASTS . . . . . . . . . . . . . . . . . . . . . . . . . . . 41
Warbeast Special Rules. . . . . . . . . . . . . . . . 41 Gargantuans. . . . . . . . . . . . . . . . . . . . . . . . . . . 42 Customization . . . . . . . . . . . . . . . . . . . . . . . . . 42
SPELLS, SPELLCASTING & ANIMI . . . . . .43
Spell Targeting. . . . . . . . . . . . . . . . . . . . . . . . .43 Measuring the Range of a Spell . . . . . . . .43 Casting a Spell with Magic Ability . . . . . . . . . . . . . . . . . . .43 Casting a Spell with Focus or Fury. . . . . . . . . . . . . . . . . . .43 Animi . . . . . . . . . . . . . . . . . . . . . . . . . . . . . . . . . .43 Spell & Animus Statistics . . . . . . . . . . . . . 44 Upkeep Spells. . . . . . . . . . . . . . . . . . . . . . . . . 44 Channeling . . . . . . . . . . . . . . . . . . . . . . . . . . . . 44
ADDITIONAL RULES . . . . . . . . . . . . . . . . . . . .46
’Jack Marshals . . . . . . . . . . . . . . . . . . . . . . . .46 Battle Engines . . . . . . . . . . . . . . . . . . . . . . . . .46 Cavalry . . . . . . . . . . . . . . . . . . . . . . . . . . . . . . . .46 Flight . . . . . . . . . . . . . . . . . . . . . . . . . . . . . . . . . .46 Incorporeal . . . . . . . . . . . . . . . . . . . . . . . . . . . .46 Structures . . . . . . . . . . . . . . . . . . . . . . . . . . . . .47
PREPARING FOR WAR . . . . . . . . . . . . . . . . . .48
Assassination vs. Execution Modes. . . . . . . . . . . . . . . . . . . . .48 Deployment. . . . . . . . . . . . . . . . . . . . . . . . . . . .49 Starting Focus & Fury . . . . . . . . . . . . . . . . .49
ARMY CONSTRUCTION . . . . . . . . . . . . . . . . . 50
Building Your Army . . . . . . . . . . . . . . . . . . . 50 Command Cards . . . . . . . . . . . . . . . . . . . . . . . 52
TERRAIN. . . . . . . . . . . . . . . . . . . . . . . . . . . . . . . . 53
Terrain Types . . . . . . . . . . . . . . . . . . . . . . . . . 53
SCENARIOS . . . . . . . . . . . . . . . . . . . . . . . . . . . . . 57
Scenario Rules . . . . . . . . . . . . . . . . . . . . . . . . . 57 Flags . . . . . . . . . . . . . . . . . . . . . . . . . . . . . . . . . . . 57 Scenarios . . . . . . . . . . . . . . . . . . . . . . . . . . . . . . 58
APPENDIX 1: TIMING . . . . . . . . . . . . . . . . . . . .60
APPENDIX 2: TEMPLATES . . . . . . . . . . . . . 62
©2001–2022 Privateer Press, Inc. All Rights Reserved. Trademarks are property of Privateer Press and registered in the United States and other countries.
1
RULES BASICSGENERAL KNOWLEDGE FOR COMBAT
Set in the steam-powered fantasy world of the Iron Kingdoms, WARMACHINE is a fast-paced 32 mm tabletop miniatures game for two or more players to pit their forces against each other in epic battles of machines and beasts. Players collect, assemble, and paint fantastically detailed models representing the various warriors, creatures, and automata that make up their armies.
In WARMACHINE, players take on the role of elite soldier-sorcerers known as warcasters or battle-shamans known as warlocks. Though warcasters are formidable, their strength lies in their magical ability to control warjacks—massive military automatons. No less powerful are the warlocks, whose strength lies in their parasitic synergy with savage warbeasts—monstrous creatures of flesh, blood, and bone. A WARMACHINE army is built around a warcaster and their battlegroup of warjacks or a warlock and their battlegroup of warbeasts. Squads of soldiers and support teams can further bolster a battlegroup’s combat capability.
Warjacks are powered by steam technology and arcane science controlled by a warcaster. Also called ’jacks, these mighty creations are outfitted with a plethora of weaponry and equipment. A warcaster maintains telepathic contact with the ’jacks in their battlegroup and continually draws on a magical energy called focus. A warcaster’s focus points can be used to boost their own combat abilities, boost those of their warjacks, or cast powerful spells. If a warcaster falls, their ’jacks become little more than hulking iron shells. A crucial component of strategy is the warcaster’s management of focus to boost their warjacks’ abilities. Properly allocated, focus points can enhance a ’jack’s impressive combat power significantly!
Warbeasts are mighty creatures drawn from the wilds and trained for combat. They are bred or chosen for their ability to fight and
heed their warlock’s commands. Most rely on claw and fang, but some wield massive weapons or boast supernatural powers. A warlock maintains mental contact with the warbeasts in their battlegroup and can force them to attack with greater accuracy and strength or evoke latent arcane abilities, increasing the beasts’ fury. The warlock can leech this fury from their warbeasts and use it to boost their combat abilities, heal their battlegroup, stave off injury, or cast formidable spells. If a warlock falls, their warbeasts lose interest in the fight and soon fall to their enemies on the field. A crucial component of strategy is the warlock’s management of warbeasts’ fury to enhance their attacks and fuel their own powers. Too much fury can backfire, however, causing warbeasts to frenzy uncontrollably and attack whatever is nearest—whether friend or foe.
Summary of PlayBefore a battle begins, players agree on an encounter level, which determines the scope of the game being played, and a scenario for play. They then create their armies based on those guidelines. Next, the players determine the turn order. Once established, the turn order will not change throughout the game. Players then deploy their forces and prepare for battle to begin.
Battles are conducted in a series of game rounds. During a game round, each player receives one turn to command their army. During their turn, a player activates all the models in their army in an order of their choosing. When activated, a model can move and then make one of a variety of actions such as attacking or repairing a warjack. Once both players have taken their turns, the current game round ends and a new one begins, starting again with the first player. Game rounds continue until one player wins by destroying the opposing warcaster or warlock, meeting the scenario objectives, or accepting the surrender of their opponent.
WHAT YOU NEEDIn addition to this book and your army, you will also need a few basic items to play:
• A table or playing surface where you can conduct your battles (typically 4' × 4').
• A tape measure or ruler marked in inches and fractions thereof to measure movement and attack distances.
• A few six-sided dice. Six will be plenty. •Ahandfuloftokens,liketheofficialtokensetsoffered
by Privateer Press, to indicate focus points, spell effects, etc.
• Templates for various effects for use during play. You canfindanprintabletemplatesattheendofthisdocument.
2
Dice and RoundingWARMACHINE uses six-sided dice, abbreviated d6, to determine the success of attacks and other actions. Most events, such as attacks, require rolling two dice (abbreviated 2d6). Other events typically require rolling one to four dice. Die rolls often have modifiers, which are expressed as + or – some quantity after the die roll notation. For example, melee attack rolls are described as “2d6 + MAT.” This means “roll two six-sided dice and add the attacking model’s MAT stat to the result.”
Some events call for rolling a d3. To do so, roll a d6, divide the result by 2, and round up.
Some instances call for a model’s stat or a die roll to be divided in half. For distance measurements, use the actual result after dividing the number in question. For everything else, always round a fractional result to the next highest whole number.
cannot spend focus to boost the damage roll again in order to receive a total of two extra dice on the roll. A model that receives an additional die on an attack or damage roll can still also boost that roll, however.
General GuidelinesThis section covers how WARMACHINE handles game terms, the relationship between standard and special rules, sportsmanship between players, and the procedures for resolving rules disputes.
Game TermsWhen these rules define a game term, it appears in bold.
For the sake of brevity, the phrase “model with the special rule” is sometimes replaced with the rule’s name. For example, a model with the ’Jack Marshal advantage is a ’jack marshal, and a model with the Spellcaster rule is a spellcaster. Similarly, the phrases “attack with __ weapon” and “attack granted by the __ special rule” can be replaced by the expression “__ attack.” For instance, the Orgoth Tyrant warjack’s Flail weapon allows it to potentially make several attacks with its Thresher special attack. These attacks are referred to as “Thresher attacks” in the text of the special attack. In the same way, the attacks a trampling warjack makes against models it moved over are called “trample attacks.”
All models you control are friendly models. Models controlled by your opponent are enemy models.
The rules of models are written as if speaking to the current controller of the model. When a model’s rule references “you” or “yours,” it refers to the player currently controlling the model.
In a model’s rules, “this model” always refers to the model carrying the rule.
The various nations and forces within the Iron Kingdoms are represented by the different Factions. Armies are made up of models from a single Faction and can also include Mercenaries that will work for that Faction. When a rule references “Faction,” it refers to the Faction of the model carrying the rule. On a Mercenary model, for instance, “friendly Faction warjack” means “friendly Mercenary warjack,” while the same text on a Dusk model means “friendly Dusk warjack.”
The names of the models and units in WARMACHINE appear on two lines that describe what the model is called and what type of model it is. Each model also has a name that appears on its stat profile. Rules in WARMACHINE can refer to a model by any of these identifiers. Additionally, a model can be identified by its own rules; for this to apply to a unit, however, all models in the unit must have the identifying rule.
EXAMPLE: The Reaver Skirmisher unit has the name “Reaver Skirmisher” (listed on the first line) and is an “Orgoth Sea Raider Unit” (listed on the second line). This unit could be referenced specifically as Reaver Skirmisher, as an Orgoth unit, as a Sea Raider unit, as Sea Raiders, as a unit, Raiders, or as Reavers.
EXAMPLE: The Soulless Guardian unit has the Soulless advantage. This unit could be referenced as a soulless unit.
DICE SHORTHANDA six-sided die is referred to as a d6. When you need two or more of these, a numeral before the “d” indicates the number of dice to roll. Two six-sided dice are abbreviated as 2d6, three dice as 3d6, and so on.
The term d3 is a shortcut for “roll a d6, divide by 2, and round up.” Here’s how to quickly read the results of a d3 roll:
1 or 2 = 1
3 or 4 = 2
5 or 6 = 3
Additional Dice and Boosted RollsSometimes a special rule or circumstance will allow a model to roll an additional die. An additional die is a die added to the number of dice a model would ordinarily roll. For example, when a model makes a ranged attack roll, it generally rolls 2d6 and adds its RAT stat. If the model gains an additional die on this attack, it would roll 3d6 and add its RAT stat.
A die roll can include multiple additional dice as long as each additional die comes from a different rule.
Some effects grant models boosted attack or damage rolls. Boosting a roll allows you to roll one extra die. If a model has a rule that gives it the option to boost a roll, you must declare it is boosting before rolling any dice for the roll. Each attack or damage roll can be boosted only once, but a model can boost multiple rolls during its activation. When an attack affects several models, the attack and damage rolls against each individual model must be boosted separately.
Even though they affect die rolls similarly, boosting a roll is different than gaining additional dice. A roll can be boosted and gain additional dice.
EXAMPLE: The damage roll for a charge attack that hits is boosted, meaning it adds an extra die to its damage roll. Because this roll is already boosted, the model
3
If a triggered effect contains an optional part, indicating the player “can” do something, the player can choose not to resolve that part of the effect but the trigger will still count as having resolved.
Whenever two or more special rules are triggered at the same time, such as “attack hit” or “end activation,” the active player chooses the order in which special rules on their models resolve and resolves them, then the inactive player chooses the order in which special rules on their models resolve and resolves them.
Some effects cause certain conditions of an attack, such as whether it hit or what models it disabled or destroyed, to change during resolution. When resolving triggered effects, recheck trigger conditions as you resolve each special rule. If a condition is no longer met, the effect does not resolve. Similarly, if an effect on one model causes a condition to change on another model, effects triggered by that condition will resolve for each of those models.
Use of “Any Time” Special RulesSpells, feats, and other special rules that state they can be used “at any time during this model’s activation” can be used before moving, after moving, before making an attack, or after an attack but not while moving, attacking, or resolving another triggered effect. A model cannot interrupt movement or an attack to use one of these special rules. Additionally, a model cannot use one of these special rules after running.
EXAMPLE: Warlocks and warcasters can cast spells “at any time during their activation.” This means Tyrus, Nis-Arsyr of Spiders can cast a spell before and after moving, before and after an attack, and before and after using his feat. He cannot, however, cast a spell while he is moving, making an attack, or while resolving his feat.
Sportsmanship and Sharing InformationAlthough WARMACHINE simulates violent battles between rival forces, you should still strive to be a good sport in all aspects of the game. Remember, this is a game meant to provide entertainment and friendly competition. Whether winning or losing, you should still be having lots of fun.
From time to time, your opponent may wish to see your records to verify a model’s stats or see how much damage a particular warjack has taken. Always represent this information honestly and share your records and information without hesitation.
Resolving Rules IssuesThese rules have been carefully designed to provide as much guidance as possible in all aspects of play. That said, you still might encounter situations in which the proper course of action is not immediately obvious. For instance, players might disagree on whether a model has line of sight to its intended target.
During a game, try to resolve any such issue quickly in the interest of keeping the game flowing. There will be plenty of time after the game to determine the best answer, which you can then incorporate into future games.
Unless specified otherwise, when a model’s rules reference another model by name, the model referenced is assumed to be a friendly model.
Rule PriorityWARMACHINE is a complex game that provides a multitude of play options, but its rules are intuitive and easy to learn. The standard rules lay the foundation for the game and provide all the typical mechanics used in play. Additional rules apply to specific models and modify the standard rules in certain circumstances. When they apply, the rules of individual models take precedence over the rules in this rulebook.
Unless otherwise specified, multiple instances of the same effect (that is, effects with the same name) affecting a model are not cumulative. If a model is affected by more than one instance of an effect, the effect does not expire until all instances of the effect expire.
Different effects are cumulative with each other, however, even if they apply the same modifier to a model. For example, a model within 2” of an enemy model with the Dark Shroud special rule suffers –2 ARM. Kiss of Lyliss also reduces models’ ARM by 2 but has a different name, so a model affected by both would suffer –4 to its ARM.
Occasionally, two special rules conflict. Use the following guidelines, in order, to resolve special rules interactions.
• If one rule specifically states its interaction with another rule, follow it.
• Special rules stating that something “cannot” happen override rules stating that the same thing “can” or “must” occur. (Treat rules directing or describing actions or circumstances as if they use “must.” Examples include “Gain an additional die,” “Knocked down models stand up,” and “This model gains cover.”)
EXAMPLE: A model has a rule stating it cannot be knocked down, and it is affected by something that states it becomes knocked down. Because the rules make no specific mention of each other, follow the second guideline to resolve the interaction: the model is not knocked down.
Active or Inactive PlayerIf a model is making an attack, its controller is the active player. If no model is making an attack, the active player is the player whose turn it is. In both cases, the other player is the inactive player. When resolving effects that occur “after the attack is resolved,” the active and inactive players remain the same as during the attack until all effects triggered by the attack (see below) are resolved.
TriggersSome rules will describe conditional effects, also referred to as “triggered” effects. These rules will typically describe the trigger condition, the timing of the trigger, the resulting effect, and the timing of the resolution of this effect. If no specific timing is described, the effect is resolved upon the trigger condition being met.
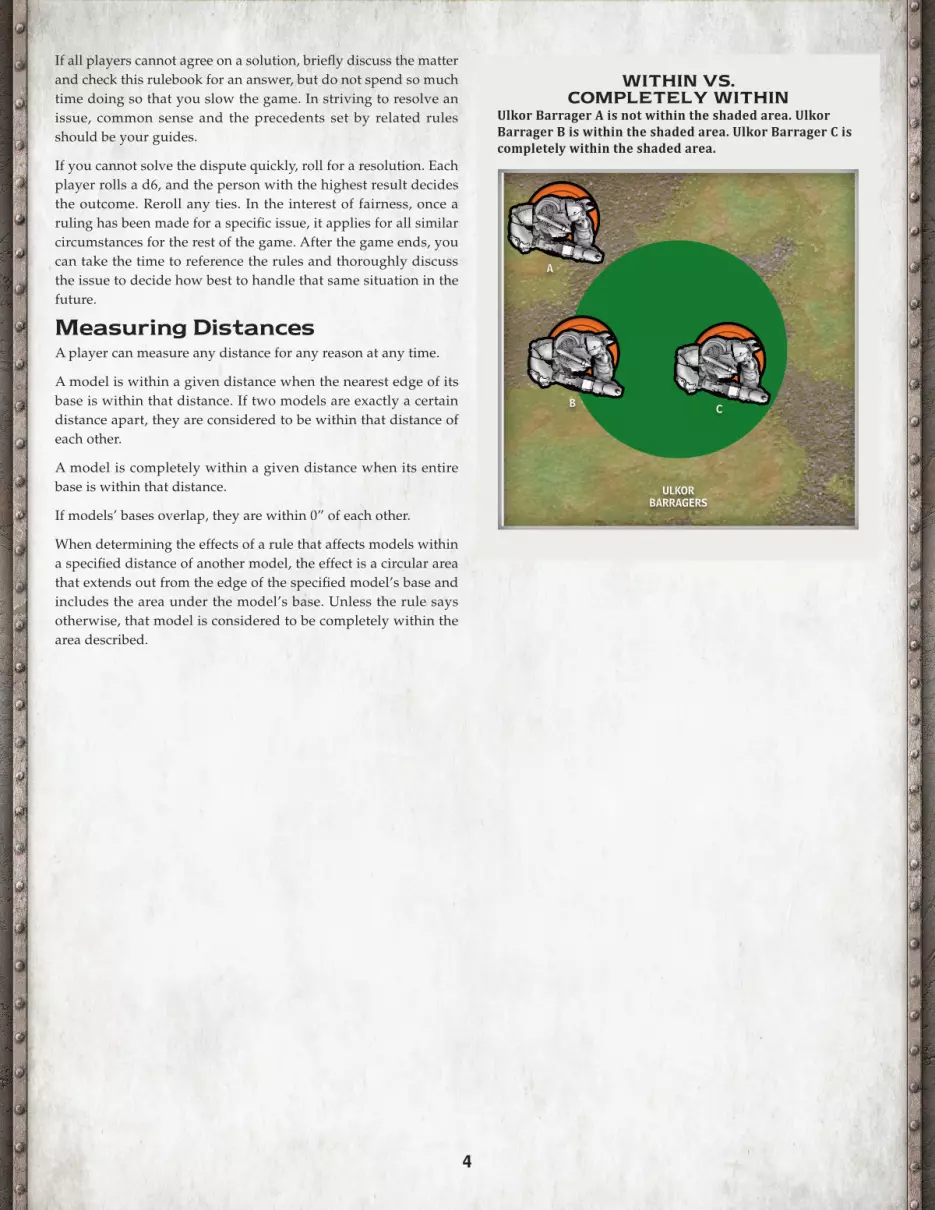
WITHIN VS. COMPLETELY WITHIN
Ulkor Barrager A is not within the shaded area. Ulkor Barrager B is within the shaded area. Ulkor Barrager C is completely within the shaded area.
4
If all players cannot agree on a solution, briefly discuss the matter and check this rulebook for an answer, but do not spend so much time doing so that you slow the game. In striving to resolve an issue, common sense and the precedents set by related rules should be your guides.
If you cannot solve the dispute quickly, roll for a resolution. Each player rolls a d6, and the person with the highest result decides the outcome. Reroll any ties. In the interest of fairness, once a ruling has been made for a specific issue, it applies for all similar circumstances for the rest of the game. After the game ends, you can take the time to reference the rules and thoroughly discuss the issue to decide how best to handle that same situation in the future.
Measuring DistancesA player can measure any distance for any reason at any time.
A model is within a given distance when the nearest edge of its base is within that distance. If two models are exactly a certain distance apart, they are considered to be within that distance of each other.
A model is completely within a given distance when its entire base is within that distance.
If models’ bases overlap, they are within 0” of each other.
When determining the effects of a rule that affects models within a specified distance of another model, the effect is a circular area that extends out from the edge of the specified model’s base and includes the area under the model’s base. Unless the rule says otherwise, that model is considered to be completely within the area described.
A
B C
ULKOR BARRAGERS
5
MODELSMODEL TYPES, STATS & DAMAGE CAPACITY
Each WARMACHINE combatant is represented on the tabletop by a highly detailed and dramatically posed miniature figurine referred to as a model. There are several basic model types: warcasters, warjacks, warlocks, warbeasts, troopers, solos, structures, and battle engines. Troopers, solos, and non–battle engine warcasters and warlocks are warriors.
Models are considered to be living unless otherwise noted.
Independent ModelsIndependent models are those that activate individually. Warcasters, warjacks, warlocks, warbeasts, solos, structures, and battle engines are independent models.
WarcastersA warcaster is a tremendously powerful sorcerer, warpriest, or battle mage with the ability to control a group of warjacks telepathically. A warcaster is a deadly opponent, highly skilled in both physical combat and spellcasting. A battlegroup led by a warcaster includes the warcaster and the warjacks it controls.
During battle, a warcaster commands its battlegroup of warjacks in an effort to complete its objectives. A warcaster can use their focus points to enhance its combat abilities and cast spells, or it can assign them to individual warjacks to increase their fighting abilities. A warcaster can also channel spells through ’jacks equipped with arc nodes, effectively extending the range of its magical powers.
Warcasters are independent Commander models. A model with the model type “Warcaster” has many rules that are common to all warcasters and are not listed on the model’s stat card (see “Warcaster Special Rules,” p. 35). All warcasters are characters.
potential only when controlled by a warcaster. The warcaster forms a telepathic link to each of the warjacks in their battlegroup. This link lets the warcaster give their warjacks commands and use focus to boost their abilities with just a thought. Through focus, a warcaster can make their warjacks’ attacks more accurate and powerful. A well-controlled warjack can even make amazing power attacks, such as slamming its opponents into buildings, head-butting them into the ground, or even throwing them.
The telepathic connection linking a warcaster to their warjacks is fragile. A warjack whose cortex is crippled cannot have focus points. Even worse, should a warcaster become incapacitated, their telepathic link to their ’jacks is severed. The accompanying feedback of uncontrolled magical energies overloads their warjacks’ cortexes and causes the machines to become inert.
Warjacks are classified according to base size: a light warjack has a medium base (40 mm), a heavy warjack has a large base (50 mm), a super heavy warjack has an extra large base (80 mm), and a colossal has a huge base (120 mm). Each warjack is an independent model even though it is assigned to a specific battlegroup. All warjacks have the Construct advantage and are not living models.
Models with the model type “Warjack” have many rules that are common to all warjacks and are not listed on their stat cards. These rules are detailed on p. 37.
WarlocksA warlock and is a commander of raging beasts and feral troops. A warlock is a tremendously powerful sorcerer, shaman, or druid with the ability to control a group of warbeasts telepathically. Deadly opponents, warlocks are highly skilled in both physical combat and spellcasting. A battlegroup led by a warlock includes the warlock and the warbeasts it controls.
A warlock can use fury points drawn from the warbeasts in its battlegroup to enhance its own combat abilities and cast spells. Throughout a battle, the warlock forces warbeasts to bolster their effectiveness in combat.
Warlocks are independent Commander models. A model with the model type “Warlock” has many rules that are common to all warlocks and are not listed on the model’s stat card (see “Warlock Special Rules,” p. 39). All warlocks are characters.
WarbeastsWarbeasts are creatures noted for formidable battle prowess and a capacity to be controlled by warlocks. Warbeasts come in a variety of shapes and sizes and are drawn from diverse geographies and ecologies. They are generally smarter than animals but more primitive and savage than the races fighting across the face of Immoren. Each Faction brings distinct types of warbeasts to their battles and employs specialized techniques in recruiting and controlling them. Once warbeasts are brought to fight, the fury of
COMMANDERSThe various Factions warring across the Iron Kingdoms are led by a variety of heroes and champions, whether they are warcasters, warlocks, or even infernal masters. Each is considered to be a Commander model. A rule affecting a “Commander” or “Commander model” affects any model with the Commander rule.
WarjacksA steamjack is a mechanical construct given the ability to reason by a magical brain, known as a cortex, housed within its hull. A steamjack does not possess high cognitive powers, but it can execute simple commands and make logical decisions to complete its assigned tasks. Throughout the Iron Kingdoms, steamjacks perform a variety of heavy or dangerous tasks that would be impossible for a human.
A warjack is a steamjack built expressly to wage war. Armed with fearsome ranged and close-combat weaponry, a warjack is more than a match for a dozen soldiers. Though able to think and operate independently, a warjack reaches its full destructive

6
their attacks strengthens their warlocks, and together they form an almost unstoppable synergy.
Warbeasts would be considered terrible monsters by civilized nations, for each is capable of ripping even armed foes limb from limb. Many have had their considerable natural abilities enhanced with heavy armor and the best-made weapons available. Most have been subjected to considerable training to capitalize on their abilities and fight ably alongside warriors and warlocks. Though warbeasts are capable of acting on their own, a warlock’s dominating will overrides their individuality except in cases of frenzy (p. 41).
Warbeasts are classified according to base size: each lesser warbeast has a small base (30 mm), a light warbeast has a medium base (40 mm), a heavy warbeast has a large base (50 mm), a super heavy warbeast has an extra large base (80 mm), and a gargantuan has a huge base (120 mm). Each warbeast is an independent model even though it is assigned to a specific battlegroup.
Models with the model type “Warbeast” have many rules that are common to all warbeasts and are not listed on their stat cards. These rules are detailed on p. 41.
SolosSolos are individuals who operate alone, such as assassins and snipers. Solos are independent warrior models.
UnitsA unit is a group of similarly trained and equipped warrior models—such as swordsmen, riflemen, and mechaniks— who operate together as a single force. All models in a unit are troopers. Models in units do not activate individually; instead, all members of the unit activate at the same time and progress through the steps of an activation together (see Activating Unit, p. 12, Unit Movement, p. 12, and Units, Spells & Special Effects, p. 8).
GRUNTS
Grunts are the basic troopers in a unit. The number of Grunts in a unit is noted on the unit’s card.
ATTACHMENTS
Attachments are troopers that can be added to some units. They include command attachments and weapon attachments. A unit can have only one command attachment and up to three weapon attachments. Weapon attachment models added to a unit replace Grunt models in the unit.
EXAMPLE: If you add three weapon attachments to a unit you must also remove three Grunt models from the unit. If you add a command attachment to the unut, however, the attachment is added without removing a Grunt model.
Attachments are easily identified by their “Attachment” rule, which specifies the unit or units to which they can be attached.
Battle EnginesBattle engines are powerful weapons of war. Battle engines are independent models with huge bases (120 mm). Battle engines are not warrior models. Battle engines have a number of special
rules, which can be found on p. 8. Most battle engines have the Construct advantage and are not living models.
StructuresStructures represent unmoving fortifications on the battlefield. Structures are independent models. Structures are considered to be huge-base models (120 mm) even if they are not on a base. Structures have a number of special rules, which can be found on p. 47. Most structures have the Construct advantage and are not living models.
Model ProfilesEvery model and unit has a unique profile called a model entry that translates its combat abilities into game terms. WARMACHINE uses a set of stats to quantify and scale the attributes fundamental to gameplay. In addition, a model can have special rules that further define its performance.
A model or unit’s stat card provides a quick in-game reference of its profile and special rules. The card’s front lists the model’s name and model type, field allowance, and point cost; its model and weapon stats; and a graphic for tracking damage if the model can suffer more than 1 damage point. The text for special rules appears on the card’s back. Warcasters and warlocks have an additional stat card that explains their spells and feats.
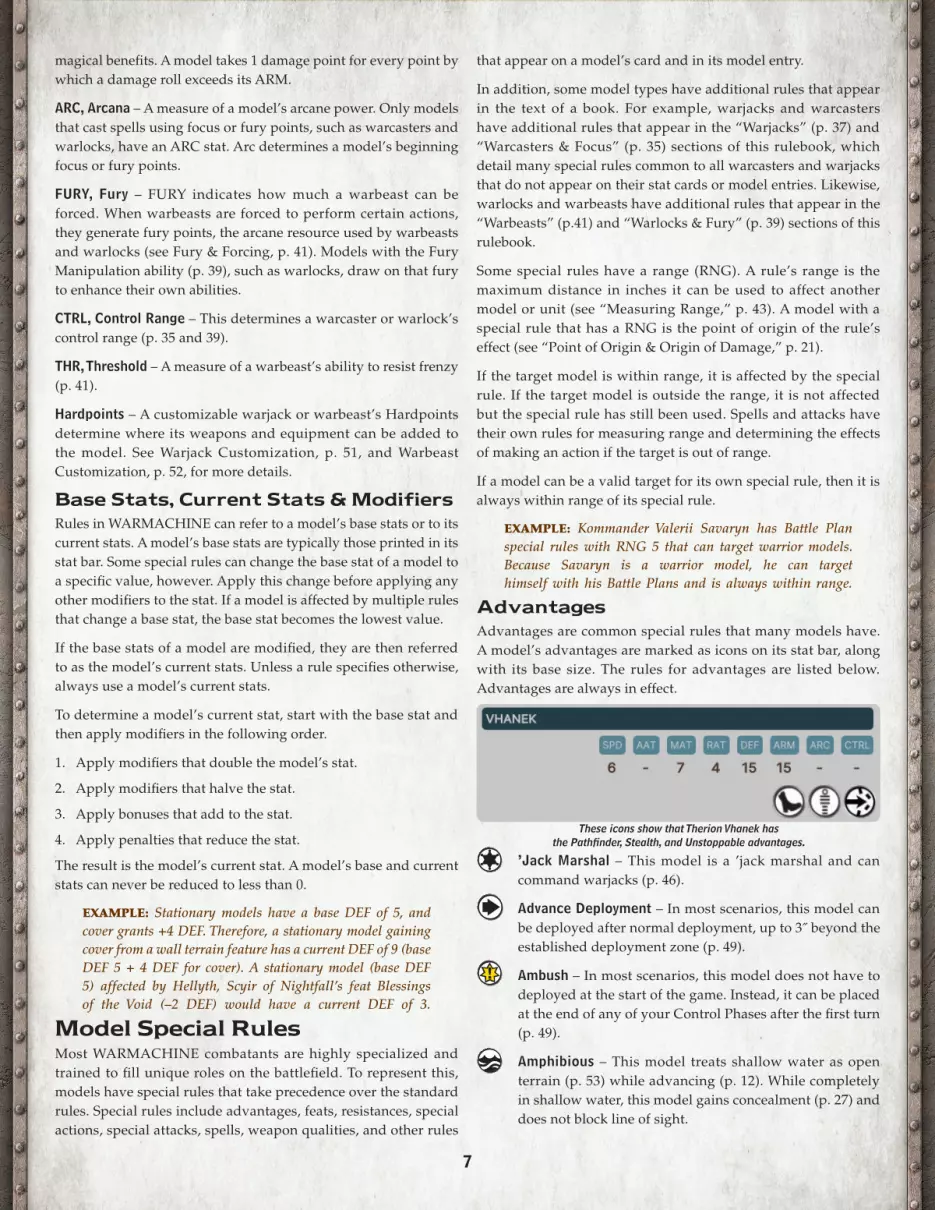
Model StatisticsModel statistics, or stats, are a numerical representation of the model’s basic combat qualities: the higher the number, the better the stat. These stats are used for various die rolls throughout the game. A stat bar presents model statistics in an easy-to-reference format. The abbreviation for each stat shows how it is referenced in the rules.
Major Anson Wolfe
SPD, Speed – A model’s movement rate. A model moves up to its SPD in inches when making a full advance.
AAT, Arcane Attack – A measure of a model’s potency in combat when casting offensive spells. A model uses its AAT when making arcane attack rolls.
MAT, Melee Attack – A model’s skill with melee weapons such as swords and hammers or with natural weapons like fists and teeth. A model uses its MAT when making melee attack rolls.
RAT, Ranged Attack – A model’s accuracy with ranged weapons such as guns and crossbows or thrown weapons like spears and knives. A model uses its RAT when making ranged attack rolls.
DEF, Defense – A model’s ability to avoid being hit by an attack. A model’s size, quickness, skill, and even magical protection all contribute to its DEF. An attack roll must be equal to or greater than the target model’s DEF to score a hit against it.
ARM, Armor – A model’s ability to resist being damaged. This resistance can come from natural resilience, worn armor, or even
7
magical benefits. A model takes 1 damage point for every point by which a damage roll exceeds its ARM.
ARC, Arcana – A measure of a model’s arcane power. Only models that cast spells using focus or fury points, such as warcasters and warlocks, have an ARC stat. Arc determines a model’s beginning focus or fury points.
FURY, Fury – FURY indicates how much a warbeast can be forced. When warbeasts are forced to perform certain actions, they generate fury points, the arcane resource used by warbeasts and warlocks (see Fury & Forcing, p. 41). Models with the Fury Manipulation ability (p. 39), such as warlocks, draw on that fury to enhance their own abilities.
CTRL, Control Range – This determines a warcaster or warlock’s control range (p. 35 and 39).
THR, Threshold – A measure of a warbeast’s ability to resist frenzy (p. 41).
Hardpoints – A customizable warjack or warbeast’s Hardpoints determine where its weapons and equipment can be added to the model. See Warjack Customization, p. 51, and Warbeast Customization, p. 52, for more details.
Base Stats, Current Stats & ModifiersRules in WARMACHINE can refer to a model’s base stats or to its current stats. A model’s base stats are typically those printed in its stat bar. Some special rules can change the base stat of a model to a specific value, however. Apply this change before applying any other modifiers to the stat. If a model is affected by multiple rules that change a base stat, the base stat becomes the lowest value.
If the base stats of a model are modified, they are then referred to as the model’s current stats. Unless a rule specifies otherwise, always use a model’s current stats.
To determine a model’s current stat, start with the base stat and then apply modifiers in the following order.
1. Apply modifiers that double the model’s stat.
2. Apply modifiers that halve the stat.
3. Apply bonuses that add to the stat.
4. Apply penalties that reduce the stat.
The result is the model’s current stat. A model’s base and current stats can never be reduced to less than 0.
EXAMPLE: Stationary models have a base DEF of 5, and cover grants +4 DEF. Therefore, a stationary model gaining cover from a wall terrain feature has a current DEF of 9 (base DEF 5 + 4 DEF for cover). A stationary model (base DEF 5) affected by Hellyth, Scyir of Nightfall’s feat Blessings of the Void (–2 DEF) would have a current DEF of 3.
Model Special RulesMost WARMACHINE combatants are highly specialized and trained to fill unique roles on the battlefield. To represent this, models have special rules that take precedence over the standard rules. Special rules include advantages, feats, resistances, special actions, special attacks, spells, weapon qualities, and other rules
that appear on a model’s card and in its model entry.
In addition, some model types have additional rules that appear in the text of a book. For example, warjacks and warcasters have additional rules that appear in the “Warjacks” (p. 37) and “Warcasters & Focus” (p. 35) sections of this rulebook, which detail many special rules common to all warcasters and warjacks that do not appear on their stat cards or model entries. Likewise, warlocks and warbeasts have additional rules that appear in the “Warbeasts” (p.41) and “Warlocks & Fury” (p. 39) sections of this rulebook.
Some special rules have a range (RNG). A rule’s range is the maximum distance in inches it can be used to affect another model or unit (see “Measuring Range,” p. 43). A model with a special rule that has a RNG is the point of origin of the rule’s effect (see “Point of Origin & Origin of Damage,” p. 21).
If the target model is within range, it is affected by the special rule. If the target model is outside the range, it is not affected but the special rule has still been used. Spells and attacks have their own rules for measuring range and determining the effects of making an action if the target is out of range.
If a model can be a valid target for its own special rule, then it is always within range of its special rule.
EXAMPLE: Kommander Valerii Savaryn has Battle Plan special rules with RNG 5 that can target warrior models. Because Savaryn is a warrior model, he can target himself with his Battle Plans and is always within range.
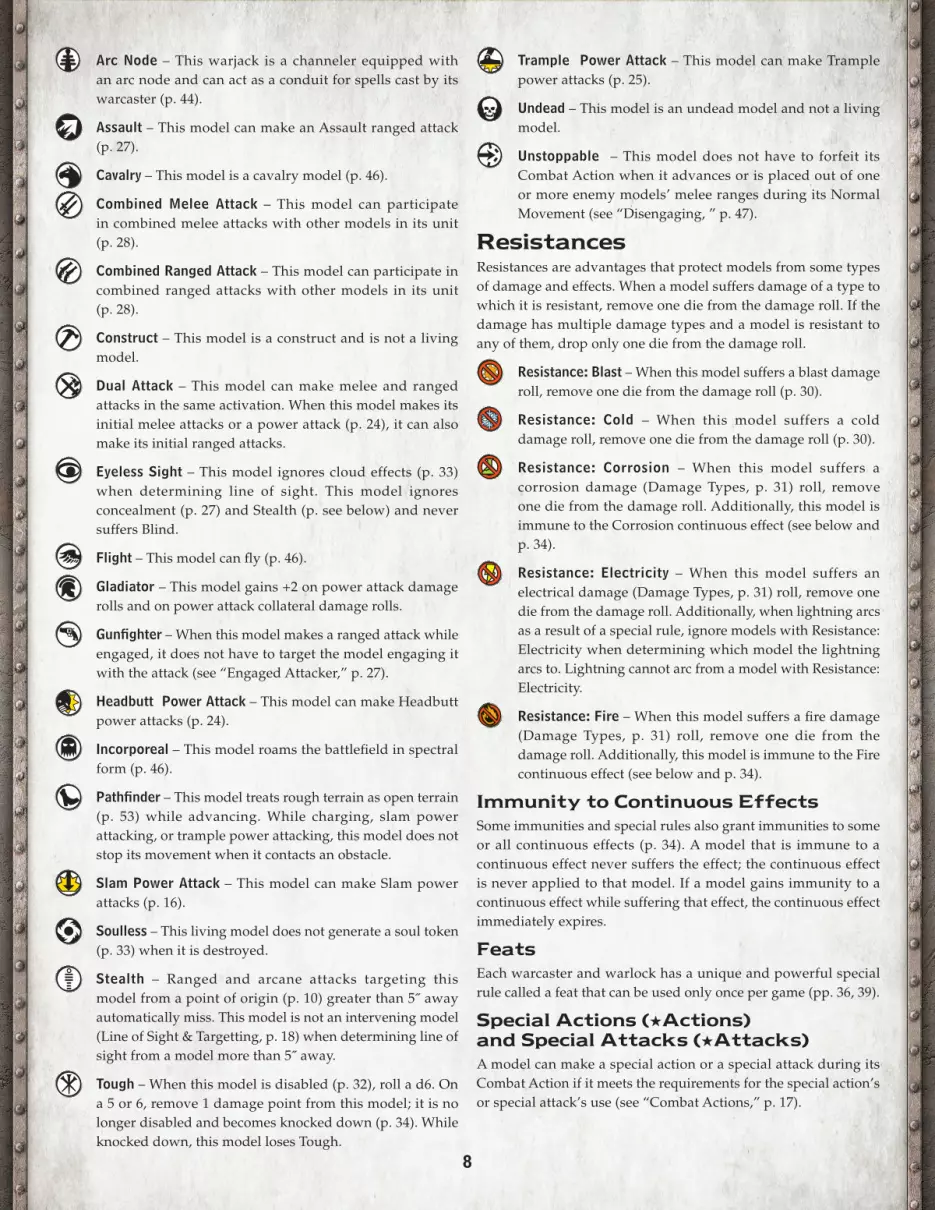
AdvantagesAdvantages are common special rules that many models have. A model’s advantages are marked as icons on its stat bar, along with its base size. The rules for advantages are listed below. Advantages are always in effect.
These icons show that Therion Vhanek has the Pathfinder, Stealth, and Unstoppable advantages.
’Jack Marshal – This model is a ’jack marshal and can command warjacks (p. 46).
Advance Deployment – In most scenarios, this model can be deployed after normal deployment, up to 3˝ beyond the established deployment zone (p. 49).
Ambush – In most scenarios, this model does not have to deployed at the start of the game. Instead, it can be placed at the end of any of your Control Phases after the first turn (p. 49).
Amphibious – This model treats shallow water as open terrain (p. 53) while advancing (p. 12). While completely in shallow water, this model gains concealment (p. 27) and does not block line of sight.
8
Arc Node – This warjack is a channeler equipped with an arc node and can act as a conduit for spells cast by its warcaster (p. 44).
Assault – This model can make an Assault ranged attack (p. 27).
Cavalry – This model is a cavalry model (p. 46).
Combined Melee Attack – This model can participate in combined melee attacks with other models in its unit (p. 28).
Combined Ranged Attack – This model can participate in combined ranged attacks with other models in its unit (p. 28).
Construct – This model is a construct and is not a living model.
Dual Attack – This model can make melee and ranged attacks in the same activation. When this model makes its initial melee attacks or a power attack (p. 24), it can also make its initial ranged attacks.
Eyeless Sight – This model ignores cloud effects (p. 33) when determining line of sight. This model ignores concealment (p. 27) and Stealth (p. see below) and never suffers Blind.
Flight – This model can fly (p. 46).
Gladiator – This model gains +2 on power attack damage rolls and on power attack collateral damage rolls.
Gunfighter – When this model makes a ranged attack while engaged, it does not have to target the model engaging it with the attack (see “Engaged Attacker,” p. 27).
Headbutt Power Attack – This model can make Headbutt power attacks (p. 24).
Incorporeal – This model roams the battlefield in spectral form (p. 46).
Pathfinder – This model treats rough terrain as open terrain (p. 53) while advancing. While charging, slam power attacking, or trample power attacking, this model does not stop its movement when it contacts an obstacle.
Slam Power Attack – This model can make Slam power attacks (p. 16).
Soulless – This living model does not generate a soul token (p. 33) when it is destroyed.
Stealth – Ranged and arcane attacks targeting this model from a point of origin (p. 10) greater than 5˝ away automatically miss. This model is not an intervening model (Line of Sight & Targetting, p. 18) when determining line of sight from a model more than 5˝ away.
Tough – When this model is disabled (p. 32), roll a d6. On a 5 or 6, remove 1 damage point from this model; it is no longer disabled and becomes knocked down (p. 34). While knocked down, this model loses Tough.
Trample Power Attack – This model can make Trample power attacks (p. 25).
Undead – This model is an undead model and not a living model.
Unstoppable – This model does not have to forfeit its Combat Action when it advances or is placed out of one or more enemy models’ melee ranges during its Normal Movement (see “Disengaging, ” p. 47).
ResistancesResistances are advantages that protect models from some types of damage and effects. When a model suffers damage of a type to which it is resistant, remove one die from the damage roll. If the damage has multiple damage types and a model is resistant to any of them, drop only one die from the damage roll.
Resistance: Blast – When this model suffers a blast damage roll, remove one die from the damage roll (p. 30).
Resistance: Cold – When this model suffers a cold damage roll, remove one die from the damage roll (p. 30).
Resistance: Corrosion – When this model suffers a corrosion damage (Damage Types, p. 31) roll, remove one die from the damage roll. Additionally, this model is immune to the Corrosion continuous effect (see below and p. 34).
Resistance: Electricity – When this model suffers an electrical damage (Damage Types, p. 31) roll, remove one die from the damage roll. Additionally, when lightning arcs as a result of a special rule, ignore models with Resistance: Electricity when determining which model the lightning arcs to. Lightning cannot arc from a model with Resistance: Electricity.
Resistance: Fire – When this model suffers a fire damage (Damage Types, p. 31) roll, remove one die from the damage roll. Additionally, this model is immune to the Fire continuous effect (see below and p. 34).
Immunity to Continuous EffectsSome immunities and special rules also grant immunities to some or all continuous effects (p. 34). A model that is immune to a continuous effect never suffers the effect; the continuous effect is never applied to that model. If a model gains immunity to a continuous effect while suffering that effect, the continuous effect immediately expires.
FeatsEach warcaster and warlock has a unique and powerful special rule called a feat that can be used only once per game (pp. 36, 39).
Special Actions (HActions) and Special Attacks (HAttacks)A model can make a special action or a special attack during its Combat Action if it meets the requirements for the special action’s or special attack’s use (see “Combat Actions,” p. 17).
9
SpellsSome models have the ability to cast spells during their activations (see “Spells, Spellcasting & Animi,” p. 43).
Weapon QualitiesWeapon qualities are special effects that are marked as icons on a weapon’s stat block. See p. 9 for a full list.
Units, Spells & Special EffectsSome special rules and spells affect entire units, as noted in their descriptions. If a special rule or spell specifies “target unit,” it must target a trooper in a unit but will affect all models in the unit. Effects that specify “target model/unit” can target any model, including non-troopers, but if the target model is a trooper, the effect will apply to the entire unit.
When a spell or effect affects a unit, it affects models that are later added to the unit until the spell or effect expires. If no models remain in a unit, any unit-affecting spells or effects on that unit expire. This is usually only important when a trooper becomes an independent model while it is under an opponent’s control (see pp. 34, 35).
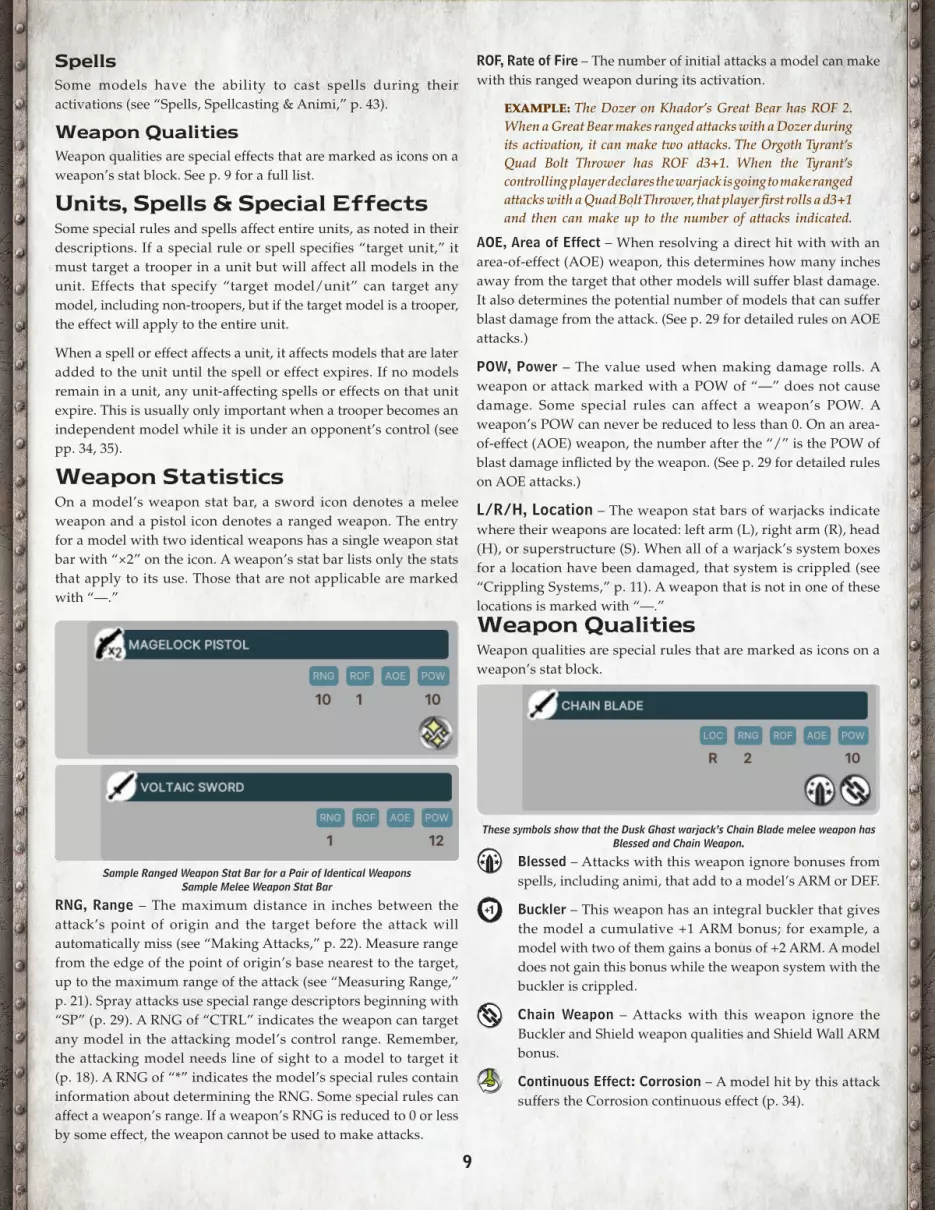
Weapon StatisticsOn a model’s weapon stat bar, a sword icon denotes a melee weapon and a pistol icon denotes a ranged weapon. The entry for a model with two identical weapons has a single weapon stat bar with “×2” on the icon. A weapon’s stat bar lists only the stats that apply to its use. Those that are not applicable are marked with “—.”
ROF, Rate of Fire – The number of initial attacks a model can make with this ranged weapon during its activation.
EXAMPLE: The Dozer on Khador’s Great Bear has ROF 2. When a Great Bear makes ranged attacks with a Dozer during its activation, it can make two attacks. The Orgoth Tyrant’s Quad Bolt Thrower has ROF d3+1. When the Tyrant’s controlling player declares the warjack is going to make ranged attacks with a Quad Bolt Thrower, that player first rolls a d3+1 and then can make up to the number of attacks indicated.
AOE, Area of Effect – When resolving a direct hit with with an area-of-effect (AOE) weapon, this determines how many inches away from the target that other models will suffer blast damage. It also determines the potential number of models that can suffer blast damage from the attack. (See p. 29 for detailed rules on AOE attacks.)
POW, Power – The value used when making damage rolls. A weapon or attack marked with a POW of “—” does not cause damage. Some special rules can affect a weapon’s POW. A weapon’s POW can never be reduced to less than 0. On an area-of-effect (AOE) weapon, the number after the “/” is the POW of blast damage inflicted by the weapon. (See p. 29 for detailed rules on AOE attacks.)
L/R/H, Location – The weapon stat bars of warjacks indicate where their weapons are located: left arm (L), right arm (R), head (H), or superstructure (S). When all of a warjack’s system boxes for a location have been damaged, that system is crippled (see “Crippling Systems,” p. 11). A weapon that is not in one of these locations is marked with “—.”
Weapon QualitiesWeapon qualities are special rules that are marked as icons on a weapon’s stat block.
Sample Ranged Weapon Stat Bar for a Pair of Identical WeaponsSample Melee Weapon Stat Bar
RNG, Range – The maximum distance in inches between the attack’s point of origin and the target before the attack will automatically miss (see “Making Attacks,” p. 22). Measure range from the edge of the point of origin’s base nearest to the target, up to the maximum range of the attack (see “Measuring Range,” p. 21). Spray attacks use special range descriptors beginning with “SP” (p. 29). A RNG of “CTRL” indicates the weapon can target any model in the attacking model’s control range. Remember, the attacking model needs line of sight to a model to target it (p. 18). A RNG of “*” indicates the model’s special rules contain information about determining the RNG. Some special rules can affect a weapon’s range. If a weapon’s RNG is reduced to 0 or less by some effect, the weapon cannot be used to make attacks.
These symbols show that the Dusk Ghast warjack’s Chain Blade melee weapon has Blessed and Chain Weapon.
Blessed – Attacks with this weapon ignore bonuses from spells, including animi, that add to a model’s ARM or DEF.
Buckler – This weapon has an integral buckler that gives the model a cumulative +1 ARM bonus; for example, a model with two of them gains a bonus of +2 ARM. A model does not gain this bonus while the weapon system with the buckler is crippled.
Chain Weapon – Attacks with this weapon ignore the Buckler and Shield weapon qualities and Shield Wall ARM bonus.
Continuous Effect: Corrosion – A model hit by this attack suffers the Corrosion continuous effect (p. 34).

10
Continuous Effect: Fire – A model hit by this attack suffers the Fire continuous effect (p. 34).
Critical Corrosion – On a critical hit (p. 22), the model hit by this attack suffers the Corrosion continuous effect (p. 34).
Critical Disruption – On a critical hit (p. 22) on a warjack, the warjack suffers Disruption. A warjack suffering Disruption loses its focus points and cannot channel spells or gain focus by any means, including by being allocated focus, for one round.
Critical Fire – On a critical hit (p. 22), the model hit by this attack suffers the Fire continuous effect (p. 34).
Damage Type: Cold – This weapon causes cold damage (p. 31).
Damage Type: Corrosion – This weapon causes corrosion damage (p. 31).
Damage Type: Electricity – This weapon causes electrical damage (p. 31).
Damage Type: Fire – This weapon causes fire damage (p. 31).
Damage Type: Magical – This weapon causes magical damage (p. 31).
Disruption – A warjack hit by this attack loses its focus points and cannot channel spells or gain focus by any means, including by being allocated focus, for one round.
Pistol – A model making an attack with this weapon targeting a model it is in melee with ignores the Target in Melee bonus when resolving this attack (see p. 27). Weapons with Pistol are considered to have a melee range of 1.
Shield – This weapon is a shield that gives the model a cumulative +2 ARM bonus; for example, a model with two of them gains a bonus of +4 ARM. A model does not gain this bonus while the weapon system with the shield is crippled.
Throw Power Attack – This weapon can be used to make throw power attacks (p. 24-25).
Weapon Master – When resolving an attack with this weapon, add an additional die to damage rolls.
Damage Capacity, Damage Grids & Life SpiralsA model’s damage capacity determines how many damage points it can suffer. Most troopers do not have a damage capacity. The entry for a model with damage capacity gives the total amount of damage it can suffer. Its stat card provides a row of damage boxes for tracking the damage it receives. The damage boxes for some models, such as warjacks, are arranged in a damage grid. On warbeasts, damage boxes are represented as circles and are arranged in a life spiral.
Every time a model with multiple damage boxes suffers damage, mark one damage box for each damage point taken. (See “Recording Damage,” p. 31.)
A warjack can suffer from crippled systems before its damage grid is completely filled, however. Some of a warjack’s damage boxes are system boxes. These are labeled with a letter denoting the component of the model they represent. When all system boxes for a specific system have been marked, that system is crippled (see “Crippling Systems,” p. 31).
A warbeast can suffer from crippled aspects before its life spiral is completely filled as well. A warbeast’s life spiral is arranged into three aspects: Mind, Body, and Spirit. When all damage boxes for a specific aspect have been marked, that aspect is crippled.
Base Size The physical size and mass of a model are reflected by its base size. There are five base sizes: small bases (30 mm), medium bases (40 mm), large bases (50 mm), extra large bases (80 mm), and huge bases (120 mm). Generally, most human-sized warrior models have small bases; larger creatures and light warjacks have medium bases; very large creatures and heavy warjacks have large bases; and colossal, gargantuans, and battle engines, have huge bases. An icon indicating base size (30, 40, 50, 80, or 120) appears on a model’s stat bar.
Sample damage grid from a warjack stat card
Sample life spiral from a warbeast stat card
11
GAMEPLAYTURN SEQUENCE, MOVEMENT & ACTIONS
The Game RoundWARMACHINE battles are fought in a series of game rounds. Each game round, each player takes a turn in the order established during setup, beginning with the first player. Once the second player completes their turn, the current game round ends. A new game round then begins, starting with the first player again. Game rounds continue until one side wins the game.
For game effects, a round is measured from the current player’s turn to the beginning of their next turn, regardless of their location in the turn order. A game effect with a duration of one round expires at the beginning of the current player’s next turn. This means both players will take one turn while the effect is in play.
The Player TurnA player’s turn has three phases: Maintenance, Control, and Activation.
Some effects are resolved at the beginning of a player’s turn. These effects are resolved before the start of the Maintenance Phase. If you are using markers to remind you of effects in play, remember to remove markers for any effects that expire at the beginning of your turn.
Maintenance PhaseDuring the Maintenance Phase, perform the following steps in order:
1. Remove all focus points from your warjacks. Remove all focus points in excess of the FOCUS stat for each of your models with the Focus Manipulation special rule. Remove all fury points in excess of the FURY stat for each of your models with the Fury Manipulation rule. Leave fury points on warbeasts at this time.
2. Check for expiration of continuous effects on any models you control. After checking for expired continuous effects, resolve the effects of those that remain in play.
3. Resolve all other effects that occur during the Maintenance Phase.
Control PhaseDuring the Control Phase, perform the following steps in order.
1. Each of your models with the Focus Manipulation special rule, like warcasters, replenishes its focus points. To replenish focus, a model gains focus points so that it has a number equal to its current FOCUS. Each of your models with the Fury Manipulation special rule, like warlocks, can leech (p. 39) any number of fury points from warbeasts in its battlegroup that are in its control range. However, a model cannot exceed its current FURY in fury points as a result of leeching.
2. After leeching, a model with the Fury Manipulation special rule can additionally gain up to 1 fury point for each medium-based or larger warbeast that was part of its battlegroup and has been destroyed or removed from play as a result of Spirit Bond (see p. 40). If a destroyed warbeast returns to play for any reason, this model can no longer gain fury points for that warbeast from Spirit Bond while that warbeast remains in play. A model cannot exceed its FURY in fury points as a result of Spirit Bond.
3. Warjacks power up. Each warjack in a battlegroup that has a functional cortex and is within its controller’s control range gains 1 focus point. A warjack with a crippled cortex or no cortex at all cannot power up and does not gain this focus.
4. Each model with the Focus Manipulation special rule can allocate focus points to warjacks in its battlegroup that are in its control range. A model cannot allocate focus to a warjack with a crippled cortex.
5. Each model with the Focus Manipulation special rule can spend focus points to maintain its upkeep spells in play. Similarly, each model with the Fury Manipulation special rule can spend fury points to maintain its upkeep spells in play. If a model does not spend focus or fury points to maintain an upkeep spell, the spell expires, and its effects immediately end.
6. Make a threshold check (p. 41) for each of your warbeasts with 1 or more fury points left on it. Any warbeasts that fail the check immediately frenzy (p. 41).
7. Resolve all other effects that occur during the Control Phase.
Activation PhaseThe Activation Phase is the major portion of a player’s turn. All models you control must be activated once per turn. This is usually done during the Activation Phase, but some effects cause a model to activate earlier in the turn, such as when a warbeast frenzies. Units and independent models are activated one at a time in the order you choose. A model cannot forfeit its activation unless allowed to do so by a special rule (see “Forfeiting Normal Movement or Combat Actions,” below). A model must be on the table to activate.
Activating ModelsWhen a model activates, the activation is divided into its Normal Movement (see “Normal Movement,” p. 12) and its Combat Action (see “Combat Actions,” p. 17). A model’s Normal Movement must be resolved before progressing to its Combat Action. For a detailed breakdown of model activation, see “Activation Timing,” p. 60.
Activating Independent ModelsIndependent models activate individually. Only one independent model can activate at a time. The model makes its Normal
12
Movement if it was not forfeited. Then, after resolving its Normal Movement, the model resolves its Combat Action if it was not forfeited. After resolving its Combat Action, the model ends its activation. The active model must end its activation before another model or unit can be activated.
Activating UnitsTroopers do not activate individually. Instead, the entire unit activates at once. After resolving the unit’s Normal Movement (see “Unit Movement,” below), each trooper then makes its Combat Action. Once the models in a unit begin resolving their Combat Actions, each trooper’s Combat Action cannot begin until the previous model’s Combat Action has been resolved. As with activating independent models, a unit must end its activation before another model or unit can be activated.
Forfeiting Normal Movement or Combat ActionsSome rules require a model to forfeit its Normal Movement or Combat Action or allow it to do so voluntarily for some benefit. When a model voluntarily forfeits its Normal Movement or Combat Action, resolve the effect for which its Normal Movement or Combat Action was forfeited.
A model cannot voluntarily forfeit its Normal Movement or Combat Action if it is also required to forfeit it, and a model cannot forfeit the same thing for multiple effects.
MovementThe first part of a model’s activation is its Normal Movement (see “Activating Models,” p. 11). Models generally move only during this portion of their activations, though some special rules permit movement at other times.
Advancing refers to movement a model intentionally makes and not due to involuntary movement caused by other effects, such as being pushed or slammed. Make all measurements from the front of an advancing model’s base. Determine the distance a model advances by measuring how far the leading edge of its base travels. The distance moved is absolute. A model’s base cannot pass over another model’s base while advancing. This means that if a gap between the bases of two models is too small for another model’s base to fit between them, the third model cannot move through the space.
Unit MovementWhen a unit advances as part of its Normal Movement—whether making a full advance, run, or charge—choose one trooper model in the squad to move. Unit movement only applies to Normal Movement and does not apply when models move for any other reason, such as when moving as a result of the Reposition special rule.
After determining that model’s movement, place the remaining troopers in the squad within 2” of that model. These models must be placed so that they have line of sight (see p. 18) to the trooper that moved. Models suffering an effect that does not allow them to advance are placed normally but must forfeit their Combat Action this activation and cannot make attacks that activation. Troopers
that cannot be placed within 2” of the trooper model that moved are destroyed.
EXAMPLE: During his turn, Allyn activates and advances his Stormblade Legionnaire unit as part of their Normal Movement. The unit has SPD 6, so Allyn moves one model in the squad 6”. He then places the other four models in the unit anywhere within 2” of the model he moved and with line of sight to that model.
If during unit movement the moving model is destroyed or removed from play before the other models in its unit are placed, the controlling player can select another model to move and choose any Normal Movement option for the unit (see below).
When models in the unit move for any other reason, move the models individually as normal.
EXAMPLE: When an Orgoth Ulkor Barrager unit makes a full advance during the unit’s Normal Movement, only one model in the unit moves as part as the advance and the other models in the unit are placed within 2” of it once its movement ends. The Ulkor Barragers also have the Reposition [3”] special rule that allows each model in the unit to advance up to 3” at the end of the unit’s activation. Because that movement is not part of the unit’s Normal Movement, each model in the unit moves independently.
Normal MovementWhen a unit or independent model resolves its Normal Movement, it must choose one of the following options:
• Forfeit its Normal Movement
• Aim
• Full advance
• Run
• Charge
Additionally some models can choose to perform a power attack encompassing its Normal Movement and Combat Action such as a slam (p. 24) or trample power attack (p. 25).
BY ANY OTHER NAMERemember that all intentional movement—whether full advancing, running, or charging—is considered to be advancing regardless of whether it takes place during a model’s Normal Movement.
Forfeiting Normal MovementSee “Forfeiting Normal Movement or Combat Actions,” p. 12.
AimThe model or unit’s Normal Movement ends. For the rest of the model or unit’s activation, each affected model gains a +2 bonus to every ranged attack roll it makes. Models do not gain this bonus while they are enaged (p. 27).
Full AdvanceThe model or unit advances up to its current speed (SPD) in inches.
13
RunThe model or unit advances up to up to its current SPD plus 5”. When a model or unit uses its Normal Movement to run, it must forfeit its Combat Action before advancing, and its activation ends as soon as it completes its run movement. A model cannot cast a spell or use “any time” special rules (see p. 3) after running.
If a model cannot run due to some effect and is required to use its Normal Movement to run, instead of running it forfeits its Combat Action and makes a full advance, then its activation ends.
Some models must meet special requirements to run:
• A warjack must spend 1 focus point to use its Normal Movement to run.
• A warbeast must be forced to use its Normal Movement to run.
A model that forfeits its Combat Action cannot use its Normal Movement to charge that activation. A model cannot target a friendly model with a charge.
A model cannot charge while engaged.
INDEPENDENT MODEL CHARGES
When an independent model charges, begin by declaring the charge and its target before moving the model. A model requires line of sight to another model to target it with a charge (see “Line of Sight & Targeting” on p. 18 for details). After declaring a charge, the charging model then advances up to its current SPD plus 3˝ in a straight line in any direction that will bring its target into its melee range when it moves, ignoring terrain, the distance to the charge target, and other models.
The charging model cannot voluntarily stop its movement until its target is in its melee range, but at that point, it can end this movement at any time. Once the charging model has the charge target in its melee range, it must keep the charge target in its melee range for the rest of the charge. The charging model stops if it contacts a model, an obstacle, or an obstruction or if it is pushed, slammed, thrown, or placed during its charge movement. If a model contacts another model, an obstacle, or an obstruction while charging but is able to move through it for some reason (such as a special rule on the model), the charging model does not stop but is still considered to have contacted the model, obstacle, or obstruction.
A charging model that is engaging its charge target at the end of its charge movement has made a successful charge. The charging model must use its Combat Action to make either initial melee attacks or a special attack with a melee weapon.
The charging model’s first melee attack after ending its charge movement must target the model it charged. If the charging model advanced at least 3˝, its first attack with a melee weapon targeting the model it charged is a charge attack. If that attack hits, the damage roll against the charge target is automatically boosted. After resolving its charge attack, the charging model completes its Combat Action normally.
If a charging model moved less than 3˝, its first attack with a melee weapon is not a charge attack. Its first attack must still be made against the charge target, however.
If a charging model ends its charge movement without its charge target in its melee range, it has made a failed charge. If a model makes a failed charge during its activation, its activation ends.
Some models must meet special requirements to charge:
• A warjack must spend 1 focus point to use its Normal Movement to charge.
• A warbeast must be forced to use its Normal Movement to charge.
If the charging model did not fail its charge and cannot make its first melee attack against the charge target, the charging model can make its first melee attack against another eligible target. In that case, its first melee attack damage roll is not automatically boosted.
RUNNING AND END OF TURN MOVEMENT
Note that because a running model or unit’s activation ends as it completes its run movement, running models do not benefit from special rules granting end of activation movement (p. 15), such as Reposition.
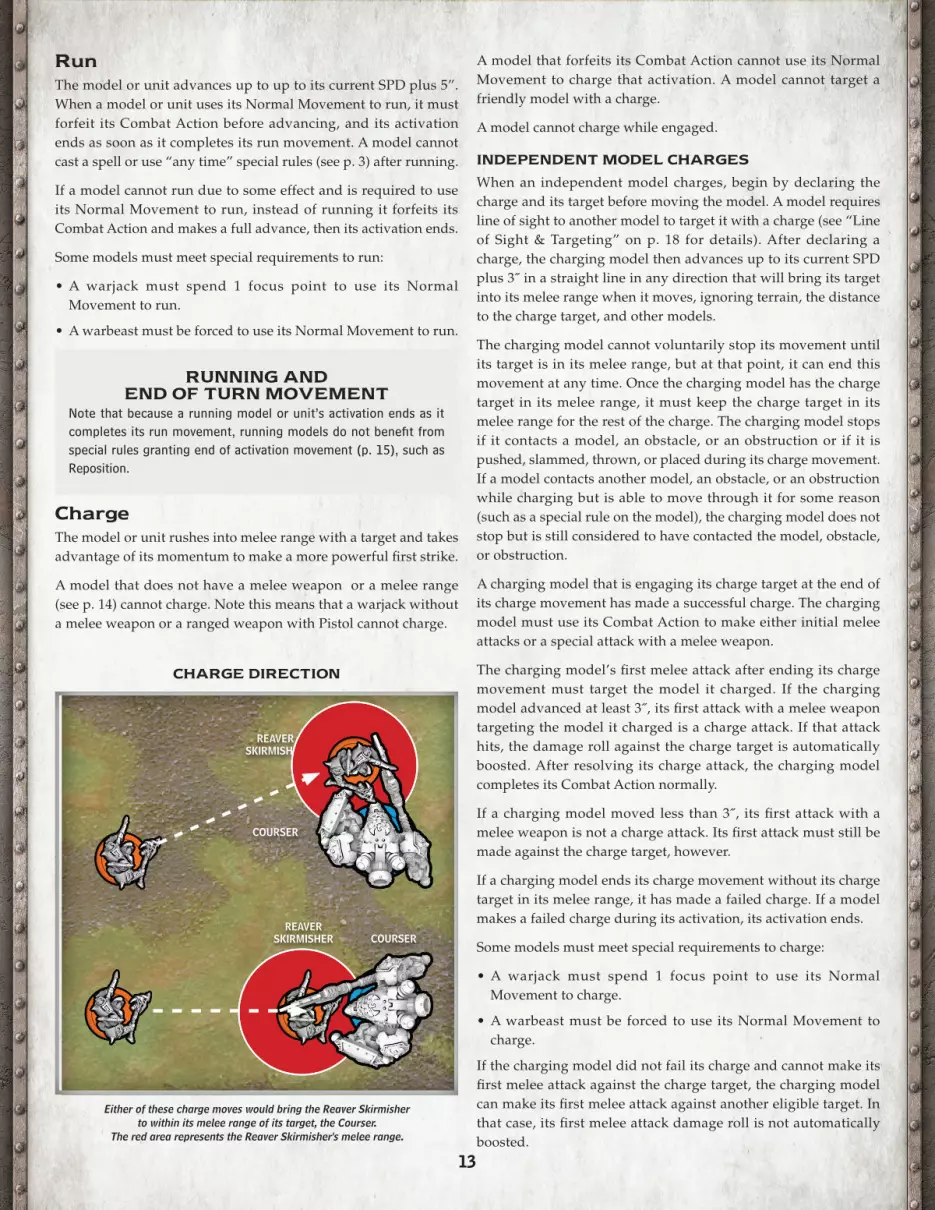
ChargeThe model or unit rushes into melee range with a target and takes advantage of its momentum to make a more powerful first strike.
A model that does not have a melee weapon or a melee range (see p. 14) cannot charge. Note this means that a warjack without a melee weapon or a ranged weapon with Pistol cannot charge.
CHARGE DIRECTION
Either of these charge moves would bring the Reaver Skirmisher to within its melee range of its target, the Courser.
The red area represents the Reaver Skirmisher's melee range.
REAVER SKIRMISHER
REAVER SKIRMISHER
COURSER
COURSER
14
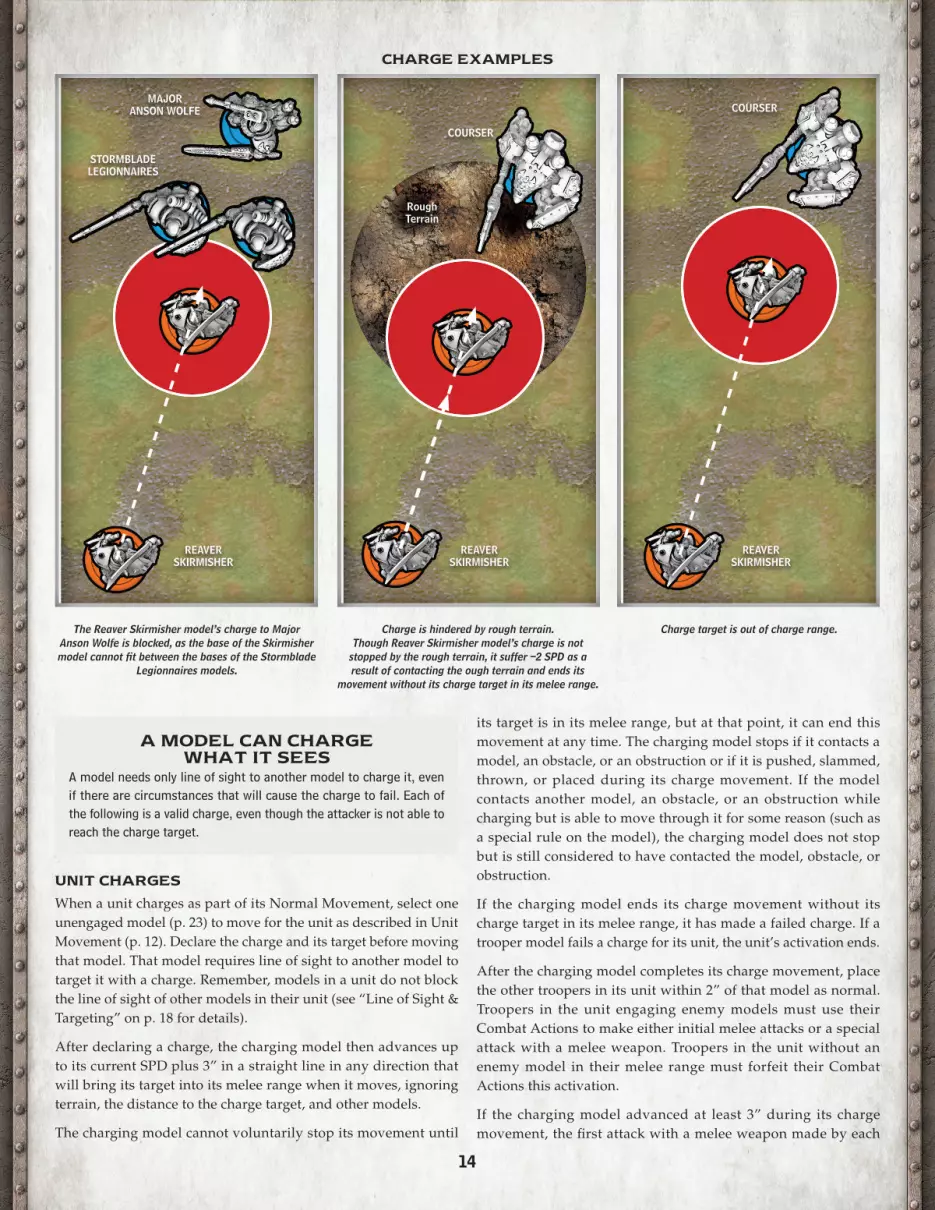
UNIT CHARGES
When a unit charges as part of its Normal Movement, select one unengaged model (p. 23) to move for the unit as described in Unit Movement (p. 12). Declare the charge and its target before moving that model. That model requires line of sight to another model to target it with a charge. Remember, models in a unit do not block the line of sight of other models in their unit (see “Line of Sight & Targeting” on p. 18 for details).
After declaring a charge, the charging model then advances up to its current SPD plus 3” in a straight line in any direction that will bring its target into its melee range when it moves, ignoring terrain, the distance to the charge target, and other models.
The charging model cannot voluntarily stop its movement until
its target is in its melee range, but at that point, it can end this movement at any time. The charging model stops if it contacts a model, an obstacle, or an obstruction or if it is pushed, slammed, thrown, or placed during its charge movement. If the model contacts another model, an obstacle, or an obstruction while charging but is able to move through it for some reason (such as a special rule on the model), the charging model does not stop but is still considered to have contacted the model, obstacle, or obstruction.
If the charging model ends its charge movement without its charge target in its melee range, it has made a failed charge. If a trooper model fails a charge for its unit, the unit’s activation ends.
After the charging model completes its charge movement, place the other troopers in its unit within 2” of that model as normal. Troopers in the unit engaging enemy models must use their Combat Actions to make either initial melee attacks or a special attack with a melee weapon. Troopers in the unit without an enemy model in their melee range must forfeit their Combat Actions this activation.
If the charging model advanced at least 3” during its charge movement, the first attack with a melee weapon made by each
The Reaver Skirmisher model’s charge to Major Anson Wolfe is blocked, as the base of the Skirmisher model cannot fit between the bases of the Stormblade
Legionnaires models.
Charge is hindered by rough terrain. Though Reaver Skirmisher model’s charge is not
stopped by the rough terrain, it suffer –2 SPD as a result of contacting the ough terrain and ends its
movement without its charge target in its melee range.
Charge target is out of charge range.
CHARGE EXAMPLES
A MODEL CAN CHARGE WHAT IT SEES
A model needs only line of sight to another model to charge it, even if there are circumstances that will cause the charge to fail. Each of the following is a valid charge, even though the attacker is not able to reach the charge target.
REAVER SKIRMISHER
REAVER SKIRMISHER
REAVER SKIRMISHER
STORMBLADE LEGIONNAIRES
MAJOR ANSON WOLFE
COURSER
Rough Terrain
COURSER
15
model in the unit this activation targeting a model/unit engaged by the charging model are charge attacks. If a charge attack hits, the damage roll is automatically boosted.
Melee attacks made by models in this unit targeting models/units not engaged by the charging model are not charge attacks.
Remember that a model in a unit that was engaged prior to being placed as a result of its unit charging must also forfeit its Combat Action that activation unless it is placed within the melee range of any models that were previously engaging it (see “Disengaging,” p. 23). In such a case, the engaged model’s first melee is not considered to be a charge attack, and its damage rolls are not automatically boosted as part of the charge.
REQUIRED CHARGES
Some effects require a model to charge. If a model is required to charge and either it cannot or there are no legal charge targets in its line of sight, the model activates but must forfeit its Normal Movement and Combat Action.
Movement RestrictionsSome effects place restrictions on how a model moves or advances. There are four types of these restrictions. In the following descriptions, Model A is moving with some restriction relative to Model B.
• Model A Must Move Toward Model B: Model A can move along any path such that the distance between Model A and Model B is always decreasing or remaining the same during the movement.
• Model A Must Move Directly Toward Model B: Model A moves along the straight line that connects the center points of Model A and Model B such that the distance between them decreases during the movement.
• Model A Must Move Away from Model B: Model A can move along any path such that the distance between Model A and Model B is always increasing or remaining the same during the movement.
• Model A Must Move Directly Away from Model B: Model A moves along the straight line that connects the center points of Model A and Model B such that the distance between them increases during the movement.
In all these cases, the model affected by the movement restriction can still forfeit its Normal Movement or choose not to move at all.
A model can be affected by more than one movement restriction. For example, a model required to advance toward one model and away from another would need to move in a manner to satisfy both requirements. If a moving model cannot satisfy all restrictions on the movement, it cannot move at all.
End of Activation MovementSome special rules enable a model to advance a certain distance at the end of its activation. If two or more special rules would grant a model such movement, the model’s controlling player chooses one special rule to apply. The model’s movement is then resolved using the rules for that special rule.
Base-to-Base and ContactModels whose bases are touching are in base-to-base (B2B) contact. If a model has a special rule that allows it to move through another model, while it is moving through the other model, they are considered to be in base-to-base contact.
One model contacts another when it changes from not being base-to-base with it to being base-to-base with it. Additionally, when a model is already base-to-base with another model and would move toward it, it is considered to contact that model again.
EnteringA model enters an area when it moves from not being within the area to being within the area, when it is put into play in the area, or when it is placed in the area. A model can suffer the effects of entering any particular area only once each time it advances.
MOVEMENT IN A NUTSHELLAll intentional movement, for any reason, is advancing.
The Normal Movement phase of your model’s Activation Phase is the time you can be certain your model will have the opportunity to move.
Unintentional movement can also occur at various times.
Unintentional MovementModels can move without advancing as a result of being pushed or slammed or from other effects. Determine the distance a model moves in this way by measuring how far the leading edge of its base travels. Remember, unintentional movement is not advancing.
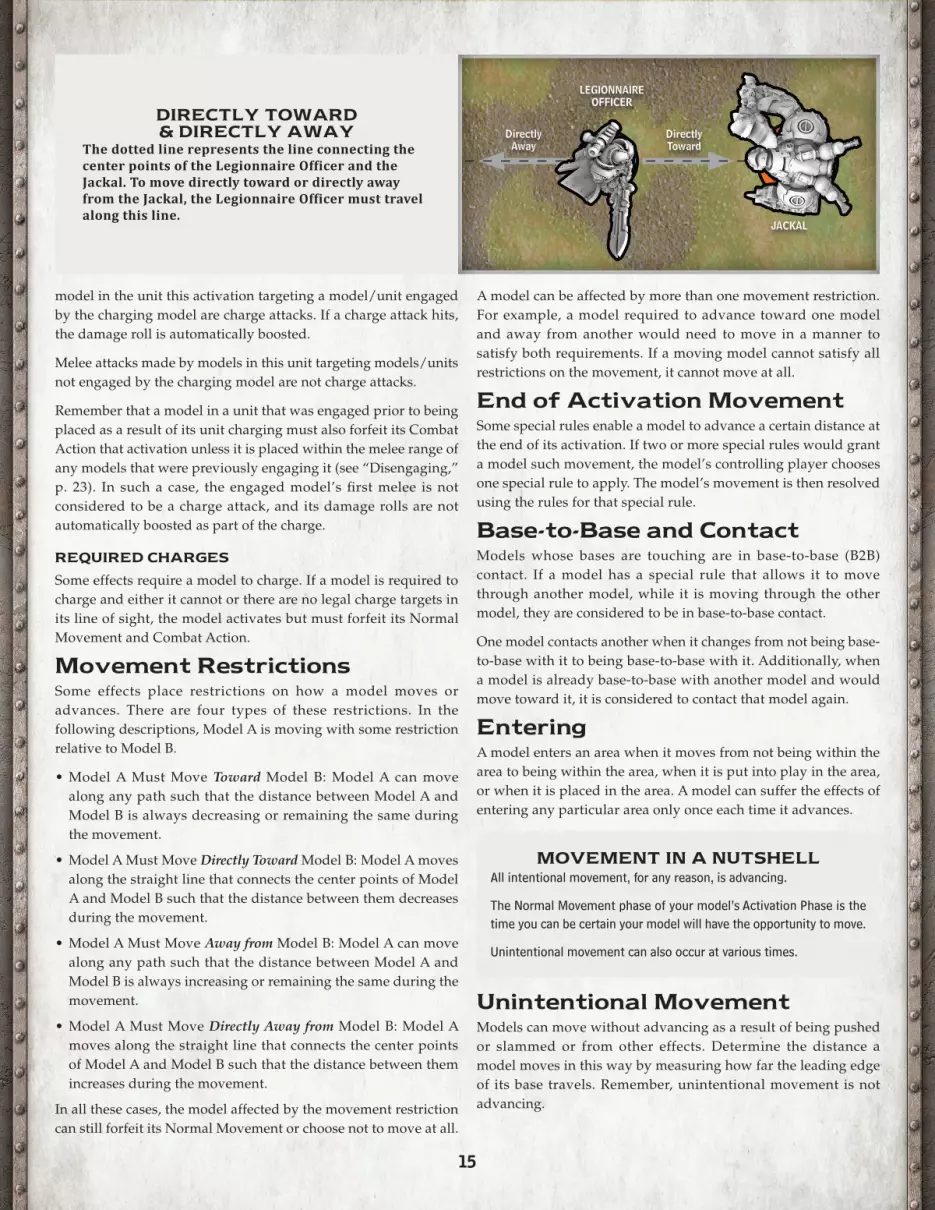
DIRECTLY TOWARD & DIRECTLY AWAY
The dotted line represents the line connecting the center points of the Legionnaire Officer and the Jackal. To move directly toward or directly away from the Jackal, the Legionnaire Officer must travel along this line.
LEGIONNAIRE OFFICER
JACKAL
Directly Toward
Directly Away
16
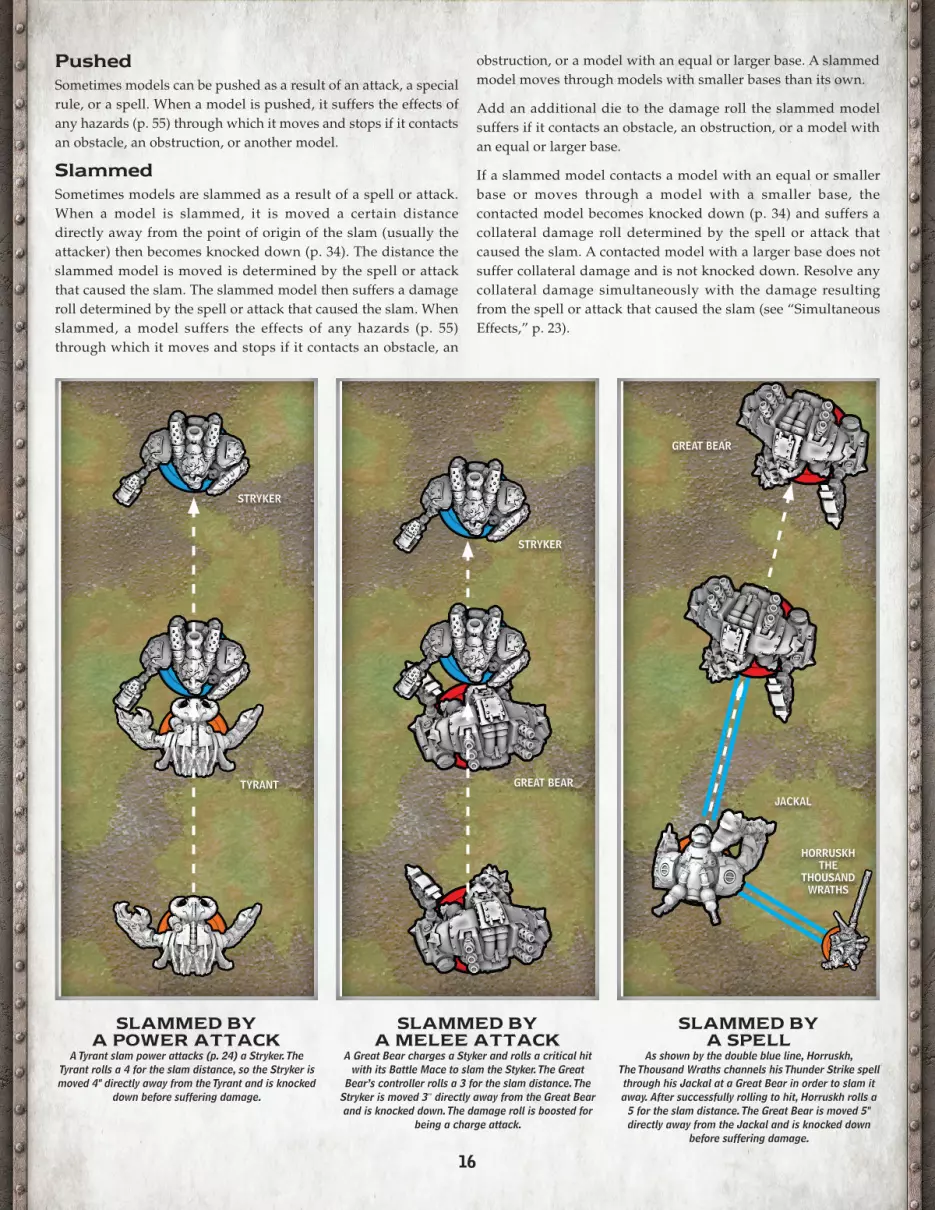
PushedSometimes models can be pushed as a result of an attack, a special rule, or a spell. When a model is pushed, it suffers the effects of any hazards (p. 55) through which it moves and stops if it contacts an obstacle, an obstruction, or another model.
SlammedSometimes models are slammed as a result of a spell or attack. When a model is slammed, it is moved a certain distance directly away from the point of origin of the slam (usually the attacker) then becomes knocked down (p. 34). The distance the slammed model is moved is determined by the spell or attack that caused the slam. The slammed model then suffers a damage roll determined by the spell or attack that caused the slam. When slammed, a model suffers the effects of any hazards (p. 55) through which it moves and stops if it contacts an obstacle, an
SLAMMED BY A POWER ATTACK
A Tyrant slam power attacks (p. 24) a Stryker. The Tyrant rolls a 4 for the slam distance, so the Stryker is moved 4" directly away from the Tyrant and is knocked
down before suffering damage.
SLAMMED BY A MELEE ATTACK
A Great Bear charges a Styker and rolls a critical hit with its Battle Mace to slam the Styker. The Great
Bear’s controller rolls a 3 for the slam distance. The Stryker is moved 3" directly away from the Great Bear and is knocked down. The damage roll is boosted for
being a charge attack.
SLAMMED BY A SPELL
As shown by the double blue line, Horruskh, The Thousand Wraths channels his Thunder Strike spell through his Jackal at a Great Bear in order to slam it away. After successfully rolling to hit, Horruskh rolls a
5 for the slam distance. The Great Bear is moved 5" directly away from the Jackal and is knocked down
before suffering damage.
obstruction, or a model with an equal or larger base. A slammed model moves through models with smaller bases than its own.
Add an additional die to the damage roll the slammed model suffers if it contacts an obstacle, an obstruction, or a model with an equal or larger base.
If a slammed model contacts a model with an equal or smaller base or moves through a model with a smaller base, the contacted model becomes knocked down (p. 34) and suffers a collateral damage roll determined by the spell or attack that caused the slam. A contacted model with a larger base does not suffer collateral damage and is not knocked down. Resolve any collateral damage simultaneously with the damage resulting from the spell or attack that caused the slam (see “Simultaneous Effects,” p. 23).
GREAT BEAR
GREAT BEAR
HORRUSKH THE
THOUSAND WRATHS
JACKALTYRANT
STRYKER
STRYKER
17
ThrownSometimes models are thrown as the result of a spell or attack. When a model is thrown, it is moved a certain distance directly away from the point of origin of the throw (usually the attacker) then becomes knocked down (p. 34). The distance the thrown model is moved is determined by the spell or attack that caused the throw. During this movement, a thrown model moves through models with smaller bases without contacting them. The thrown model still stops if it contacts an obstacle, an obstruction, or a model with an equal or larger base. After moving, the thrown model becomes knocked down (p. 34) and contacts all models with which it is base-to-base and all models whose bases it overlaps. The thrown model then suffers a damage roll determined by the spell or attack that caused the throw.
Add an additional die to the damage roll the thrown model suffers if it contacts an obstacle, an obstruction, or a model with an equal or larger base.
If a thrown model contacts a model with an equal or smaller base, the contacted model becomes knocked down (p. 34) and suffers a collateral damage roll determined by the spell or attack that caused the throw. A contacted model with a larger base than the thrown model does not suffer collateral damage and is not knocked down. Resolve any collateral damage simultaneously with the damage resulting from the spell or attack that caused the throw (see “Simultaneous Effects,” p. 23).
Beyond the Play AreaIf an effect would cause a model to move or be placed beyond the table edge (such as being thrown or slammed), the model stops at the table edge and remains in play. The table edge does not count as an obstacle; models do not take additional damage for stopping there.
FallingA model that is slammed, thrown, pushed, or that otherwise moves off an elevated surface to another surface at least 1 full inch lower falls. A falling model becomes knocked down (p. 34) and suffers a damage roll. A fall of up to 2˝ causes a POW 12 damage roll. Add an additional die to the damage roll for every additional 2˝ the model falls, rounded up.
Fall Damage Roll = 2d6 + 12 + d6 for every 2˝ of the fall after the first
EXAMPLE: A model falling 2˝ suffers a damage roll of 2d6 + 12. One falling 5˝ suffers a damage roll of 4d6 + 12, and one falling 7˝ suffers a damage roll of 5d6 + 12!
If a falling model lands on top of another model, follow the rule of least disturbance to move the non-falling model into a legal position.
If a falling model contacts a model with an equal or smaller base,
the contacted model becomes knocked down and suffers the same damage roll as the falling model. A contacted model with a larger base than the falling model, however, does not suffer damage and is not knocked down. All damage resulting from the fall is simultaneous (see “Simultaneous Effects,” p. 23).
Rule of Least DisturbanceSome rules can cause the bases of moving models to overlap those of other models temporarily, such as when a model is thrown or slammed. Once the model has stopped moving, models must be positioned so that no bases overlap. The model that was moving stays in its final position; other models are moved out of the way to make room. If the model that was moving overlaps the base of a model that cannot be moved or if the model that was moving is smaller than the base it overlaps, the moving model is repositioned using the rule of least disturbance.
To determine which models to move and where to move them, first identify the fewest models that would need to be moved to make room. Then find the locations to move them that create the least total distance moved. If multiple options yield the least distance—if one model is centered over another, for example—randomly determine the option to use.
PlacedModels can be placed in a new location as a result of unit movment, a special rule, or a spell. Placing a model is not moving or advancing the model. A model that is placed within an area, however, is considered to enter the area. There must be room for the model’s base in the location the model is placed. A model cannot be placed in impassable terrain or with its base overlapping an obstacle, an obstruction, or another model’s base.
Replacing ModelsWhen replacing one model with another, place the new model so the area covered by the smaller of their bases is completely within the area covered by the larger. If the two bases are the same size, place the new model in the same location as the one being replaced. There must be room for the model’s base in the location the model is placed.
Combat ActionsAfter completing its Normal Movement, a model makes its Combat Action. A model chooses one of the following options when making its Combat Action:
• Forfeit its Combat Action.
• Make one initial attack with each of its melee weapons.
• Make a number of initial attacks with each of its ranged weapons equal to the weapons’ rate of fire (ROF).
• Make one special attack (HAttack) allowed by its special rules.
• Make one special action (HAction) allowed by its special rules.
• Make one power attack allowed by its special rules (p. 24).
Unless noted otherwise, a model cannot make both melee and ranged attacks in the same Combat Action. In other words, a model cannot make a ranged attack after making a melee attack,
COLLATERAL DAMAGECollateral damage cannot be boosted and it is not considered damage from an attack or model.
18
and it cannot make a melee attack after making a ranged attack. A model making more than one attack can divide its attacks among any eligible targets.
Basic AttacksA basic attack is, quite simply, an attack made with a weapon that is not a special attack, a power attack, or a chain attack.
Special Actions (HActions) & Special Attacks (HAttacks)Special attacks and special actions let models make actions that are unavailable to other models
Special attacks listed as a rule of a melee weapon are melee special attacks. Special attacks listed as a rule of a ranged weapon are ranged special attacks. Special attacks listed as a rule of the model itself are neither melee attacks nor ranged attacks. The rules for these special attacks indicate the nature of any additional attacks that can be made afterward, if any.
Additional AttacksAfter resolving its initial attacks, a special attack, or a power attack, a model might be able to make additional attacks if it has a special rule allowing it to do so.
A model can make additional attacks only during its Combat Action. Each additional attack is a basic attack that can be made with any weapon the model possesses that is allowed by the special rule granting the attack, including multiple attacks with the same weapon. Completely resolve each attack before making another attack. A model cannot make a special attack or a power attack as an additional attack.
Warcasters and warjacks can spend focus points to make additional melee attacks. (Information on spending focus is presented in “Focus: Additional Attack”; for warjacks, see p. 37.
LOS AND TARGETINGSabbreth, The Eternal Annihilation obviously has line of sight to the Courser. Because the Courser has a medium base, it blocks line of sight to other models with medium and small bases. Sabbreth has line of sight to Stormblade Legionnaire B because you can draw an unobstructed line from Sabbreth to the edge of Stormblade Legionnaire B’s base that does not cross the Courser’s base. On the other hand, Sabbreth does not have line of sight to Stormblade Legionnaire A, be-cause you cannot draw a line between their bases that does not cross the Courser’s base. Because they have smaller bases than the Stryker, the Courser and the two Legionnaires do not block line of sight to it. Sabbreth can draw line of sight to the Stryker as if those models were not there.Sabbreth has line of sight to Major Anson Wolfe because Wolfe’s base is not completely obscured.
UNIT LOSRemember, troopers in a unit do not block the line of sight of other trooper models in their unit. When determining line of sight for a model in a unit, ignore intervening troopers that are part of that model’s unit.
For models with the Focus Manipulation special rule, see p. 35.)
Warlocks can spend fury points to make additional attacks (p. 40). Warbeasts can be forced to make additional attacks (p. 41).
Line of Sight & TargetingMany game situations such as charging or making attacks require a model to target another model. A model must have line of sight (LOS) to another model to target it. Simply put, having line of sight means a model can see another model. When a model “selects” or “chooses” another model, it need not have line of sight. A model’s controller can check its line of sight at any time.
There are several steps to determining whether one model has line of sight to another. These steps are listed on p. 19. If any step results in a model’s potential line of sight being blocked, return to the first step and try a different line. If no line can be found to pass all steps, the model does not have line of sight to the desired model and cannot target it.
If you can draw any straight line between the bases of two models that crosses over any part of the base of a third model, the third model is an intervening model. When determining line of sight for a model in a unit, ignore intervening troopers that are part of that model’s unit.
SABBRETHSABBRETH, THE ETERNAL ANNIHILATION
COURSER
STRYKER
STORMBLADE LEGIONNAIRE B
STORMBLADE LEGIONNAIRE A
MAJOR ANSON WOLFE
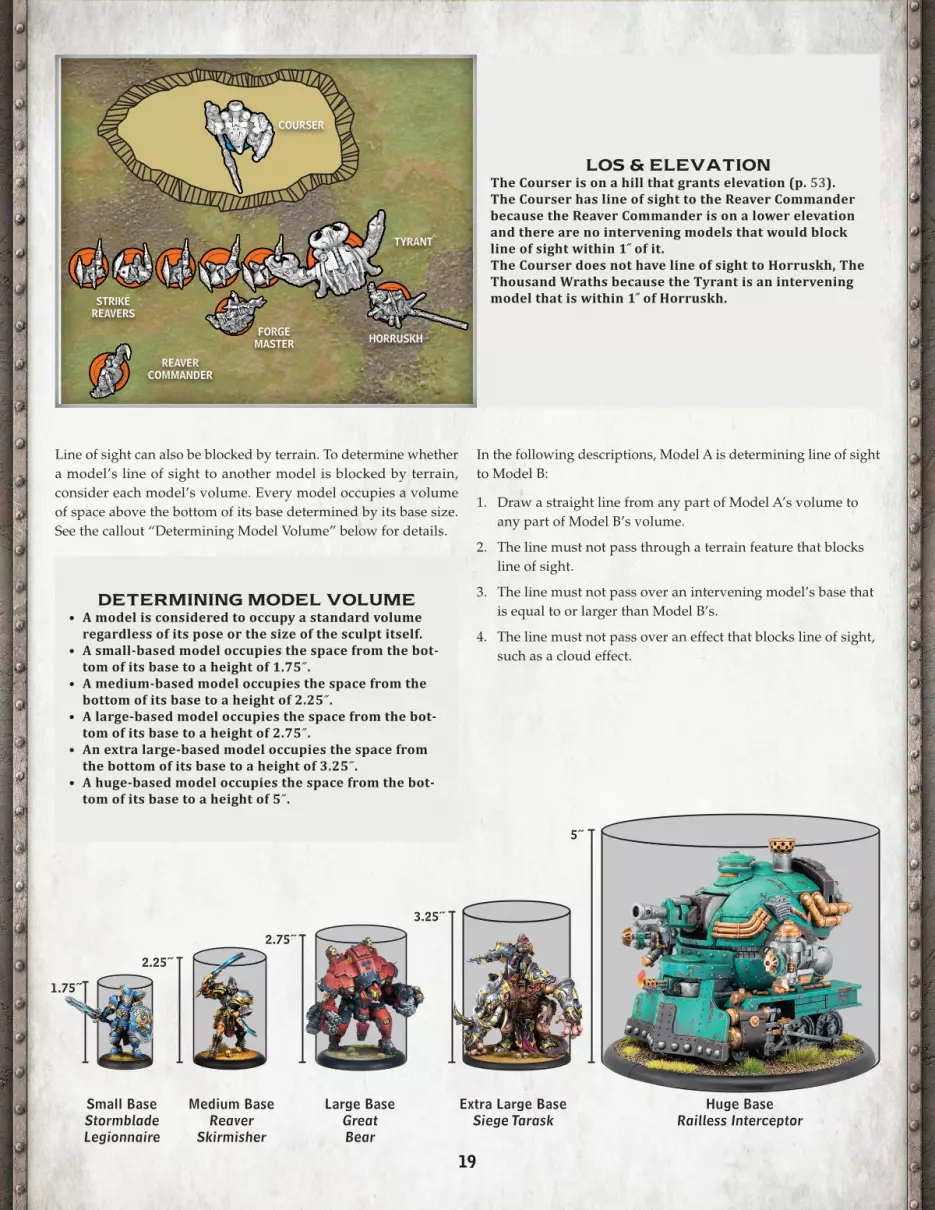
1.75˝
2.25˝
2.75˝
3.25˝
5˝
19
Line of sight can also be blocked by terrain. To determine whether a model’s line of sight to another model is blocked by terrain, consider each model’s volume. Every model occupies a volume of space above the bottom of its base determined by its base size. See the callout “Determining Model Volume” below for details.
In the following descriptions, Model A is determining line of sight to Model B:
1. Draw a straight line from any part of Model A’s volume to any part of Model B’s volume.
2. The line must not pass through a terrain feature that blocks line of sight.
3. The line must not pass over an intervening model’s base that is equal to or larger than Model B’s.
4. The line must not pass over an effect that blocks line of sight, such as a cloud effect.
DETERMINING MODEL VOLUME• A model is considered to occupy a standard volume
regardless of its pose or the size of the sculpt itself.• A small-based model occupies the space from the bot-
tom of its base to a height of 1.75˝.• A medium-based model occupies the space from the
bottom of its base to a height of 2.25˝.• A large-based model occupies the space from the bot-
tom of its base to a height of 2.75˝.• An extra large-based model occupies the space from
the bottom of its base to a height of 3.25˝.• A huge-based model occupies the space from the bot-
tom of its base to a height of 5˝.
Small Base StormbladeLegionnaire
Huge BaseRailless Interceptor
Extra Large BaseSiege Tarask
Large BaseGreat Bear
LOS & ELEVATION The Courser is on a hill that grants elevation (p. 53).The Courser has line of sight to the Reaver Commander because the Reaver Commander is on a lower elevation and there are no intervening models that would block line of sight within 1 ̋ of it.The Courser does not have line of sight to Horruskh, The Thousand Wraths because the Tyrant is an intervening model that is within 1 ̋ of Horruskh.
Medium Base Reaver
Skirmisher
COURSER
TYRANT
REAVER COMMANDER
FORGE MASTER HORRUSKH
STRIKEREAVERS
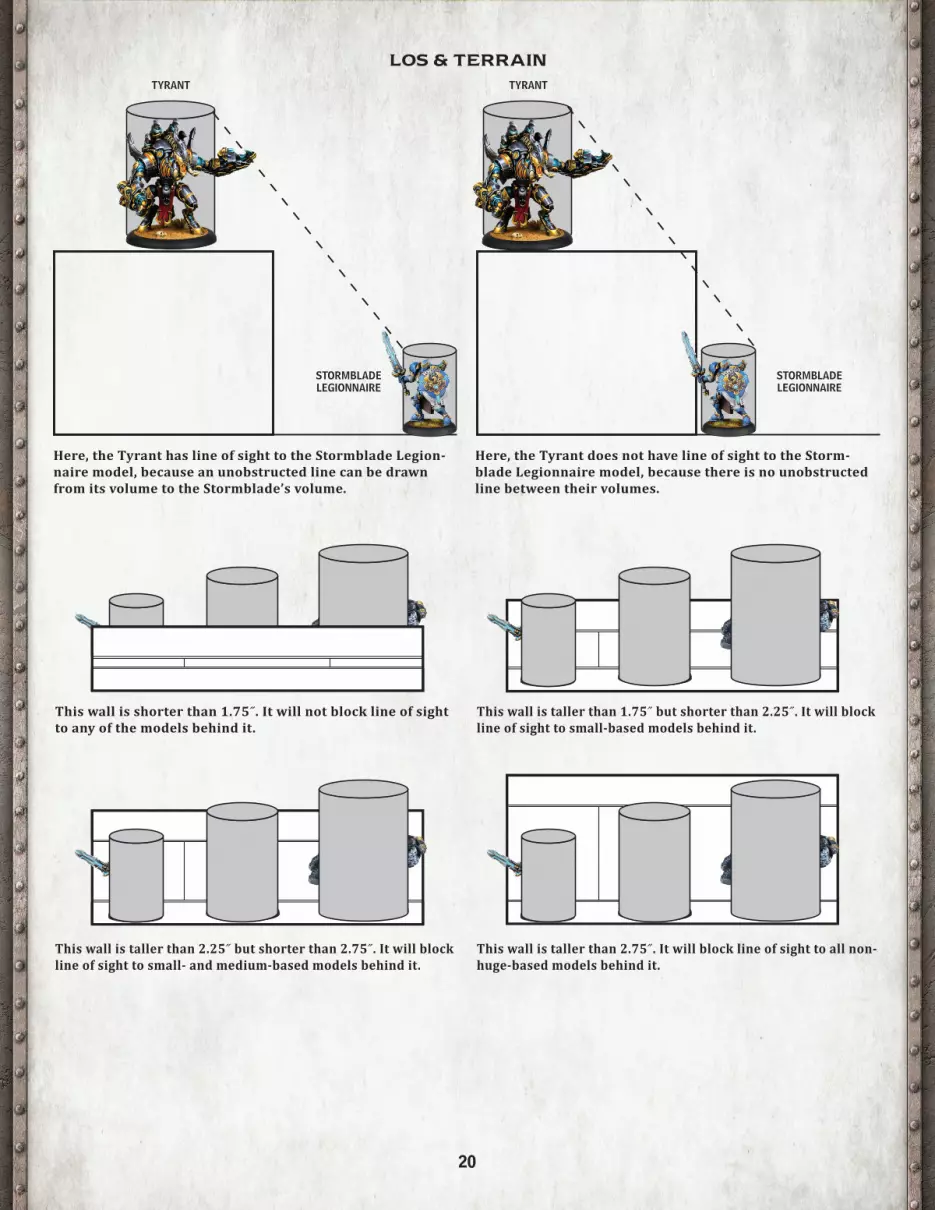
20
This wall is shorter than 1.75˝. It will not block line of sight to any of the models behind it.
This wall is taller than 1.75˝ but shorter than 2.25˝. It will block line of sight to small-based models behind it.
This wall is taller than 2.25˝ but shorter than 2.75˝. It will block line of sight to small- and medium-based models behind it.
This wall is taller than 2.75˝. It will block line of sight to all non-huge-based models behind it.
Here, the Tyrant has line of sight to the Stormblade Legion-naire model, because an unobstructed line can be drawn from its volume to the Stormblade’s volume.
Here, the Tyrant does not have line of sight to the Storm-blade Legionnaire model, because there is no unobstructed line between their volumes.
LOS & TERRAINTYRANT
STORMBLADE LEGIONNAIRE
TYRANT
STORMBLADE LEGIONNAIRE
21
Using Reference ObjectsIf you cannot easily determine line of sight between your model and another model due to the position of terrain on the table, use reference objects for drawing the line. First, choose an edge of your model’s base and an edge of the other model’s base. For each model, hold an object next to the chosen edge that is the height used to determine the model’s volume (1.75˝, 2.25˝, 2.75˝, 3.25˝, or 5˝). If you can draw a line from the inside edge of the object next to your model to the inside edge of the other object that does not pass through a terrain feature, your model’s line of sight to the other model is not blocked by terrain.
Point of OriginThe point of origin of an effect or attack is the location or model from which the attack or effect originates. Typically, this is the
model causing the effect or making the attack but not always. For example, when a warcaster channels a spell through a warjack with the Arc Node advantage, the warjack is the point of origin of the spell even though the warcaster is the model casting the spell. Both line of sight and any attack roll modifiers that depend on line of sight (such as concealment) are checked from the point of origin of the attack. Range is also checked from the point of origin.
Measuring RangeWhen measuring range, measure from the edge of the point of origin’s base nearest the target to the maximum range of the attack or special rule. If the nearest edge of the target model’s base is within the maximum range of the attack or special rule, the target is in range.
22
COMBATATTACK RESOLUTION & DAMAGE
Making AttacksA model’s Combat Action is the part of its activation dedicated to making attacks. Special rules might also permit a model to make attacks at other times. An attack roll determines if an attack hits its target. A damage roll determines how much damage an attack deals.
There are three main types of attacks: melee attacks, ranged attacks, and arcane attacks. Though a model cannot make both melee and ranged attacks in the same Combat Action, arcane attacks made by spellcasters with the ARCANE stat have no such restriction. Warcasters and warlocks can make arcane attacks and melee or ranged attacks in the same activation.
When a model makes an attack, start by declaring its target. Unless stated otherwise, an attack can only target an enemy model.
If the target of an attack is in range, make an attack roll to determine if the attack hits. If the target is beyond range, the attack automatically misses.
Attacks That Hit or Miss AutomaticallySome rules cause attacks to hit automatically or miss automatically. If a rule causes an attack to hit automatically, you do not have to make an attack roll. If you choose to make a roll (because you want to try for a critical hit, for example), the attack no longer hits automatically. If the attack roll fails, the attack misses.
If a rule causes an attack to miss automatically, do not make an attack roll. The attack just misses.
If one rule causes an attack to hit automatically and one causes it to miss automatically, the automatic miss takes precedence over the automatic hit. For instance, an effect that allows attacks to hit automatically would not override special rules such as Stealth that would cause an attack to miss automatically.
Some effects can also reduce the number of dice a model can roll for an attack. If the number of dice a model can roll for an attack is reduced to zero, the attack automatically misses.
RerollsSome models have special rules that enable them to reroll attack or damage rolls or that cause another model to reroll its attack or damage rolls. These rerolls occur before applying effects that are triggered when an attack roll hits or misses or when a damage roll damages a model or fails to damage a model. The reroll results replace the original roll’s results. For example, if a reroll causes a hit model to be missed, it is missed. If a reroll causes a missed model to be hit, it is hit. Multiple reroll effects can come into play on the same roll. Resolve them all before resolving any other effects dependent on hitting/missing or damaging/not damaging. See the Timing appendix on p. 60 for details on timing.
Effects Triggering on a HitResolve effects that trigger on a hit before making a damage roll.
EXAMPLE: Hellyth, Scyir of Nightfallhits a Storm Lance Legionnaire model that is affected by the Arcane Shield spell with a Magelock Pistol ranged weapon. When she made the attack Hylleyth choose the Dispel attack type, which says that when the weapon hits a model or unit, upkeep spells and animi on that model or unit immediately
ATTACKING FRIENDLY MODELSRemember that a model generally cannot target a friendly model with an attack. There are special rules, however, such as warbeast frenzies and Berserk, that can force a model to attack a friendly model. Friendly models can also be caught in AOE or spray attacks even if they are not directly targeted by the attack.
Attack RollAn attack’s success is determined by making an attack roll. Roll 2d6 and add the model’s appropriate stat for the attack type. Roll an additional die if the attack is boosted. Special rules and certain circumstances might modify the attack roll as well.
Melee Attack Roll = 2d6 + MAT
Ranged Attack Roll = 2d6 + RAT
Arcane Attack Roll = 2d6 + AAT
A model is directly hit by an attack if the attack roll against it equals or exceeds the model’s defense (DEF). If the attack roll is less than the target’s DEF, the attack misses.
If the attack hits and any two dice in the attack roll show the same number, it is a critical hit. When an attack roll for an AOE results in a critical hit, every model under the template suffers the critical effect.
A die roll of all 1s is a miss. A roll of all 6s is a direct hit unless you are rolling only one die, regardless of the attacker’s MAT, RAT, AAT, or the target’s DEF. Sometimes a special rule causes an attack to hit automatically; such automatic hits are also direct hits.
EFFECTS THAT PREVENT TARGETING
Certain rules and effects prevent a model from being targeted. A model that cannot be targeted by an attack still suffers its effects if it is hit by the attack, such as a result of being inside an area of effect. Other rules and effects, such as Stealth, can cause an attack to miss automatically. They do not prevent the model from being targeted by the attack, however.
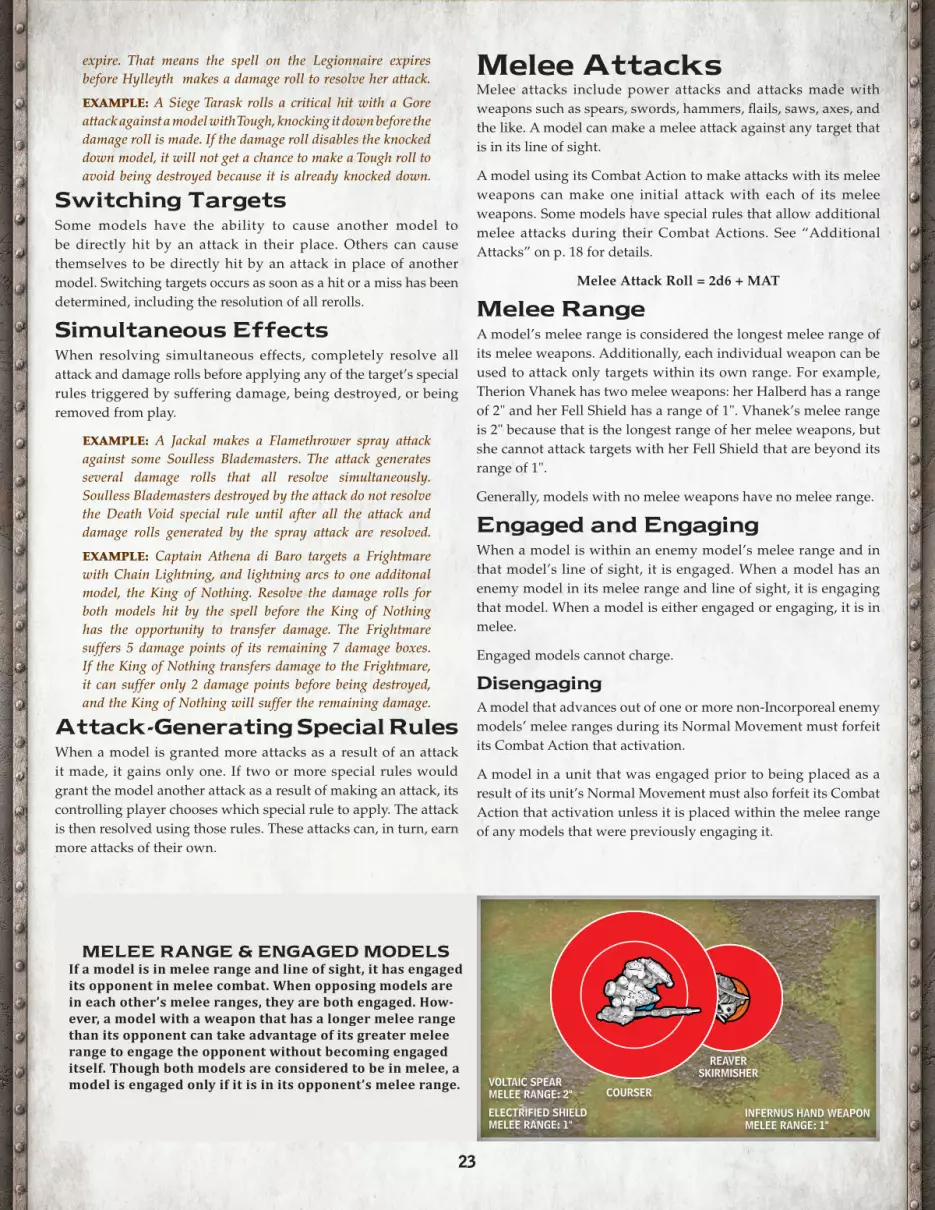
23
MELEE RANGE & ENGAGED MODELSIf a model is in melee range and line of sight, it has engaged its opponent in melee combat. When opposing models are in each other’s melee ranges, they are both engaged. How-ever, a model with a weapon that has a longer melee range than its opponent can take advantage of its greater melee range to engage the opponent without becoming engaged itself. Though both models are considered to be in melee, a model is engaged only if it is in its opponent’s melee range.
expire. That means the spell on the Legionnaire expires before Hylleyth makes a damage roll to resolve her attack.
EXAMPLE: A Siege Tarask rolls a critical hit with a Gore attack against a model with Tough, knocking it down before the damage roll is made. If the damage roll disables the knocked down model, it will not get a chance to make a Tough roll to avoid being destroyed because it is already knocked down.
Switching TargetsSome models have the ability to cause another model to be directly hit by an attack in their place. Others can cause themselves to be directly hit by an attack in place of another model. Switching targets occurs as soon as a hit or a miss has been determined, including the resolution of all rerolls.
Simultaneous EffectsWhen resolving simultaneous effects, completely resolve all attack and damage rolls before applying any of the target’s special rules triggered by suffering damage, being destroyed, or being removed from play.
EXAMPLE: A Jackal makes a Flamethrower spray attack against some Soulless Blademasters. The attack generates several damage rolls that all resolve simultaneously. Soulless Blademasters destroyed by the attack do not resolve the Death Void special rule until after all the attack and damage rolls generated by the spray attack are resolved.
EXAMPLE: Captain Athena di Baro targets a Frightmare with Chain Lightning, and lightning arcs to one additonal model, the King of Nothing. Resolve the damage rolls for both models hit by the spell before the King of Nothing has the opportunity to transfer damage. The Frightmare suffers 5 damage points of its remaining 7 damage boxes. If the King of Nothing transfers damage to the Frightmare, it can suffer only 2 damage points before being destroyed, and the King of Nothing will suffer the remaining damage.
Attack-Generating Special RulesWhen a model is granted more attacks as a result of an attack it made, it gains only one. If two or more special rules would grant the model another attack as a result of making an attack, its controlling player chooses which special rule to apply. The attack is then resolved using those rules. These attacks can, in turn, earn more attacks of their own.
Melee AttacksMelee attacks include power attacks and attacks made with weapons such as spears, swords, hammers, flails, saws, axes, and the like. A model can make a melee attack against any target that is in its line of sight.
A model using its Combat Action to make attacks with its melee weapons can make one initial attack with each of its melee weapons. Some models have special rules that allow additional melee attacks during their Combat Actions. See “Additional Attacks” on p. 18 for details.
Melee Attack Roll = 2d6 + MAT
Melee RangeA model’s melee range is considered the longest melee range of its melee weapons. Additionally, each individual weapon can be used to attack only targets within its own range. For example, Therion Vhanek has two melee weapons: her Halberd has a range of 2" and her Fell Shield has a range of 1". Vhanek’s melee range is 2" because that is the longest range of her melee weapons, but she cannot attack targets with her Fell Shield that are beyond its range of 1".
Generally, models with no melee weapons have no melee range.
Engaged and EngagingWhen a model is within an enemy model’s melee range and in that model’s line of sight, it is engaged. When a model has an enemy model in its melee range and line of sight, it is engaging that model. When a model is either engaged or engaging, it is in melee.
Engaged models cannot charge.
DisengagingA model that advances out of one or more non-Incorporeal enemy models’ melee ranges during its Normal Movement must forfeit its Combat Action that activation.
A model in a unit that was engaged prior to being placed as a result of its unit’s Normal Movement must also forfeit its Combat Action that activation unless it is placed within the melee range of any models that were previously engaging it.
REAVER SKIRMISHER
COURSERVOLTAIC SPEAR MELEE RANGE: 2"
ELECTRIFIED SHIELD MELEE RANGE: 1"
INFERNUS HAND WEAPON MELEE RANGE: 1"
24
Power AttacksPower attacks are attack options available to some models, such as warjacks and warbeasts. Models can make power attacks as follows.
• A model with the Headbutt Power Attack advantage can make headbutt power attacks.
• A model with the Slam Power Attack advantage can make slam power attacks.
• A model with a weapon with the Throw Power Attack weapon quality can make throw power attacks. A warjack cannot use a crippled weapon with the Throw Power Attack weapon quality to make a throw power attack.
• A model with the Trample Power Attack advantage can make trample power attacks.
A warjack must spend 1 focus point to make a power attack. A warbeast must be forced to make a power attack.
Unless otherwise noted, a model can make a power attack only during its activation. A model cannot make a power attack during an activation in which it charges. Remember, a model cannot target a friendly model with an attack.
When a model makes a power attack, do not apply the special rules on its weapons unless they specifically reference power attacks.
A model that is able to do so can make additional melee attacks after making a power attack. A model cannot make a power attack as an additional attack.
Power Attack Damage Rolls & Collateral DamageThough power attacks are melee attacks, they do not resolve damage rolls the same way. Instead of adding the POW of the weapon being used, as with a standard melee attack, the POW of a power attack is determined by comparing the base size of the attacking model and the base size of the model hit by the power attack. If the attacking model has a base equal to or smaller than the base of the model hit, the POW of the power attack is 12. If the attacking model’s base is larger than the base of the model hit by the power attack, the POW of the power attack is 14.
If the power attack results in collateral damage, collateral damage is determined by comparing the base size of the attack with the base of the model suffering the collateral damage. If the attacking model has a base equal to or smaller than the base of the model suffering the collateral damage, the POW of the collateral is 12. If the attacking model’s base is larger than the base of the model suffering the collateral damage, the POW of the collateral is 14. Collateral damage cannot be boosted and is not considered to be damage from an attack or model.
EXAMPLE: An effect triggered by being “damaged by an enemy attack” would not trigger due to collateral damage.
HeadbuttA model making a headbutt power attack smashes its head into a model to drive it to the ground. A model must have the Headbutt Power Attack advantage to make a headbutt power attack. A headbutt power attack made by an extra-large or smaller model has a 1˝ melee range. A headbutt made by a huge-based model has a 2˝ melee range.
A model cannot target a model with a larger base size than its own with a headbutt power attack.
The attacking model makes a melee attack roll against its target. If the attack hits, the target becomes knocked down (p. 34) and then suffers a power attack damage roll.
SlamA model making a slam power attack rams a model with the full force of its body to send the target model flying backward and knock it to the ground. A slam combines a model’s Normal Movement and Combat Action. A model cannot make a slam power attack if it forfeited either its Normal Movement or its Combat Action that activation.
A model must have the Slam Power Attack advantage to make a slam power attack. A slam power attack made by an extra-large or smaller model has a 1˝ melee range. A slam made by a huge-based model has a 2˝ melee range.
A model making a slam power attack can attempt to slam any model that is in its line of sight at the beginning of its Normal Movement. Declare a slam and its target before moving the slamming model. Remember, a model requires line of sight to another model to target it. The slamming model then advances its full SPD plus 3˝ directly toward its target. The slamming model cannot voluntarily stop its movement unless its target is in its melee range, but it can end this movement at any point with its target in its slam power attack’s melee range. It stops if it contacts a model, an obstacle, or an obstruction or if it is pushed, slammed, thrown, or placed during its slam movement. If a model contacts a model, an obstacle, or an obstruction while moving as part of a slam power attack but is able to move through it for some reason, the slamming model does not stop but is still considered to have contacted the model, obstacle, or obstruction.
A slamming model that ends its slam movement with its target in the melee range of its slam power attack has made a successful slam. If the slamming model advanced at least 3˝, it makes a melee attack roll against its target. A model that slam power
MELEE ATTACK ROLL MODIFIERSThe most common modifiers affecting a model’s melee attack roll are summarized here for easy reference. Where necessary, additional details can be found on the pages listed.
• Obstructions (p. 54): A model with any portion of its volume obscured from its attacker by an obstacle or an obstruction gains +2 DEF against melee attack rolls.
• Knocked Down Target (p. 34): A melee attack against a knocked down model hits automatically.
• Stationary Target (p. 34): A melee attack against a stationary model hits automatically.
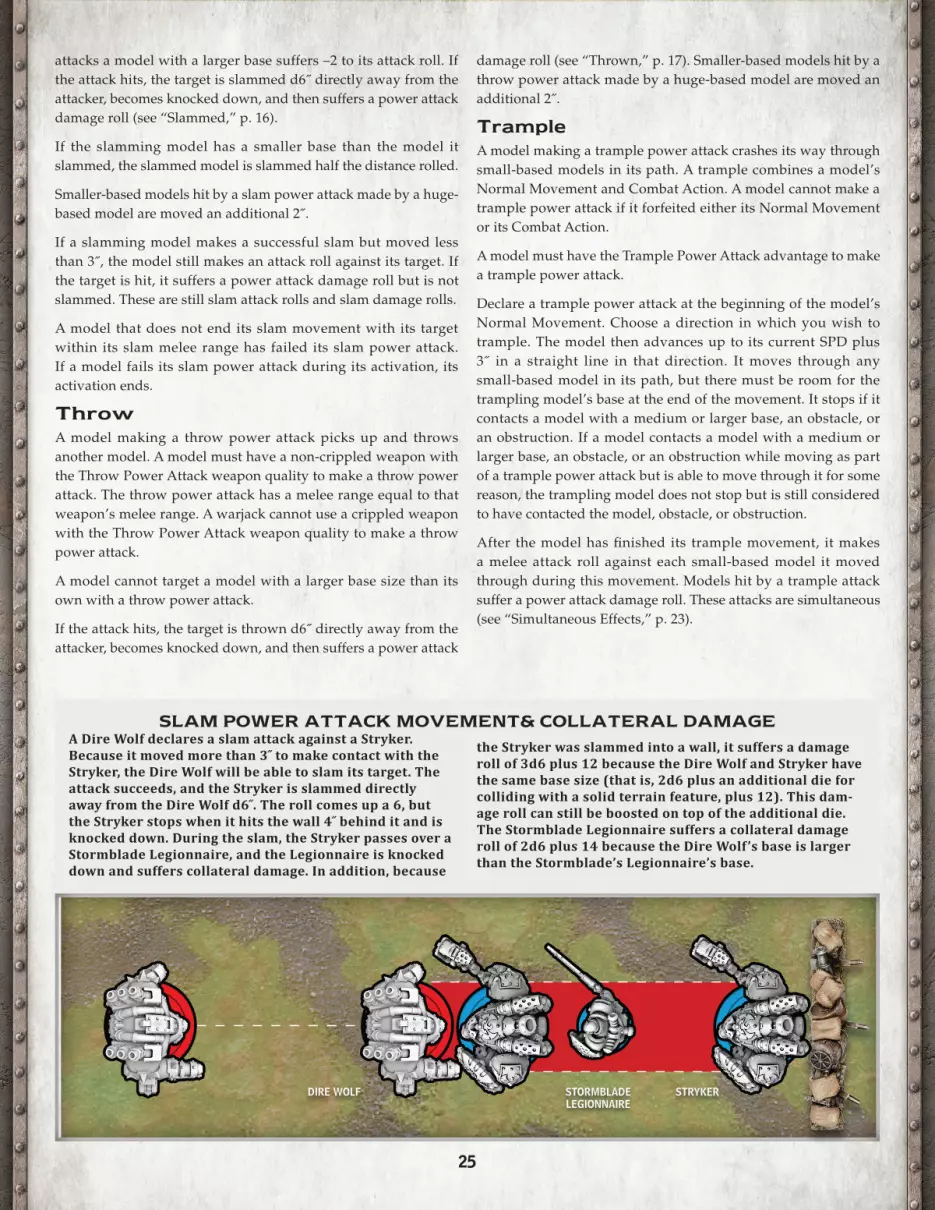
25
A Dire Wolf declares a slam attack against a Stryker. Because it moved more than 3 ̋ to make contact with the Stryker, the Dire Wolf will be able to slam its target. The attack succeeds, and the Stryker is slammed directly away from the Dire Wolf d6 ̋. The roll comes up a 6, but the Stryker stops when it hits the wall 4 ̋ behind it and is knocked down. During the slam, the Stryker passes over a Stormblade Legionnaire, and the Legionnaire is knocked down and suffers collateral damage. In addition, because
the Stryker was slammed into a wall, it suffers a damage roll of 3d6 plus 12 because the Dire Wolf and Stryker have the same base size (that is, 2d6 plus an additional die for colliding with a solid terrain feature, plus 12). This dam-age roll can still be boosted on top of the additional die. The Stormblade Legionnaire suffers a collateral damage roll of 2d6 plus 14 because the Dire Wolf ’s base is larger than the Stormblade’s Legionnaire’s base.
attacks a model with a larger base suffers –2 to its attack roll. If the attack hits, the target is slammed d6˝ directly away from the attacker, becomes knocked down, and then suffers a power attack damage roll (see “Slammed,” p. 16).
If the slamming model has a smaller base than the model it slammed, the slammed model is slammed half the distance rolled.
Smaller-based models hit by a slam power attack made by a huge-based model are moved an additional 2˝.
If a slamming model makes a successful slam but moved less than 3˝, the model still makes an attack roll against its target. If the target is hit, it suffers a power attack damage roll but is not slammed. These are still slam attack rolls and slam damage rolls.
A model that does not end its slam movement with its target within its slam melee range has failed its slam power attack. If a model fails its slam power attack during its activation, its activation ends.
ThrowA model making a throw power attack picks up and throws another model. A model must have a non-crippled weapon with the Throw Power Attack weapon quality to make a throw power attack. The throw power attack has a melee range equal to that weapon’s melee range. A warjack cannot use a crippled weapon with the Throw Power Attack weapon quality to make a throw power attack.
A model cannot target a model with a larger base size than its own with a throw power attack.
If the attack hits, the target is thrown d6˝ directly away from the attacker, becomes knocked down, and then suffers a power attack
damage roll (see “Thrown,” p. 17). Smaller-based models hit by a throw power attack made by a huge-based model are moved an additional 2˝.
Trample A model making a trample power attack crashes its way through small-based models in its path. A trample combines a model’s Normal Movement and Combat Action. A model cannot make a trample power attack if it forfeited either its Normal Movement or its Combat Action.
A model must have the Trample Power Attack advantage to make a trample power attack.
Declare a trample power attack at the beginning of the model’s Normal Movement. Choose a direction in which you wish to trample. The model then advances up to its current SPD plus 3˝ in a straight line in that direction. It moves through any small-based model in its path, but there must be room for the trampling model’s base at the end of the movement. It stops if it contacts a model with a medium or larger base, an obstacle, or an obstruction. If a model contacts a model with a medium or larger base, an obstacle, or an obstruction while moving as part of a trample power attack but is able to move through it for some reason, the trampling model does not stop but is still considered to have contacted the model, obstacle, or obstruction.
After the model has finished its trample movement, it makes a melee attack roll against each small-based model it moved through during this movement. Models hit by a trample attack suffer a power attack damage roll. These attacks are simultaneous (see “Simultaneous Effects,” p. 23).
SLAM POWER ATTACK MOVEMENT& COLLATERAL DAMAGE
DIRE WOLF STRYKERSTORMBLADE LEGIONNAIRE
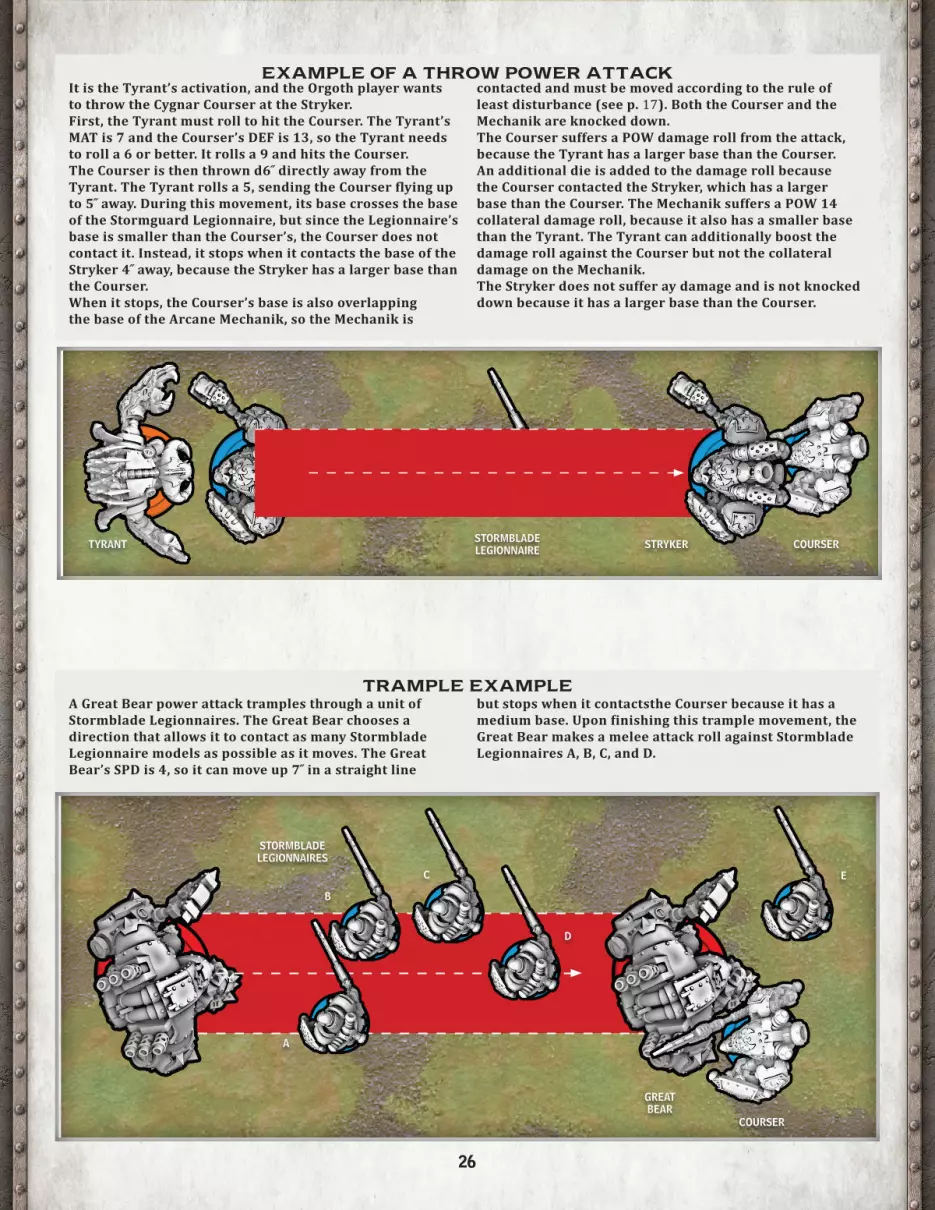
26
It is the Tyrant’s activation, and the Orgoth player wants to throw the Cygnar Courser at the Stryker.First, the Tyrant must roll to hit the Courser. The Tyrant’s MAT is 7 and the Courser’s DEF is 13, so the Tyrant needs to roll a 6 or better. It rolls a 9 and hits the Courser.The Courser is then thrown d6 ̋ directly away from the Tyrant. The Tyrant rolls a 5, sending the Courser flying up to 5 ̋ away. During this movement, its base crosses the base of the Stormguard Legionnaire, but since the Legionnaire’s base is smaller than the Courser’s, the Courser does not contact it. Instead, it stops when it contacts the base of the Stryker 4 ̋ away, because the Stryker has a larger base than the Courser.When it stops, the Courser’s base is also overlapping the base of the Arcane Mechanik, so the Mechanik is
contacted and must be moved according to the rule of least disturbance (see p. 17). Both the Courser and the Mechanik are knocked down.The Courser suffers a POW damage roll from the attack, because the Tyrant has a larger base than the Courser. An additional die is added to the damage roll because the Courser contacted the Stryker, which has a larger base than the Courser. The Mechanik suffers a POW 14 collateral damage roll, because it also has a smaller base than the Tyrant. The Tyrant can additionally boost the damage roll against the Courser but not the collateral damage on the Mechanik.The Stryker does not suffer ay damage and is not knocked down because it has a larger base than the Courser.
EXAMPLE OF A THROW POWER ATTACK
A Great Bear power attack tramples through a unit of Stormblade Legionnaires. The Great Bear chooses a direction that allows it to contact as many Stormblade Legionnaire models as possible as it moves. The Great Bear’s SPD is 4, so it can move up 7 ̋ in a straight line
but stops when it contactsthe Courser because it has a medium base. Upon finishing this trample movement, the Great Bear makes a melee attack roll against Stormblade Legionnaires A, B, C, and D.
TRAMPLE EXAMPLE
TYRANT STRYKER COURSERSTORMBLADE LEGIONNAIRE
GREATBEAR
A
B
C
D
E
COURSER
STORMBLADE LEGIONNAIRES
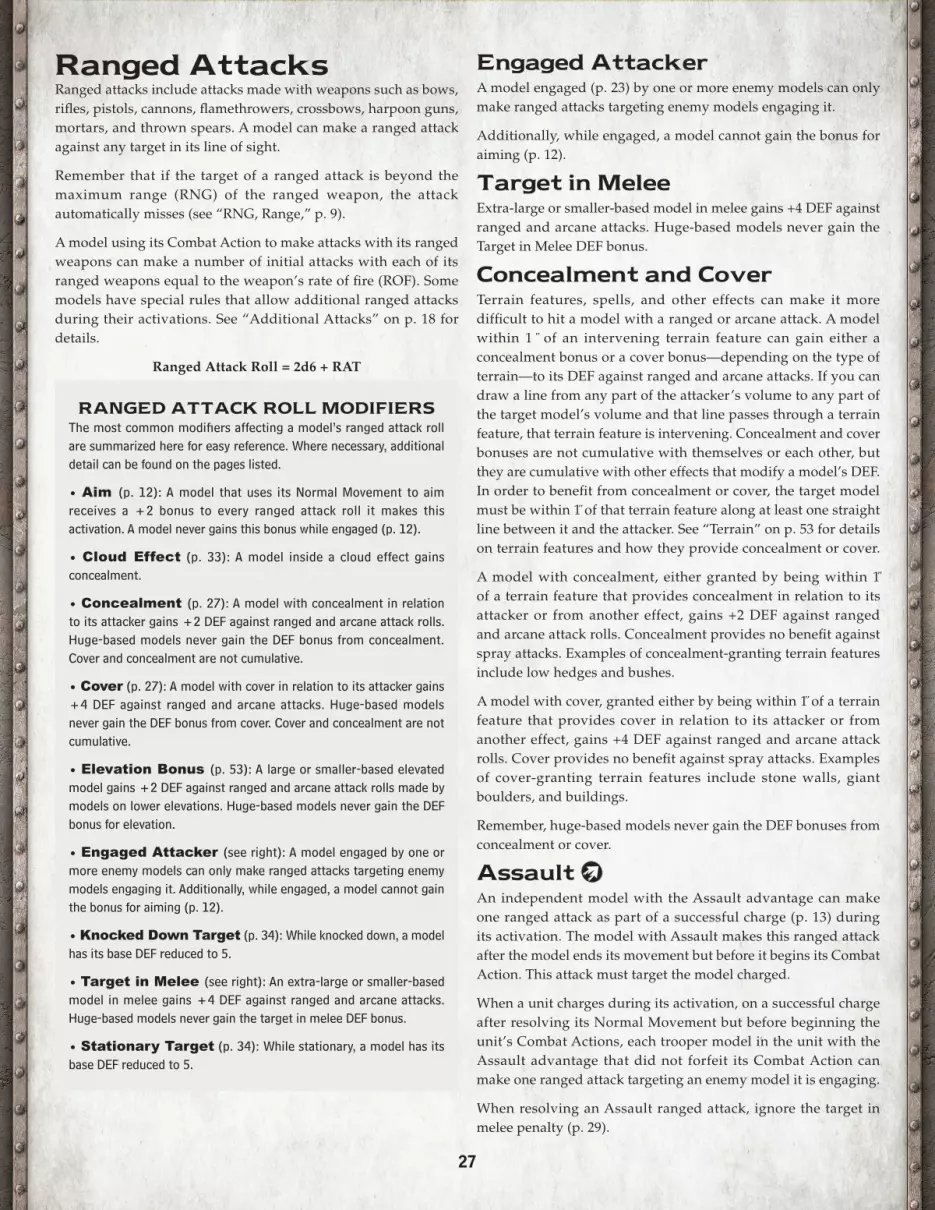
27
Ranged AttacksRanged attacks include attacks made with weapons such as bows, rifles, pistols, cannons, flamethrowers, crossbows, harpoon guns, mortars, and thrown spears. A model can make a ranged attack against any target in its line of sight.
Remember that if the target of a ranged attack is beyond the maximum range (RNG) of the ranged weapon, the attack automatically misses (see “RNG, Range,” p. 9).
A model using its Combat Action to make attacks with its ranged weapons can make a number of initial attacks with each of its ranged weapons equal to the weapon’s rate of fire (ROF). Some models have special rules that allow additional ranged attacks during their activations. See “Additional Attacks” on p. 18 for details.
Ranged Attack Roll = 2d6 + RAT
Engaged AttackerA model engaged (p. 23) by one or more enemy models can only make ranged attacks targeting enemy models engaging it.
Additionally, while engaged, a model cannot gain the bonus for aiming (p. 12).
Target in MeleeExtra-large or smaller-based model in melee gains +4 DEF against ranged and arcane attacks. Huge-based models never gain the Target in Melee DEF bonus.
Concealment and CoverTerrain features, spells, and other effects can make it more difficult to hit a model with a ranged or arcane attack. A model within 1 ̋ of an intervening terrain feature can gain either a concealment bonus or a cover bonus—depending on the type of terrain—to its DEF against ranged and arcane attacks. If you can draw a line from any part of the attacker’s volume to any part of the target model’s volume and that line passes through a terrain feature, that terrain feature is intervening. Concealment and cover bonuses are not cumulative with themselves or each other, but they are cumulative with other effects that modify a model’s DEF. In order to benefit from concealment or cover, the target model must be within 1 ̋ of that terrain feature along at least one straight line between it and the attacker. See “Terrain” on p. 53 for details on terrain features and how they provide concealment or cover.
A model with concealment, either granted by being within 1 ̋ of a terrain feature that provides concealment in relation to its attacker or from another effect, gains +2 DEF against ranged and arcane attack rolls. Concealment provides no benefit against spray attacks. Examples of concealment-granting terrain features include low hedges and bushes.
A model with cover, granted either by being within 1 ̋ of a terrain feature that provides cover in relation to its attacker or from another effect, gains +4 DEF against ranged and arcane attack rolls. Cover provides no benefit against spray attacks. Examples of cover-granting terrain features include stone walls, giant boulders, and buildings.
Remember, huge-based models never gain the DEF bonuses from concealment or cover.
Assault An independent model with the Assault advantage can make one ranged attack as part of a successful charge (p. 13) during its activation. The model with Assault makes this ranged attack after the model ends its movement but before it begins its Combat Action. This attack must target the model charged.
When a unit charges during its activation, on a successful charge after resolving its Normal Movement but before beginning the unit’s Combat Actions, each trooper model in the unit with the Assault advantage that did not forfeit its Combat Action can make one ranged attack targeting an enemy model it is engaging.
When resolving an Assault ranged attack, ignore the target in melee penalty (p. 29).
RANGED ATTACK ROLL MODIFIERSThe most common modifiers affecting a model’s ranged attack roll are summarized here for easy reference. Where necessary, additional detail can be found on the pages listed.
• Aim (p. 12): A model that uses its Normal Movement to aim receives a +2 bonus to every ranged attack roll it makes this activation. A model never gains this bonus while engaged (p. 12).
• Cloud Effect (p. 33): A model inside a cloud effect gains concealment.
• Concealment (p. 27): A model with concealment in relation to its attacker gains +2 DEF against ranged and arcane attack rolls. Huge-based models never gain the DEF bonus from concealment. Cover and concealment are not cumulative.
• Cover (p. 27): A model with cover in relation to its attacker gains +4 DEF against ranged and arcane attacks. Huge-based models never gain the DEF bonus from cover. Cover and concealment are not cumulative.
• Elevation Bonus (p. 53): A large or smaller-based elevated model gains +2 DEF against ranged and arcane attack rolls made by models on lower elevations. Huge-based models never gain the DEF bonus for elevation.
• Engaged Attacker (see right): A model engaged by one or more enemy models can only make ranged attacks targeting enemy models engaging it. Additionally, while engaged, a model cannot gain the bonus for aiming (p. 12).
• Knocked Down Target (p. 34): While knocked down, a model has its base DEF reduced to 5.
• Target in Melee (see right): An extra-large or smaller-based model in melee gains +4 DEF against ranged and arcane attacks. Huge-based models never gain the target in melee DEF bonus.
• Stationary Target (p. 34): While stationary, a model has its base DEF reduced to 5.
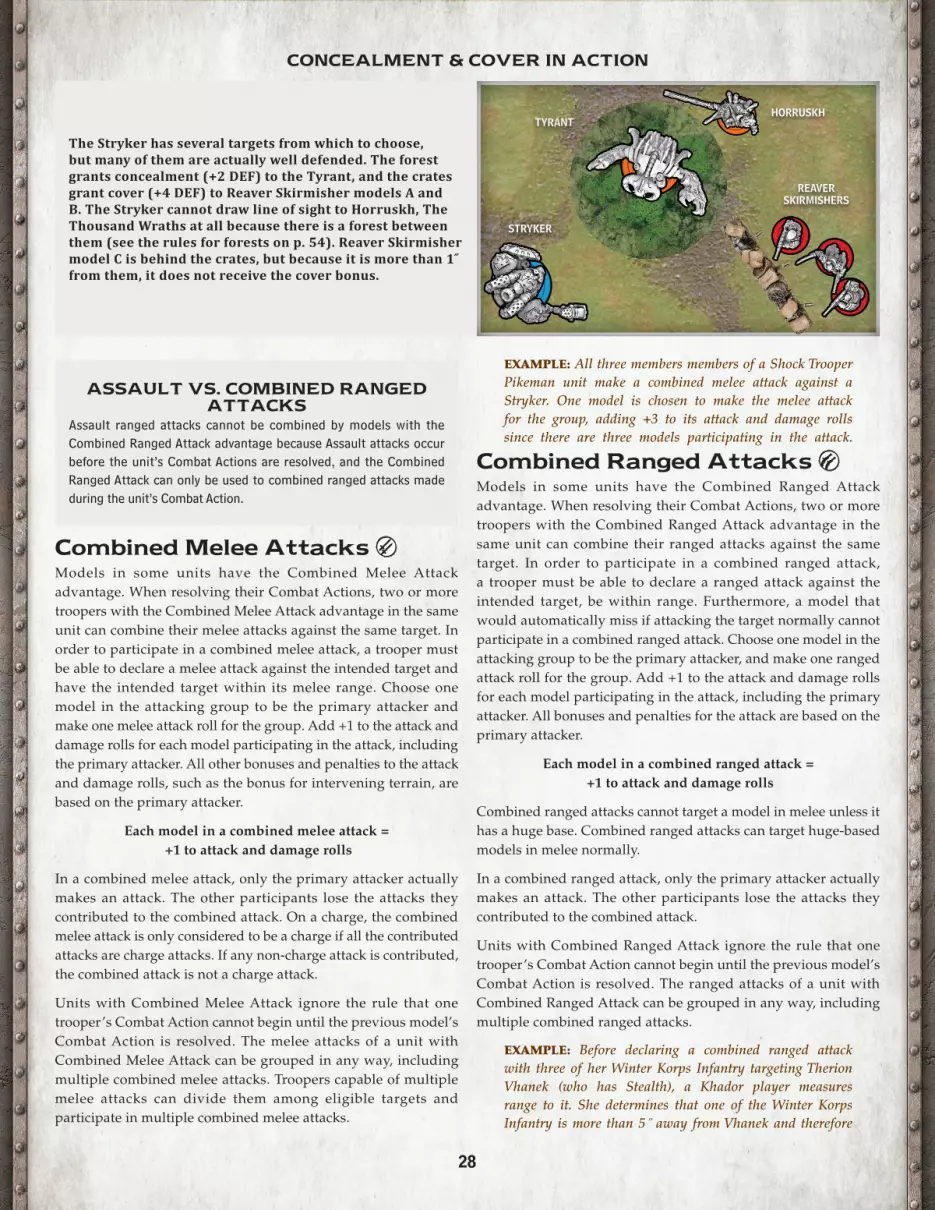
28
Combined Melee Attacks Models in some units have the Combined Melee Attack advantage. When resolving their Combat Actions, two or more troopers with the Combined Melee Attack advantage in the same unit can combine their melee attacks against the same target. In order to participate in a combined melee attack, a trooper must be able to declare a melee attack against the intended target and have the intended target within its melee range. Choose one model in the attacking group to be the primary attacker and make one melee attack roll for the group. Add +1 to the attack and damage rolls for each model participating in the attack, including the primary attacker. All other bonuses and penalties to the attack and damage rolls, such as the bonus for intervening terrain, are based on the primary attacker.
Each model in a combined melee attack = +1 to attack and damage rolls
In a combined melee attack, only the primary attacker actually makes an attack. The other participants lose the attacks they contributed to the combined attack. On a charge, the combined melee attack is only considered to be a charge if all the contributed attacks are charge attacks. If any non-charge attack is contributed, the combined attack is not a charge attack.
Units with Combined Melee Attack ignore the rule that one trooper’s Combat Action cannot begin until the previous model’s Combat Action is resolved. The melee attacks of a unit with Combined Melee Attack can be grouped in any way, including multiple combined melee attacks. Troopers capable of multiple melee attacks can divide them among eligible targets and participate in multiple combined melee attacks.
EXAMPLE: All three members members of a Shock Trooper Pikeman unit make a combined melee attack against a Stryker. One model is chosen to make the melee attack for the group, adding +3 to its attack and damage rolls since there are three models participating in the attack.
Combined Ranged Attacks Models in some units have the Combined Ranged Attack advantage. When resolving their Combat Actions, two or more troopers with the Combined Ranged Attack advantage in the same unit can combine their ranged attacks against the same target. In order to participate in a combined ranged attack, a trooper must be able to declare a ranged attack against the intended target, be within range. Furthermore, a model that would automatically miss if attacking the target normally cannot participate in a combined ranged attack. Choose one model in the attacking group to be the primary attacker, and make one ranged attack roll for the group. Add +1 to the attack and damage rolls for each model participating in the attack, including the primary attacker. All bonuses and penalties for the attack are based on the primary attacker.
Each model in a combined ranged attack = +1 to attack and damage rolls
Combined ranged attacks cannot target a model in melee unless it has a huge base. Combined ranged attacks can target huge-based models in melee normally.
In a combined ranged attack, only the primary attacker actually makes an attack. The other participants lose the attacks they contributed to the combined attack.
Units with Combined Ranged Attack ignore the rule that one trooper’s Combat Action cannot begin until the previous model’s Combat Action is resolved. The ranged attacks of a unit with Combined Ranged Attack can be grouped in any way, including multiple combined ranged attacks.
EXAMPLE: Before declaring a combined ranged attack with three of her Winter Korps Infantry targeting Therion Vhanek (who has Stealth), a Khador player measures range to it. She determines that one of the Winter Korps Infantry is more than 5 ̋ away from Vhanek and therefore
CONCEALMENT & COVER IN ACTION
The Stryker has several targets from which to choose, but many of them are actually well defended. The forest grants concealment (+2 DEF) to the Tyrant, and the crates grant cover (+4 DEF) to Reaver Skirmisher models A and B. The Stryker cannot draw line of sight to Horruskh, The Thousand Wraths at all because there is a forest between them (see the rules for forests on p. 54). Reaver Skirmisher model C is behind the crates, but because it is more than 1 ̋ from them, it does not receive the cover bonus.
ASSAULT VS. COMBINED RANGED ATTACKS
Assault ranged attacks cannot be combined by models with the Combined Ranged Attack advantage because Assault attacks occur before the unit’s Combat Actions are resolved, and the Combined Ranged Attack can only be used to combined ranged attacks made during the unit’s Combat Action.
STRYKER
TYRANT
REAVER SKIRMISHERS
HORRUSKH
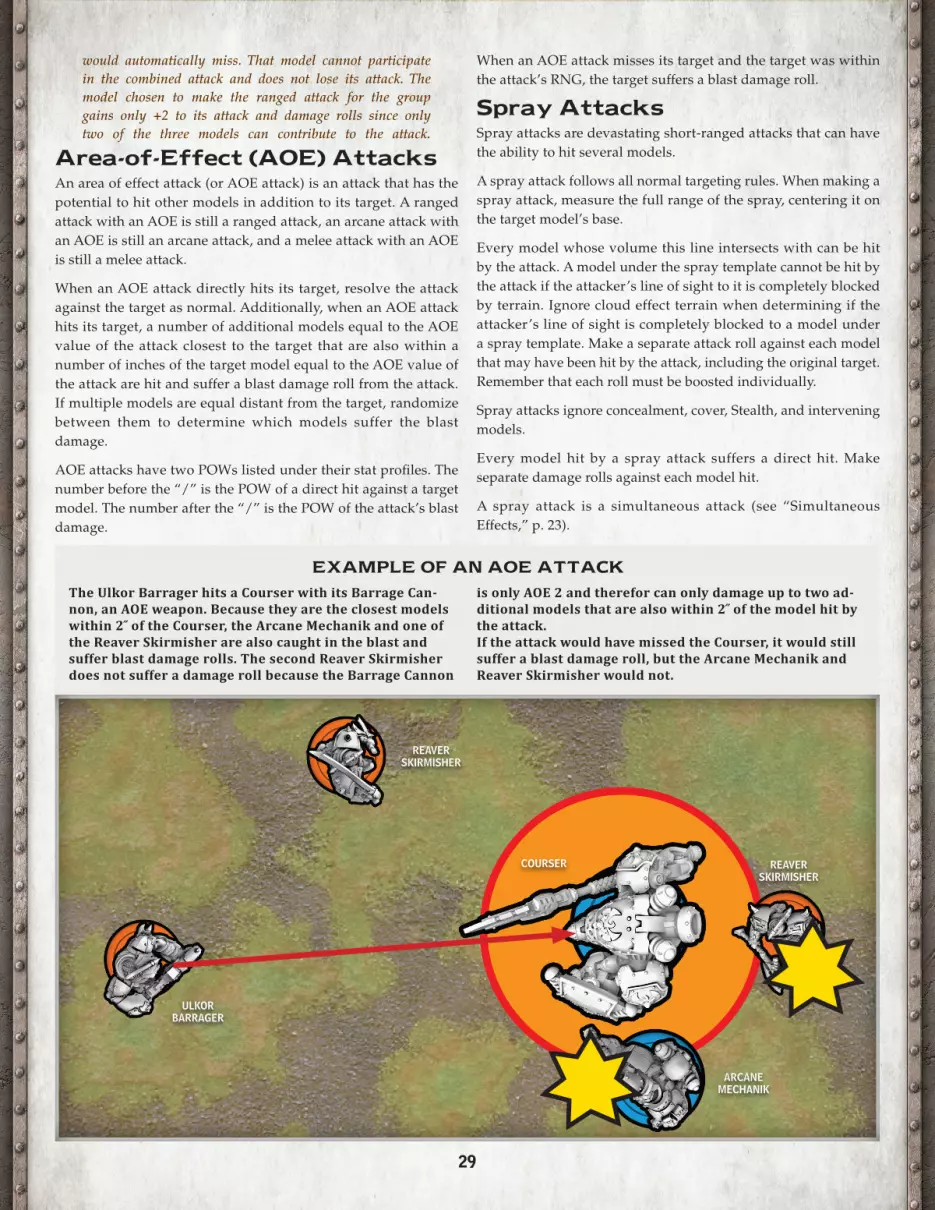
29
would automatically miss. That model cannot participate in the combined attack and does not lose its attack. The model chosen to make the ranged attack for the group gains only +2 to its attack and damage rolls since only two of the three models can contribute to the attack.
Area-of-Effect (AOE) AttacksAn area of effect attack (or AOE attack) is an attack that has the potential to hit other models in addition to its target. A ranged attack with an AOE is still a ranged attack, an arcane attack with an AOE is still an arcane attack, and a melee attack with an AOE is still a melee attack.
When an AOE attack directly hits its target, resolve the attack against the target as normal. Additionally, when an AOE attack hits its target, a number of additional models equal to the AOE value of the attack closest to the target that are also within a number of inches of the target model equal to the AOE value of the attack are hit and suffer a blast damage roll from the attack. If multiple models are equal distant from the target, randomize between them to determine which models suffer the blast damage.
AOE attacks have two POWs listed under their stat profiles. The number before the “/” is the POW of a direct hit against a target model. The number after the “/” is the POW of the attack’s blast damage.
When an AOE attack misses its target and the target was within the attack’s RNG, the target suffers a blast damage roll.
Spray AttacksSpray attacks are devastating short-ranged attacks that can have the ability to hit several models.
A spray attack follows all normal targeting rules. When making a spray attack, measure the full range of the spray, centering it on the target model’s base.
Every model whose volume this line intersects with can be hit by the attack. A model under the spray template cannot be hit by the attack if the attacker’s line of sight to it is completely blocked by terrain. Ignore cloud effect terrain when determining if the attacker’s line of sight is completely blocked to a model under a spray template. Make a separate attack roll against each model that may have been hit by the attack, including the original target. Remember that each roll must be boosted individually.
Spray attacks ignore concealment, cover, Stealth, and intervening models.
Every model hit by a spray attack suffers a direct hit. Make separate damage rolls against each model hit.
A spray attack is a simultaneous attack (see “Simultaneous Effects,” p. 23).
The Ulkor Barrager hits a Courser with its Barrage Can-non, an AOE weapon. Because they are the closest models within 2 ̋ of the Courser, the Arcane Mechanik and one of the Reaver Skirmisher are also caught in the blast and suffer blast damage rolls. The second Reaver Skirmisher does not suffer a damage roll because the Barrage Cannon
is only AOE 2 and therefor can only damage up to two ad-ditional models that are also within 2 ̋ of the model hit by the attack.If the attack would have missed the Courser, it would still suffer a blast damage roll, but the Arcane Mechanik and Reaver Skirmisher would not.
EXAMPLE OF AN AOE ATTACK
ULKOR BARRAGER
COURSER REAVERSKIRMISHER
ARCANE MECHANIK
REAVERSKIRMISHER
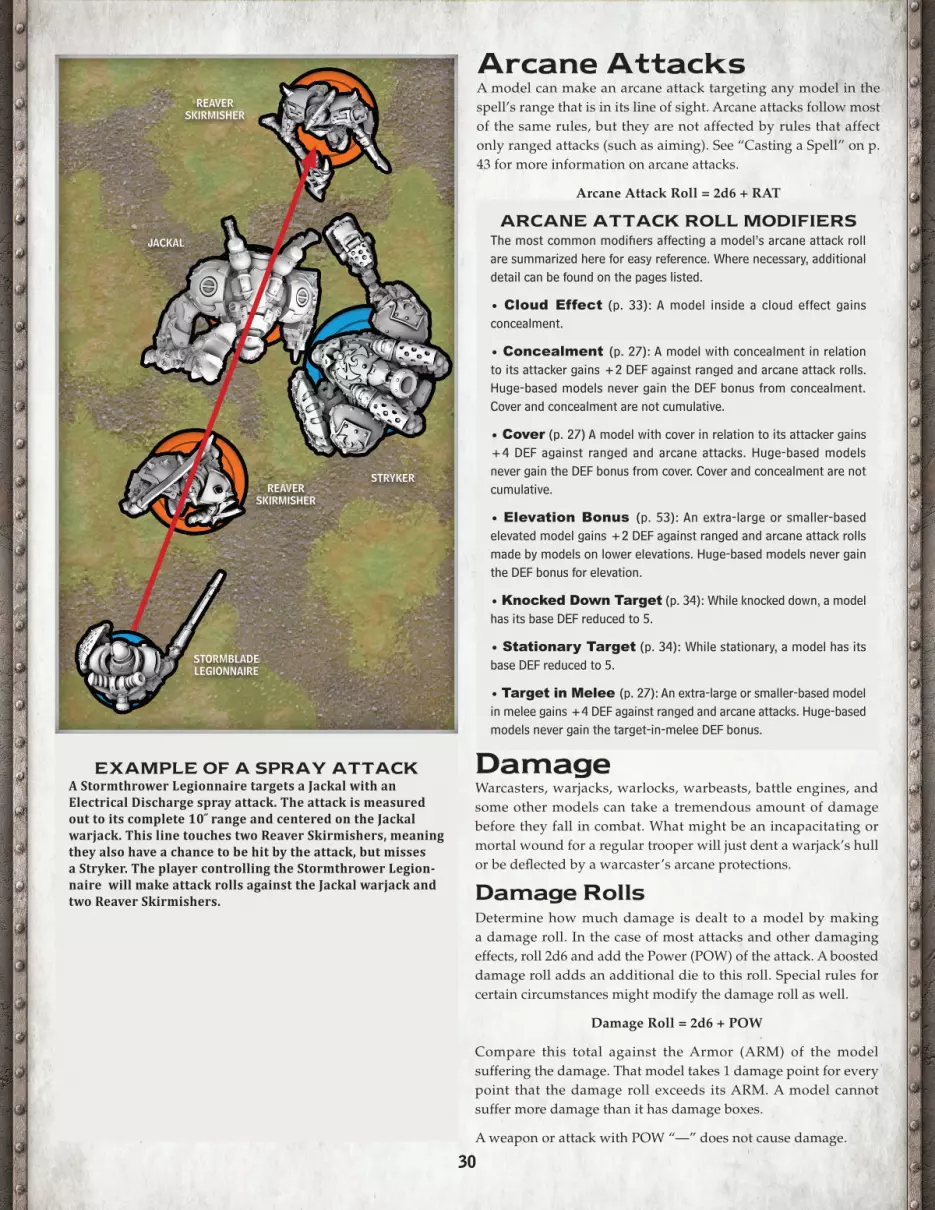
30
EXAMPLE OF A SPRAY ATTACK A Stormthrower Legionnaire targets a Jackal with an Electrical Discharge spray attack. The attack is measured out to its complete 10 ̋ range and centered on the Jackal warjack. This line touches two Reaver Skirmishers, meaning they also have a chance to be hit by the attack, but misses a Stryker. The player controlling the Stormthrower Legion-naire will make attack rolls against the Jackal warjack and two Reaver Skirmishers.
ARCANE ATTACK ROLL MODIFIERSThe most common modifiers affecting a model’s arcane attack roll are summarized here for easy reference. Where necessary, additional detail can be found on the pages listed.
• Cloud Effect (p. 33): A model inside a cloud effect gains concealment.
• Concealment (p. 27): A model with concealment in relation to its attacker gains +2 DEF against ranged and arcane attack rolls. Huge-based models never gain the DEF bonus from concealment. Cover and concealment are not cumulative.
• Cover (p. 27) A model with cover in relation to its attacker gains +4 DEF against ranged and arcane attacks. Huge-based models never gain the DEF bonus from cover. Cover and concealment are not cumulative.
• Elevation Bonus (p. 53): An extra-large or smaller-based elevated model gains +2 DEF against ranged and arcane attack rolls made by models on lower elevations. Huge-based models never gain the DEF bonus for elevation.
• Knocked Down Target (p. 34): While knocked down, a model has its base DEF reduced to 5.
• Stationary Target (p. 34): While stationary, a model has its base DEF reduced to 5.
• Target in Melee (p. 27): An extra-large or smaller-based model in melee gains +4 DEF against ranged and arcane attacks. Huge-based models never gain the target-in-melee DEF bonus.
DamageWarcasters, warjacks, warlocks, warbeasts, battle engines, and some other models can take a tremendous amount of damage before they fall in combat. What might be an incapacitating or mortal wound for a regular trooper will just dent a warjack’s hull or be deflected by a warcaster’s arcane protections.
Damage RollsDetermine how much damage is dealt to a model by making a damage roll. In the case of most attacks and other damaging effects, roll 2d6 and add the Power (POW) of the attack. A boosted damage roll adds an additional die to this roll. Special rules for certain circumstances might modify the damage roll as well.
Damage Roll = 2d6 + POW
Compare this total against the Armor (ARM) of the model suffering the damage. That model takes 1 damage point for every point that the damage roll exceeds its ARM. A model cannot suffer more damage than it has damage boxes.
A weapon or attack with POW “—” does not cause damage.
Arcane AttacksA model can make an arcane attack targeting any model in the spell’s range that is in its line of sight. Arcane attacks follow most of the same rules, but they are not affected by rules that affect only ranged attacks (such as aiming). See “Casting a Spell” on p. 43 for more information on arcane attacks.
Arcane Attack Roll = 2d6 + RAT
JACKAL
REAVER SKIRMISHER
STRYKER
STORMBLADE LEGIONNAIRE
REAVERSKIRMISHER
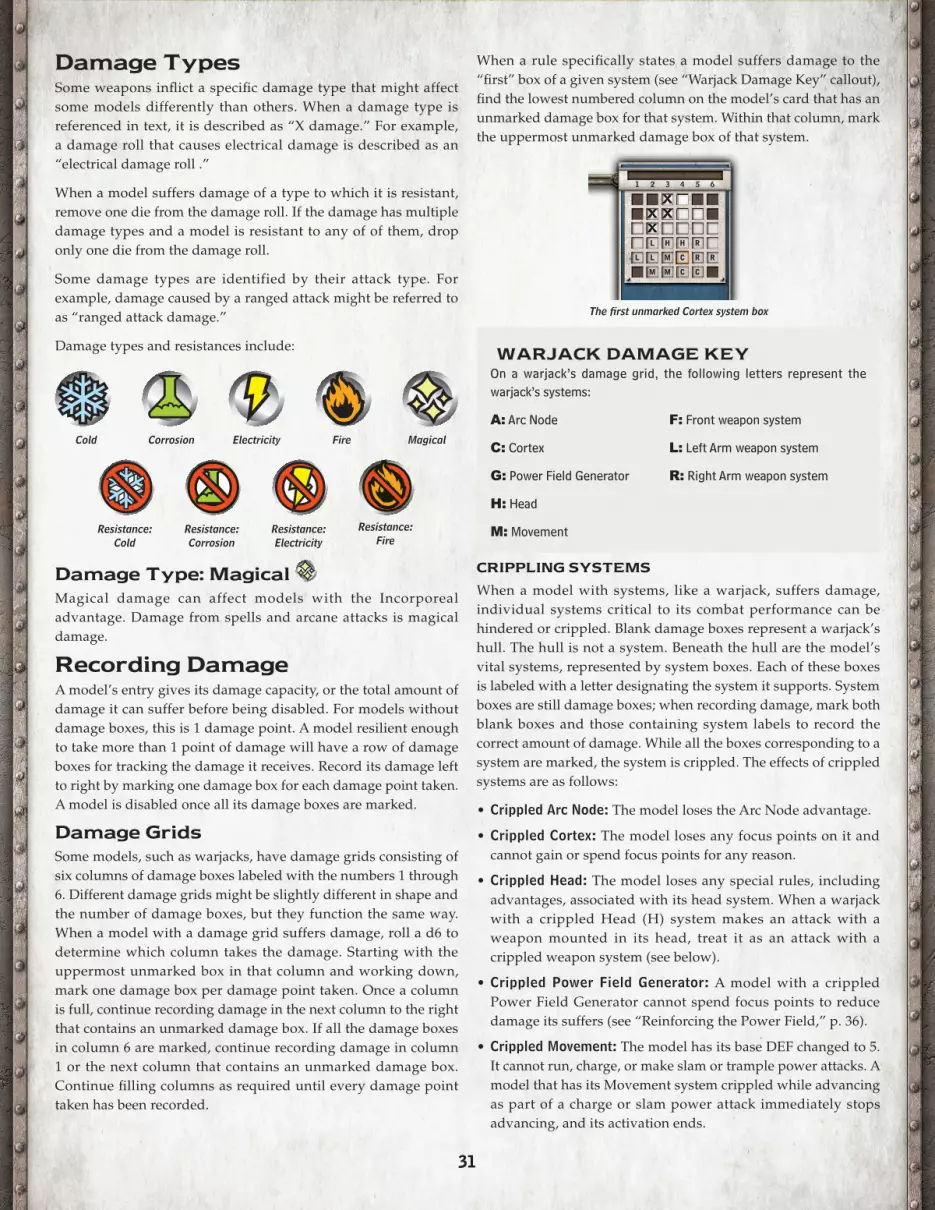
31
Damage TypesSome weapons inflict a specific damage type that might affect some models differently than others. When a damage type is referenced in text, it is described as “X damage.” For example, a damage roll that causes electrical damage is described as an “electrical damage roll .”
When a model suffers damage of a type to which it is resistant, remove one die from the damage roll. If the damage has multiple damage types and a model is resistant to any of of them, drop only one die from the damage roll.
Some damage types are identified by their attack type. For example, damage caused by a ranged attack might be referred to as “ranged attack damage.”
Damage types and resistances include:
Damage Type: Magical Magical damage can affect models with the Incorporeal advantage. Damage from spells and arcane attacks is magical damage.
Recording Damage A model’s entry gives its damage capacity, or the total amount of damage it can suffer before being disabled. For models without damage boxes, this is 1 damage point. A model resilient enough to take more than 1 point of damage will have a row of damage boxes for tracking the damage it receives. Record its damage left to right by marking one damage box for each damage point taken. A model is disabled once all its damage boxes are marked.
Damage GridsSome models, such as warjacks, have damage grids consisting of six columns of damage boxes labeled with the numbers 1 through 6. Different damage grids might be slightly different in shape and the number of damage boxes, but they function the same way. When a model with a damage grid suffers damage, roll a d6 to determine which column takes the damage. Starting with the uppermost unmarked box in that column and working down, mark one damage box per damage point taken. Once a column is full, continue recording damage in the next column to the right that contains an unmarked damage box. If all the damage boxes in column 6 are marked, continue recording damage in column 1 or the next column that contains an unmarked damage box. Continue filling columns as required until every damage point taken has been recorded.
Resistance: Fire
Resistance: Electricity
Resistance: Corrosion
Resistance: Cold
FireElectricityCorrosionCold Magical
CRIPPLING SYSTEMS
When a model with systems, like a warjack, suffers damage, individual systems critical to its combat performance can be hindered or crippled. Blank damage boxes represent a warjack’s hull. The hull is not a system. Beneath the hull are the model’s vital systems, represented by system boxes. Each of these boxes is labeled with a letter designating the system it supports. System boxes are still damage boxes; when recording damage, mark both blank boxes and those containing system labels to record the correct amount of damage. While all the boxes corresponding to a system are marked, the system is crippled. The effects of crippled systems are as follows:
• Crippled Arc Node: The model loses the Arc Node advantage.
• Crippled Cortex: The model loses any focus points on it and cannot gain or spend focus points for any reason.
• Crippled Head: The model loses any special rules, including advantages, associated with its head system. When a warjack with a crippled Head (H) system makes an attack with a weapon mounted in its head, treat it as an attack with a crippled weapon system (see below).
• Crippled Power Field Generator: A model with a crippled Power Field Generator cannot spend focus points to reduce damage its suffers (see “Reinforcing the Power Field,” p. 36).
• Crippled Movement: The model has its base DEF changed to 5. It cannot run, charge, or make slam or trample power attacks. A model that has its Movement system crippled while advancing as part of a charge or slam power attack immediately stops advancing, and its activation ends.
The first unmarked Cortex system box
WARJACK DAMAGE KEYOn a warjack’s damage grid, the following letters represent the warjack’s systems:
A: Arc Node F: Front weapon system
C: Cortex L: Left Arm weapon system
G: Power Field Generator R: Right Arm weapon system
H: Head
M: Movement
When a rule specifically states a model suffers damage to the “first” box of a given system (see “Warjack Damage Key” callout), find the lowest numbered column on the model’s card that has an unmarked damage box for that system. Within that column, mark the uppermost unmarked damage box of that system.
DAMAGE
32
• Weapon System: The model rolls one fewer die on the attack and damage rolls with weapons in the crippled location. Additionally, a model cannot use weapons in a crippled location to make power attacks or special attacks. A model cannot make a chain attack or combo special attack, such as Combo Smite or Combo Strike, while either of the weapon systems with the special rule is crippled. If a weapon in the crippled location has the Buckler or Shield weapon quality, the model loses the ARM bonus for that quality while the location is crippled.
If 1 or more damage points are removed from a crippled system, the system is no longer crippled.
EXAMPLE 1: A Cygnar Courser armed with a left arm-mounted Electrofied Shield has its Left Arm (L) weapon system crippled. While crippled, the warjack loses the benefit of the weapon’s Shield Quality and the Shock Field special rule and rolls one fewer die on its Electrofied Shield attack rolls and damage rolls.
EXAMPLE 2: An Orgoth Tyrant warjack with a Hunter Head has its Head (H) system crippled. While crippled, the warjack loses the Hunter special rule gained from its head, and it rolls one fewer die on attack and damage rolls when resolving its head-mounted Gore attacks.
EXAMPLE 3: A Khador Great Bear warjack armed with a left arm-mounted Heavy Cannon Shield has its Left Arm (L) weapon system crippled. While crippled, the warjack loses the benefit of the weapon’s Shield Quality and rolls one fewer die on both its Cannon and Shield attack rolls and damage rolls.
Warbeast Life SpiralsWarbeasts have life spirals consisting of six branches of damage boxes (represented by circles) labeled with the numbers 1 through 6. Different life spirals will be slightly different in shape and the number of damage boxes, but they function the same way. When a model with a life spiral suffers damage, roll a d6 to determine which branch takes the damage. Starting with the outermost unmarked box in that branch and working inward, mark one damage box per damage point taken. Once a branch is full, continue recording damage in the next branch clockwise that contains an unmarked damage box. Continue filling branches as required until every damage point taken has been recorded.
When a rule specifically states a model suffers damage to a particular aspect, find the lowest numbered branch on the model’s card that has an unmarked damage box for that aspect. Within that branch, mark the outermost unmarked damage box of that aspect.
CRIPPLING ASPECTS
Life spirals are divided into three aspects that can be crippled as a warbeast suffers damage: Body, Mind, and Spirit. As a warbeast’s aspects are crippled, its performance on the battlefield suffers. While all the boxes corresponding to an aspect are marked, the aspect is crippled. The effects of crippled aspects are as follows:
• Crippled Body: The warbeast rolls one fewer die on damage rolls.
• Crippled Mind: The warbeast rolls one fewer die on attack rolls. Additionally, the model cannot make chain attacks, power attacks, or special attacks.
• Crippled Spirit: The warbeast cannot be forced.
If 1 or more damage points are removed from a crippled aspect, the aspect is no longer crippled.
Power FieldsSome warjacks have power fields like warcasters and can spend focus to reduce the damage they suffer by 5 (see “Reinforcing the Power Field,” p. 36).
Disabled, Boxed & DestroyedA model is disabled when all its damage boxes are marked or, if it does not have damage boxes, when it suffers 1 damage point. When a model is disabled, immediately resolve any effects triggered by being disabled. If 1 or more damage points are removed from a disabled model, it is no longer disabled.
After resolving any effects triggered by being disabled, if the model is still disabled it is considered to be boxed. When a model is boxed, resolve any effects triggered by being boxed. After resolving any effects triggered by being boxed, if the model is still boxed it is destroyed, triggering any relevant effects. Remove the destroyed model from the table.
If an effect causes a model to leave play or cease being disabled, such as when damage is removed due to a Tough roll, do not resolve any additional effects that were triggered by the model being disabled. The model does not become boxed or destroyed, and thus effects triggered by the model becoming boxed or destroyed do not occur.
Likewise, if an effect causes a boxed model to leave play or no longer be boxed, do not resolve any additional effects triggered by the model being boxed. For example, if an effect causes a boxed model to be removed from play, no additional effects triggered by the model being boxed take place, and the model is not destroyed. In this case, the removed model does not generate a soul token (p. 33) because it was not destroyed.
BattleGroup Controller DestructionWhen a model with the Battlegroup Controller special rule is destroyed or removed from the table, the warjacks in its battlegroup become inert and the warbeasts become wild. Additionally, all upkeep spells cast by that model expire (p. 33, 44).
INERT WARJACKS
When a warjack becomes inert, it loses any focus points it had, and while it is inert, it cannot gain focus points. An inert warjack
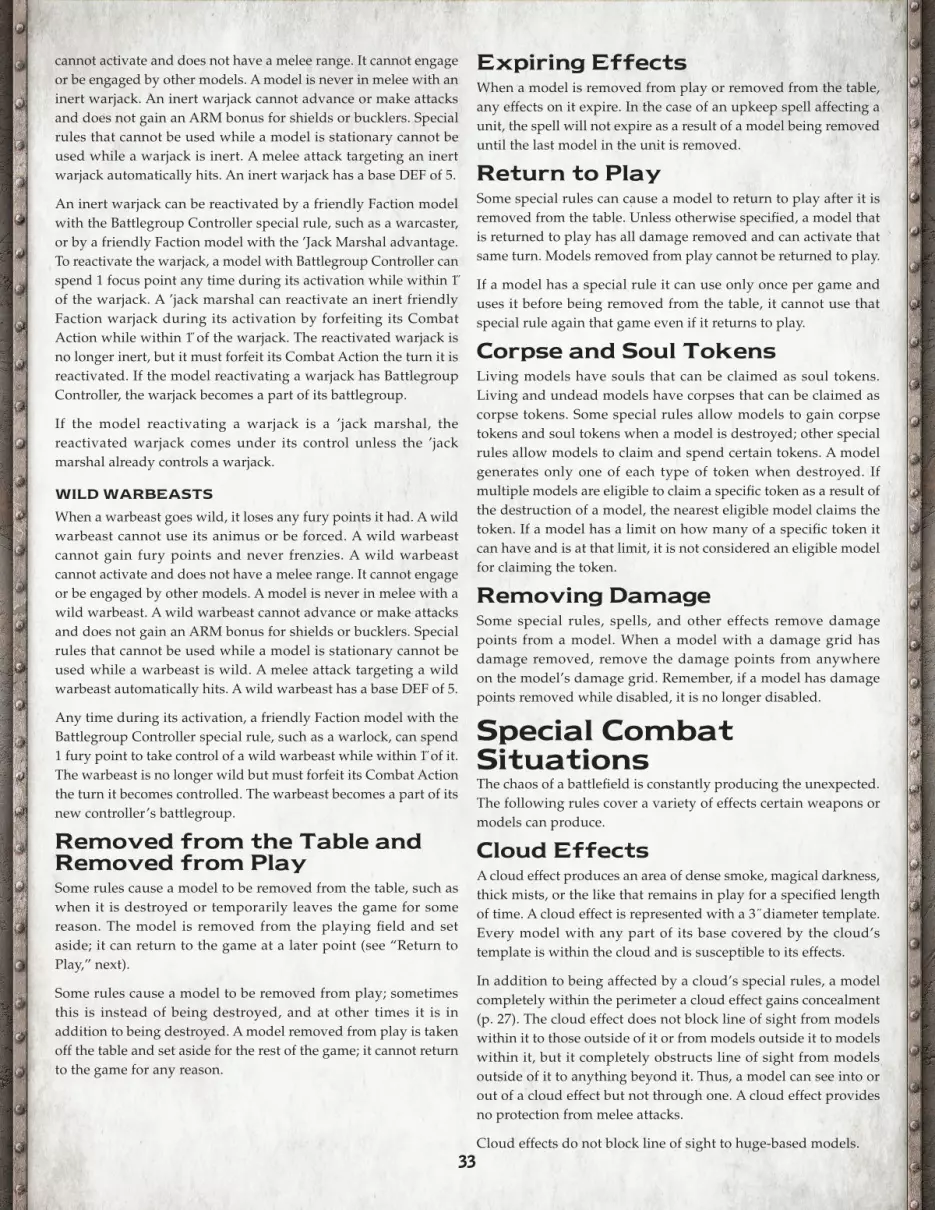
33
cannot activate and does not have a melee range. It cannot engage or be engaged by other models. A model is never in melee with an inert warjack. An inert warjack cannot advance or make attacks and does not gain an ARM bonus for shields or bucklers. Special rules that cannot be used while a model is stationary cannot be used while a warjack is inert. A melee attack targeting an inert warjack automatically hits. An inert warjack has a base DEF of 5.
An inert warjack can be reactivated by a friendly Faction model with the Battlegroup Controller special rule, such as a warcaster, or by a friendly Faction model with the ’Jack Marshal advantage. To reactivate the warjack, a model with Battlegroup Controller can spend 1 focus point any time during its activation while within 1 ̋ of the warjack. A ’jack marshal can reactivate an inert friendly Faction warjack during its activation by forfeiting its Combat Action while within 1 ̋ of the warjack. The reactivated warjack is no longer inert, but it must forfeit its Combat Action the turn it is reactivated. If the model reactivating a warjack has Battlegroup Controller, the warjack becomes a part of its battlegroup.
If the model reactivating a warjack is a ’jack marshal, the reactivated warjack comes under its control unless the ’jack marshal already controls a warjack.
WILD WARBEASTS
When a warbeast goes wild, it loses any fury points it had. A wild warbeast cannot use its animus or be forced. A wild warbeast cannot gain fury points and never frenzies. A wild warbeast cannot activate and does not have a melee range. It cannot engage or be engaged by other models. A model is never in melee with a wild warbeast. A wild warbeast cannot advance or make attacks and does not gain an ARM bonus for shields or bucklers. Special rules that cannot be used while a model is stationary cannot be used while a warbeast is wild. A melee attack targeting a wild warbeast automatically hits. A wild warbeast has a base DEF of 5.
Any time during its activation, a friendly Faction model with the Battlegroup Controller special rule, such as a warlock, can spend 1 fury point to take control of a wild warbeast while within 1 ̋ of it. The warbeast is no longer wild but must forfeit its Combat Action the turn it becomes controlled. The warbeast becomes a part of its new controller’s battlegroup.
Removed from the Table and Removed from PlaySome rules cause a model to be removed from the table, such as when it is destroyed or temporarily leaves the game for some reason. The model is removed from the playing field and set aside; it can return to the game at a later point (see “Return to Play,” next).
Some rules cause a model to be removed from play; sometimes this is instead of being destroyed, and at other times it is in addition to being destroyed. A model removed from play is taken off the table and set aside for the rest of the game; it cannot return to the game for any reason.
Expiring EffectsWhen a model is removed from play or removed from the table, any effects on it expire. In the case of an upkeep spell affecting a unit, the spell will not expire as a result of a model being removed until the last model in the unit is removed.
Return to PlaySome special rules can cause a model to return to play after it is removed from the table. Unless otherwise specified, a model that is returned to play has all damage removed and can activate that same turn. Models removed from play cannot be returned to play.
If a model has a special rule it can use only once per game and uses it before being removed from the table, it cannot use that special rule again that game even if it returns to play.
Corpse and Soul TokensLiving models have souls that can be claimed as soul tokens. Living and undead models have corpses that can be claimed as corpse tokens. Some special rules allow models to gain corpse tokens and soul tokens when a model is destroyed; other special rules allow models to claim and spend certain tokens. A model generates only one of each type of token when destroyed. If multiple models are eligible to claim a specific token as a result of the destruction of a model, the nearest eligible model claims the token. If a model has a limit on how many of a specific token it can have and is at that limit, it is not considered an eligible model for claiming the token.
Removing DamageSome special rules, spells, and other effects remove damage points from a model. When a model with a damage grid has damage removed, remove the damage points from anywhere on the model’s damage grid. Remember, if a model has damage points removed while disabled, it is no longer disabled.
Special Combat SituationsThe chaos of a battlefield is constantly producing the unexpected. The following rules cover a variety of effects certain weapons or models can produce.
Cloud EffectsA cloud effect produces an area of dense smoke, magical darkness, thick mists, or the like that remains in play for a specified length of time. A cloud effect is represented with a 3 ̋ diameter template. Every model with any part of its base covered by the cloud’s template is within the cloud and is susceptible to its effects.
In addition to being affected by a cloud’s special rules, a model completely within the perimeter a cloud effect gains concealment (p. 27). The cloud effect does not block line of sight from models within it to those outside of it or from models outside it to models within it, but it completely obstructs line of sight from models outside of it to anything beyond it. Thus, a model can see into or out of a cloud effect but not through one. A cloud effect provides no protection from melee attacks.
Cloud effects do not block line of sight to huge-based models.
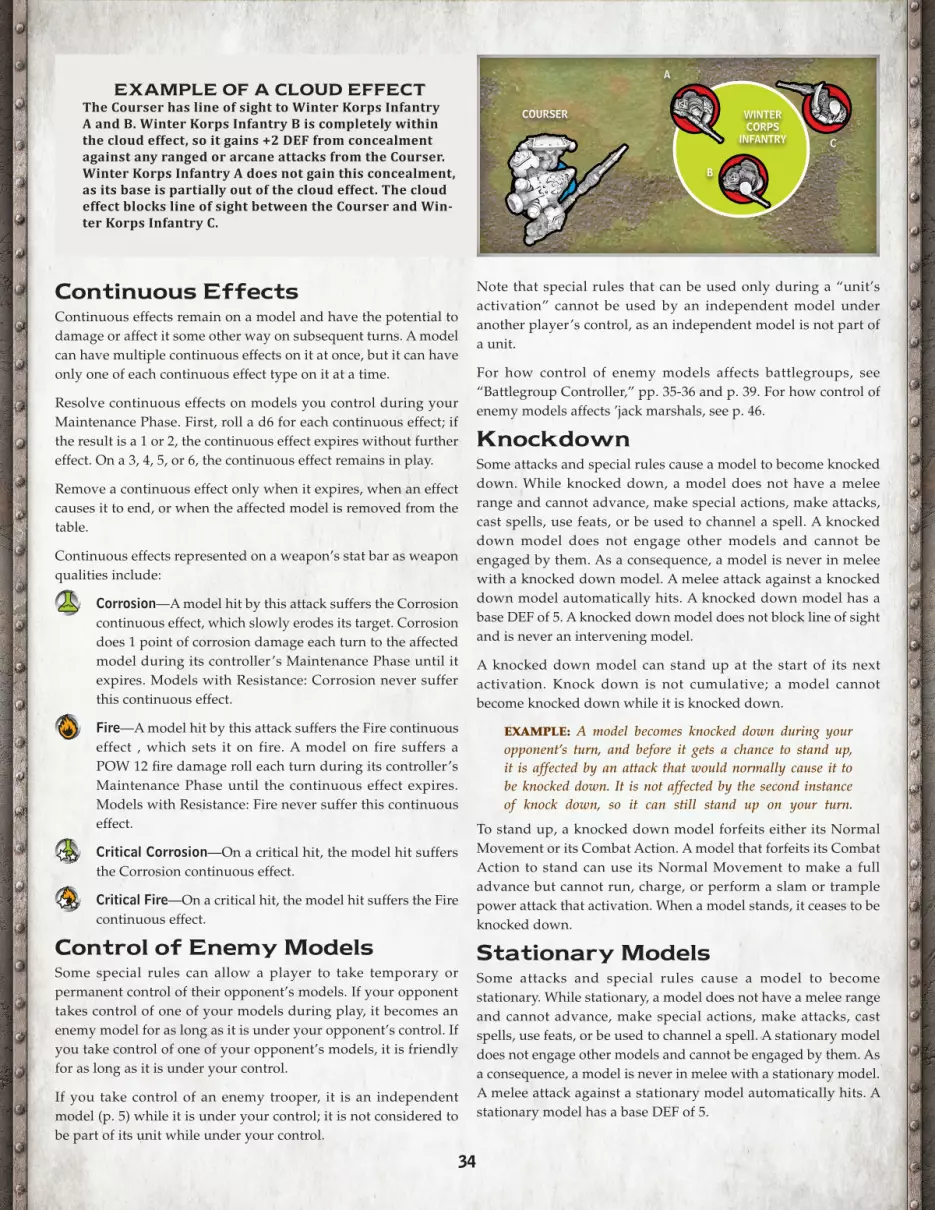
34
Continuous EffectsContinuous effects remain on a model and have the potential to damage or affect it some other way on subsequent turns. A model can have multiple continuous effects on it at once, but it can have only one of each continuous effect type on it at a time.
Resolve continuous effects on models you control during your Maintenance Phase. First, roll a d6 for each continuous effect; if the result is a 1 or 2, the continuous effect expires without further effect. On a 3, 4, 5, or 6, the continuous effect remains in play.
Remove a continuous effect only when it expires, when an effect causes it to end, or when the affected model is removed from the table.
Continuous effects represented on a weapon’s stat bar as weapon qualities include:
Corrosion—A model hit by this attack suffers the Corrosion continuous effect, which slowly erodes its target. Corrosion does 1 point of corrosion damage each turn to the affected model during its controller’s Maintenance Phase until it expires. Models with Resistance: Corrosion never suffer this continuous effect.
Fire—A model hit by this attack suffers the Fire continuous effect , which sets it on fire. A model on fire suffers a POW 12 fire damage roll each turn during its controller’s Maintenance Phase until the continuous effect expires. Models with Resistance: Fire never suffer this continuous effect.
Critical Corrosion—On a critical hit, the model hit suffers the Corrosion continuous effect.
Critical Fire—On a critical hit, the model hit suffers the Fire continuous effect.
Control of Enemy ModelsSome special rules can allow a player to take temporary or permanent control of their opponent’s models. If your opponent takes control of one of your models during play, it becomes an enemy model for as long as it is under your opponent’s control. If you take control of one of your opponent’s models, it is friendly for as long as it is under your control.
If you take control of an enemy trooper, it is an independent model (p. 5) while it is under your control; it is not considered to be part of its unit while under your control.
Note that special rules that can be used only during a “unit’s activation” cannot be used by an independent model under another player’s control, as an independent model is not part of a unit.
For how control of enemy models affects battlegroups, see “Battlegroup Controller,” pp. 35-36 and p. 39. For how control of enemy models affects ’jack marshals, see p. 46.
KnockdownSome attacks and special rules cause a model to become knocked down. While knocked down, a model does not have a melee range and cannot advance, make special actions, make attacks, cast spells, use feats, or be used to channel a spell. A knocked down model does not engage other models and cannot be engaged by them. As a consequence, a model is never in melee with a knocked down model. A melee attack against a knocked down model automatically hits. A knocked down model has a base DEF of 5. A knocked down model does not block line of sight and is never an intervening model.
A knocked down model can stand up at the start of its next activation. Knock down is not cumulative; a model cannot become knocked down while it is knocked down.
EXAMPLE: A model becomes knocked down during your opponent’s turn, and before it gets a chance to stand up, it is affected by an attack that would normally cause it to be knocked down. It is not affected by the second instance of knock down, so it can still stand up on your turn.
To stand up, a knocked down model forfeits either its Normal Movement or its Combat Action. A model that forfeits its Combat Action to stand can use its Normal Movement to make a full advance but cannot run, charge, or perform a slam or trample power attack that activation. When a model stands, it ceases to be knocked down.
Stationary ModelsSome attacks and special rules cause a model to become stationary. While stationary, a model does not have a melee range and cannot advance, make special actions, make attacks, cast spells, use feats, or be used to channel a spell. A stationary model does not engage other models and cannot be engaged by them. As a consequence, a model is never in melee with a stationary model. A melee attack against a stationary model automatically hits. A stationary model has a base DEF of 5.
EXAMPLE OF A CLOUD EFFECTThe Courser has line of sight to Winter Korps Infantry A and B. Winter Korps Infantry B is completely within the cloud effect, so it gains +2 DEF from concealment against any ranged or arcane attacks from the Courser. Winter Korps Infantry A does not gain this concealment, as its base is partially out of the cloud effect. The cloud effect blocks line of sight between the Courser and Win-ter Korps Infantry C.
COURSER
A
B
C
WINTER CORPS
INFANTRY
35
WARCASTERS & FOCUS
SPECIAL RULES & FOCUS MANIPULATION
Warcasters are highly trained combat arcanists as effective in martial combat as when wielding magical forces. A warcaster’s greatest function on the battlefield, however, is controlling warjacks.
Battles can be won or lost purely by how well a player manages their warcasters’ focus, the magical energy that lets them control warjacks and cast spells. Often a player must decide between casting a spell and allocating focus to the warjacks in the battlegroup—and that choice can easily make the difference between victory and defeat.
Warcaster Special RulesAll warcasters have the following special rules in common.
Focus ManipulationThis model has an Arcana stat (ARC) that determines how many focus points it gains each turn. During your Control Phase, this model replenishes its focus points so that it has a number equal to its current ARC. This model begins the game with a number of focus points equal to its ARC. Unless otherwise stated, a model can spend focus points only during its activation.
A model with the Focus Manipulation special rule has a control range and can spend its focus points for additional melee attacks, to boost attack and damage rolls, and to shake some effects. During its controller ’s Maintenance Phase, a model with the Focus Manipulation special rule loses all focus points in excess of its ARC stat.
A warjack must be in its battlegroup commander’s control range to power up, to be allocated focus points from the warcaster, or to channel spells (p. 44).
Focus: Additional AttackA model with the Focus Manipulation special rule can spend focus points to make additional melee attacks as part of its Combat Action (p. 18). It can make one additional attack for each focus point spent. Some models have special rules that enable them to also spend focus points to make additional ranged attacks.
Focus: BoostA model with the Focus Manipulation special rule can spend 1 focus point to boost any of its attack or damage rolls during its activation. Add an extra die to the boosted roll. Boosting must be declared before rolling any dice for the roll. Remember, a particular roll can be boosted only once, but a model can boost as many different rolls as you choose and can afford.
Focus: Shake EffectDuring your Control Phase after allocating focus, a model with the Focus Manipulation special rule can spend focus points for the following:
• If the model is knocked down (p. 34), it can spend 1 focus point to stand up.
• If the model is stationary (p. 34), it can spend 1 focus point to cause the stationary status to expire.
• If the model is suffering an effect like Blind or Shadow Bind that can be shaken, it can spend 1 focus point to cause the effect to expire.
Battlegroup ControllerThis model can control a group of warjacks. This model and the ’jacks it controls are collectively referred to as a battlegroup. This model can allocate focus points to warjacks in its battlegroup and can channel spells (p. 44) through warjacks in its battlegroup with the Arc Node advantage.
As warcasters and warjacks are independent models, each model in a battlegroup can move freely about the battlefield separate from the rest of the group. Although warjacks usually benefit from remaining within their battlegroup controller ’s control range, they are not required to do so.
Only friendly models can be part of a battlegroup. If a rule causes a ’jack to become an enemy model, it is not part of its original battlegroup while that rule is in effect.
FOCUS POINTSUse something countable, such as coins, beads, or tokens, to represent focus points. During a player’s Control Phase, replenish the focus points of that player’s warcaster by placing tokens next to the model so that it has a number of tokens equal to its current ARC. These tokens can later be allocated to eligible warjacks in that warcaster’s battlegroup by moving them next to those models. Remove focus point tokens from the table as they are used.
Control rangeA model with the Focus Manipulation special rule has a Control Range stat (CTRL) that determines the radius of the model’s control range. A control range is a circular area centered on the model with a radius that extends out from the edge of its base a number of inches equal to its current CTRL. Some spells and feats use the control range, noted as “CTRL,” as their range or area of effect. A model is always considered to be in its own control range.
36
If an effect causes a battlegroup controller to fall under your opponent’s control, while the model is controlled by your opponent, the warjacks in its battlegroup remain under your control and become autonomous (p. 38). If you regain control of the battlegroup controller, it resumes control of the warjacks in its battlegroup unless some other model has already taken control of them.
Power UpWarjacks are empowered by the mere presence of their controlling warcaster on the battlefield. During the Control Phase, each warjack with a functional cortex in a battlegroup that is in its controller’s control range (p. 35) gains 1 focus point. A warjack with a crippled cortex or no cortex at all cannot power up and does not gain this focus. A warjack can have no more than 3 focus points at any time, and a warjack with a crippled cortex cannot gain focus from powering up.
Allocating Focus Points
In addition to focus points gained from powering up, a battlegroup commander can allocate additional focus points to the warjacks in its battlegroup during your Control Phase. A warjack must be in its battlegroup commander’s control range to be allocated focus, though it need not be in its line of sight. A warjack can have no more than 3 focus points at any time, and a warjack with a crippled cortex cannot be allocated focus.
A battlegroup commander cannot allocate focus points to warjacks in another model’s battlegroup, even if they are both part of the same army.
CommanderA warcaster is a Commander model.
FeatEach warcaster has a unique feat that can turn the tide of battle if used at the right time. A warcaster can use this feat at any time during its activation. A warcaster can use its feat only once per game.
Remember that because a warcaster can use its feat at any time, it can do so before moving, after moving, before making an attack, or after making an attack but not while moving or attacking (see “Use of ‘Any Time’ Special Rules,”p. 3).
Power FieldWarcaster armor is perhaps the most sophisticated blend of magic and mechanics to be found anywhere. Besides its seemingly impossible strength, this armor creates a magical field to surround and protect the warcaster from damage that would rend a normal individual to pieces.
At any time during its activation, this model can spend focus points to remove damage it has suffered. For each focus point spent this way, the model can remove 1 damage point.
Reinforcing the Power FieldWhen a model with the Power Field special rule would suffer damage, it can immediately spend up to 1 focus point to reduce the damage it would suffer by 5. The model is still considered to have suffered damage even if the damage is reduced to 0 or less. Excess damage prevention is lost.
EXAMPLE: Sabbreth, The Eternal Annihilation has 2 focus points left and is hit by an attack that deals her 13 damage. She can spend 1 focus point to reduce the damage she suffers to 8.
EXAMPLE: Major Anson Wolfe has 1 focus point left and is hit by an attack that deals him 4 damage. He can spend his focus point to reduce the damage to 0. He is still considered to have suffered damage.
SpellcasterThis model can cast spells by paying the COST of the spells in focus points (p. 43).
Racking SpellsIn addition to the spells they start with, some warcasters have options for selecting, or racking, additional spells. The number of spells a warcaster can rack is described on their spell card. You can choose to rack any spells available to your warcaster’s Faction. Racking spells takes place at the start of the game with both players revealing their spell selections simultaneously. Once racked, a warcaster’s spells cannot be changed during a game.
EXAMPLE: Erik and Loren are about to start a game. Erik is playing a Cygnar army commanded by Captain Athena di Baro and Loren is playing an Orgoth army commanded by Horruskh, The Thousand Wraths. Each warcaster has two rack slots. Erik selects Arcane Shield and Snipe for Brisbane’s rack. Loren selects Unnatrual Darkness and Windstorm for Horruskh’s rack. Before starting the game, Erik and Loren simultaneously reveal their rack rack selections, which will not change during the game.
37
WARJACKSSPECIAL RULES & SPENDING FOCUS POINTS
Warjacks represent the pinnacle of military technology in the Iron Kingdoms and are the greatest assets in a warcaster’s arsenal. They are equipped with a broad variety of melee and ranged weaponry and embody the strengths of their respective Factions. A single warjack can annihilate dozens of soldiers, and several warjacks working together comprise a threat no enemy can ignore.
Warjack Special RulesAll warjacks have the following special rules in common.
All warjacks have the Construct advantage and are not living models.
CortexWarjacks can gain focus. A warjack can have no more than 3 focus points at any time. Unless otherwise stated, a warjack can spend focus points only during its activation. Remember, a warjack cannot gain or spend focus while its Cortex system is crippled (p. 31).
Damage GridWarjacks have damage grids. A warjack is not destroyed until all the boxes in its damage grid are marked. See “Recording Damage” on p. 31 for details.
Focus: Additional AttackA warjack can spend focus to make additional melee attacks as part of its Combat Action (pp. 17-18). It can make one additional attack for each focus point spent. Some models possess special rules that also enable them to spend focus points to make additional ranged attacks.
Focus: BoostA warjack can spend 1 focus point to boost any of its attack rolls or damage rolls during its activation. Add an extra die to the boosted roll. Boosting must be declared before rolling any dice for the roll. Remember, a particular roll can be boosted only once, but a warjack can boost as many different rolls as you choose and can afford.
Focus: Run or ChargeA warjack must spend 1 focus point in order to use its Normal Movement to run or charge.
Focus: Shake EffectDuring your Control Phase after allocating focus, a warjack can spend focus points for the following:
• If the warjack is knocked down, it can spend 1 focus point to stand up.
• If the warjack is stationary, it can spend 1 focus point to cause the stationary status to expire.
• If the warjack is suffering an effect like Blind or Shadow Bind that can be shaken, it can spend 1 focus point to cause the effect to expire.
Power AttacksWarjacks can make power attacks. To make a power attack, a warjack must spend 1 focus point. For the rules for power attacks and their requirements, see “Power Attacks,” p. 24.
MERCENARY WARJACKSRemember, Mercenary warjacks can only be part of battlegroups controlled by Mercenary warcasters. Inert Mercenary warjacks (p. 52) can be controlled and reactivated only by Mercenary warcasters and Mercenary ’jack marshals. Likewise, a Mercenary warcaster or ’jack marshal can control and reactivate only Mercenary warjacks.
ColossalsColossals are the largest and most powerful warjacks ever to stride the battlefield. As a result of their great size and raw power, there are a number of special rules that apply to colossals but not to smaller warjacks.
A colossal is a huge-based (120 mm) warjack.
Controlling a ColossalColossals must be assigned to a battlegroup and cannot begin the game under the control of a ’jack marshal. A colossal can never be controlled by a ’jack marshal. If a ’jack marshal reactivates an inert (p. 33) colossal, the colossal becomes autonomous (see “Autonomous Warjacks,” p. 38) instead of coming under the ’jack marshal’s control.
Your opponent can never take control of your colossal.
Colossal MovementA colossal can advance only during its Normal Movement. A colossal can never be placed.
Great MachineA colossal never suffers Disruption. A colossal can never gain Advance Deployment, Incorporeal, or Stealth.
MassiveA colossal cannot be pushed, knocked down, or made stationary. A colossal cannot be moved by a slam or throw. A colossal is never affected by the rule of least disturbance. A colossal cannot be affected by the Grievous Wounds special rule. If a colossal would require another huge-based model to move through the rule of least disturbance, instead, the moving colossal is moved backward along its most recent line of movement until it can be legally placed.
38
Superstructure SystemDue to their immense size and the complexity of their unique systems some colossals have a superstructure system. The (S) boxes of a colossal’s damage grid represent a Superstructure system. A colossal’s special rules determine the effects of a crippled Superstructure system.
CustomizationSome warjacks are customizable. See Warjack Customization, p. 51 for details.
Autonomous WarjacksAn autonomous warjack is a warjack that does not have a controller and is not part of a battlegroup. A warjack becomes autonomous when its controlling ’jack marshal (p. 46) is destroyed or removed from play or while its controller is under an opponent’s control.
An autonomous warjack acts normally but does not gain the benefits of being marshaled or being part of a battlegroup. A warjack must have a controller at the start of the game; it cannot begin the game autonomous.
A friendly Faction model with the Battlegroup Commander special rule, such as a warcaster, or a friendly Faction model with ’Jack Marshal can take control of an autonomous warjack. A ’jack marshal that is already controlling a warjack cannot take control of an autonomous warjack.
To take control of an autonomous warjack, a friendly Faction model with the Battlegroup Controller special rule must spend 1 focus point during its activation while within 1 ̋ of the warjack. A ’jack marshal can take control of an autonomous friendly Faction warjack during its activation by forfeiting its Combat Action while within 1 ̋ of the warjack. If the model taking control of the warjack has the Battlegroup Controller special rule, the warjack becomes a part of its battlegroup.
39
WARLOCKS & FURYSPECIAL RULES & FURY MANIPULATION
Warlocks are potent shamans and deadly warriors as effective in martial combat as when wielding magical forces. A warlock’s greatest talent, however, is controlling warbeasts.
Battles can be won or lost purely by how well a player manages their models’ fury and how they force their warbeasts. Players need to know not only where to boost an attack or cast a spell but also how far they are willing to push the warbeasts under their control. Choosing poorly can result in a frenzied warbeast charging ahead of the rest of the army—or worse, assaulting its controlling warlock in a blind rage.
Warlock Special RulesAll warlocks have the following special rules in common.
Battlegroup ControllerThis model can control a group of warbeasts. This model and the warbeasts it controls are collectively referred to as a battlegroup. This model can force the warbeasts in its battlegroup.
As warlocks and warbeasts are independent models, each model in a battlegroup can move freely about the battlefield separate from the rest of the group. Although warbeasts usually benefit from remaining within their battlegroup controller ’s control range, they are not required to do so.
Only friendly models can be part of a battlegroup. If a rule causes a warbeast to become an enemy model, it is not part of its original battlegroup while that rule is in effect.
If an effect causes a battlegroup controller to fall under your opponent’s control, while the model is controlled by your opponent, the warbeasts in its battlegroup remain under your control but are not considered to be part of their former controller’s battlegroup. If you regain control of the battlegroup controller, it resumes control of the warbeasts in its battlegroup unless some other model has already taken control of them.
CommanderA warlock is a Commander model.
FeatEach warlock has a unique feat that can turn the tide of battle if used at the right time. A warlock can use this feat at any time during its activation. A warlock can use its feat only once per game.
Remember that because a warlock can use its feat at any time, it can do so before moving, after moving, before making an attack, or after making an attack but not while moving or attacking (see “Use of ‘Any Time’ Special Rules,” p. 3).
Fury ManipulationThis model has an Arcana stat (ARC) that determines how many fury points it can gain each turn.
This model begins the game with a number of fury points equal to its ARC. During your Control Phase, this model replenishes its fury points by leeching fury from the warbeasts in its battlegroup. This model cannot exceed its ARC stat in fury points as a result of leeching (see below). Unless otherwise stated, this model can spend fury points only during its activation.
A model with the Fury Manipulation special rule has a control range and can spend its fury points for additional melee attacks, to boost attack and damage rolls, and to shake some effects. During its controller’s Maintenance Phase, a model with the Fury Manipulation special rule loses all fury points in excess of its ARC stat.
Control rangeA model with the Fury Manipulation special rule has a Control Range stat (CTRL) that determines the radius of the model’s control range. A control range is a circular area centered on the model with a radius that extends out from the edge of its base a number of inches equal to its current CTRL. Some spells and feats use the control range, noted as “CTRL,” as their range or area of effect. A model is always considered to be in its own control range.
A warbeast must be in its battlegroup commander’s control range to be forced or for the battlegroup commander to leech fury points from it.
Forcing WarbeastsA model with the Fury Manipulation special rule can force its warbeasts as long as they meet the following criteria. The warbeast must be in the battlegroup commander’s own battlegroup and in its control range, though the warbeast need not be in its battlegroup commander’s line of sight. A battlegroup commander cannot force warbeasts in another model’s battlegroup even if they are both part of the same army.
LeechingDuring its controlling player’s Control Phase, a model with the Fury Manipulation special rule can leech fury points from warbeasts in its battlegroup that are in its control range. Fury points leeched from a warbeast are removed from it and placed on this model.
This model can also leech fury points from its own life force during its controlling player’s Control Phase. For each fury point a model leeches in this way, it suffers 1 damage point. This damage cannot be transferred.
This model can leech any number of fury points but cannot exceed its ARC in fury points as a result of leeching. Leeching is performed at the start of the Control Phase before threshold checks are made or fury is spent to upkeep spells.
40
EXAMPLE: If a warlock with ARC 7 begins its controlling player’s turn with 2 fury points, it can leech up to 5 additional fury points from warbeasts in its battlegroup that are in its control range, but it cannot leech more than 5 because the additional points would cause it to exceed its ARC.
Spirit BondAfter leeching, a model with the Fury Manipulation special rule can additionally gain up to 1 fury point for each medium-based or larger warbeast that was part of its battlegroup and has been destroyed or removed from play. If a destroyed warbeast returns to play for any reason, this model can no longer gain fury points for that warbeast from Spirit Bond while that warbeast remains in play. A model cannot exceed its FURY in fury points as a result of Spirit Bond.
ReavingA model with the Fury Manipulation special rule is able to capture the life essence of its warbeasts as they are destroyed or removed from play. When a warbeast in its battlegroup is destroyed or removed from play while in its control range, this model can reave the fury points on the warbeast. Before removing the warbeast from the table, remove its fury points and place them on the reaving model. A model cannot reave fury points from a warbeast in its battlegroup that was destroyed or removed from play by a friendly attack or as a result of transferring damage to the warbeast.
Some special rules enable a model that does not control a warbeast to reave its fury points. The fury points of a warbeast that was destroyed or removed from play can only ever be reaved by a single model, however.
A model cannot exceed its FURY in fury points as a result of reaving. Excess fury points gained from reaving are lost.
Fury: Additional AttackA model with the Fury Manipulation special rule can spend fury points to make additional melee attacks as part of its Combat Action (p. 17). It can make one additional attack for each fury point spent. Some models have special rules that enable them to also spend fury points to make additional ranged attacks.
Fury: BoostA model with the Fury Manipulation special rule can spend 1 fury point to boost any of its attack or damage rolls during its activation. Add an extra die to the boosted roll. Boosting must be declared before rolling any dice for the roll. Remember, a particular roll can be boosted only once, but a model can boost as many different rolls as you choose and can afford.
Fury: Shake EffectDuring your Control Phase after leeching fury, a model with the Fury Manipulation special rule can spend fury points for the following:
• If the model is knocked down (p. 34), it can spend 1 fury point to stand up.
• If the model is stationary (p. 34), it can spend 1 fury point to cause the stationary status to expire.
• If the model is suffering an effect like Blind or Shadow Bind that can be shaken, it can spend 1 fury point to cause the effect to expire.
Shedding FuryDuring its activation, a model with the Fury Manipulation special rule can remove any number of fury points from itself, even if it runs.
Transferring DamageWhen this model would suffer damage, it can spend 1 fury point to transfer that damage to a warbeast in its battlegroup that is in its control range. The warbeast suffers the damage instead of this model. Determine where to mark the damage normally. When this model transfers damage to a warbeast, damage exceeding the warbeast’s unmarked damage boxes is applied to this model and cannot be transferred again. This model cannot transfer damage to a warbeast that currently has a number of fury points equal to its FURY. This model is still considered to have suffered damage even if the damage is transferred. Models unable to suffer transferred damage cannot have damage transferred to them.
EXAMPLE: A warlock with one unmarked damage box remaining is hit by an enemy attack and would suffer 10 damage points. The warlock spends 1 fury point and transfers the damage to a warbeast in his battlegroup. Unless the warbeast has at least ten unmarked damage boxes, the remaining damage will be suffered by the warlock.
HealingAt any time during its activation, this model can heal by spending fury points to remove damage it has suffered. This model can also spend fury points to remove damage suffered by warbeasts in its battlegroup that are in its control range. For each fury point spent this way, this model can remove 1 damage point.
SpellcasterThis model can cast spells by paying the COST of the spells in fury points. In addition to the spells listed on its card, a battlegroup commander can also cast the animi (p. 43-44) of the warbeasts in its battlegroup that are in its control range.
41
WARBEASTSSPECIAL RULES, FORCING & FRENZY
Living engines of rage, warbeasts are the greatest assets in a warlock’s arsenal. They are equipped with a broad variety of melee and ranged weaponry and embody the primal power of their respective Factions. A single warbeast can annihilate dozens of warriors, and several warbeasts working together comprise a threat no enemy can ignore.
Warbeast Special RulesAll warbeasts have the following special rules in common.
Life SpiralWarbeasts have life spirals. A warbeast is not destroyed until all the damage boxes in its life spiral are marked. See “Recording Damage” on p. 31 for details.
Warbeast ConstructsWarbeasts with the Construct advantage never make threshold checks and cannot be healed.
Fury & ForcingA warbeast is a primal creature that reaches its full potential only when under the control of a battlegroup controller such as a warlock, who impels it through strength of will for a desired effect, such as an additional attack. This is called forcing.
Only a model with the Fury Manipulation special rule can force a warbeast, and then it can only force a warbeast that is part of its battlegroup. A warbeast can be forced only while in its controller’s control range, but it does not need to be in its controller’s line of sight to be forced.
When a warbeast is forced, declare the desired effect and place a number of fury points on it according to the rules of the effect. A warbeast can be forced several times during its activation, but it can never have a fury point total higher than its current Fury stat, or FURY. A warbeast cannot be forced if the fury points gained would cause it to exceed its current FURY.
If a warbeast’s current FURY is reduced for any reason, immediately remove excess fury points. Fury points remain on warbeasts until removed by leeching, reaving, frenzying, or a special rule.
Wild warbeasts cannot gain fury points or be forced.
Forced: Additional AttackA warbeast can be forced to make additional melee attacks as part of its Combat Action (p. 17). It gains 1 fury point and can make one additional attack each time it is forced. Some warbeasts possess special rules that also enable them to be forced to make additional ranged attacks.
Forced: BoostA warbeast can be forced to boost any of its attack rolls or damage rolls during its activation. Add an extra die to the boosted roll. Boosting must be declared before rolling any dice for the roll. Remember, a particular roll can be boosted only once, but a warbeast can boost as many different rolls as you choose and can afford to force it. Each time a warbeast is forced to boost an attack or damage roll, it gains 1 fury point.
Forced: RileDuring its activation, a warbeast can be riled, or forced for the sole purpose of gaining fury points. When a warbeast is riled, it can gain any number of fury points but cannot exceed its current FURY. A warbeast can be riled even if it runs.
Forced: Run or ChargeA warbeast must be forced in order to use its Normal Movement to run or charge. When a warbeast is forced to run or charge, it gains 1 fury point.
Forced: Shake EffectDuring your Control Phase after resolving threshold checks and frenzies, a warbeast can be forced for the following:
• If the warbeast is knocked down, it can be forced to stand up.
• If the warbeast is stationary, it can be forced to cause the stationary status to expire.
• If the warbeast is suffering an effect like Blind or Shadow Bind that can be shaken, it can be forced to cause the effect to expire.
A warbeast gains 1 fury point each time it is forced to shake an effect.
AnimiWarbeasts have dormant arcane spells called animi that can be tapped by the warlocks who control them. See “Animi” on p. 43 for details.
Power AttacksWarbeasts can make power attacks. To make a power attack, a warbeast must be forced. When a warbeast is forced to make a power attack, it gains 1 fury point. For the rules for power attacks and their requirements, see “Power Attacks,” p. 24.
Threshold & FrenzyTapping into the primal energies of vicious warbeasts is not without risks. The fury accumulated by a warbeast can potentially send it into a blind rage, causing it to frenzy. During your Control Phase, after your warlocks have leeched fury from their warbeasts and spent fury to upkeep their spells, each of your warbeasts with 1 or more fury points remaining on it must make a successful threshold check or frenzy. To make a threshold check, roll 2d6
42
and add 1 to the roll for each fury point on the warbeast. If the roll exceeds the warbeast’s current Threshold (THR) stat, it fails and frenzies.
EXAMPLE: During his Control Phase, Matt makes a threshold check for his warbeast, which has 3 fury points on it. Matt rolls 2d6 and adds 3 to the roll for the warbeast’s fury points. He then compares the result to the warbeast’s THR of 9. If Matt rolls 6 or less (the warbeast’s THR of 9 – 3 fury points = 6), the warbeast passes the threshold check and nothing happens. If he rolls 7 or more, the warbeast frenzies because the result exceeds its THR.
When a model frenzies:
1. It immediately activates.
2. Without being forced, it automatically shakes knockdown, stationary, and any other effects that can be shaken. A frenzied warbeast also ignores effects that would cause it to forfeit its Normal Movement or Combat Action during an activation in which it frenzies.
3. It immediately charges directly toward the closest model in its line of sight without being forced, even if the closest model is a friendly model. The frenzied warbeast cannot voluntarily stop its movement before contacting its charge target.
4. It makes one attack against the model it charged with the highest-POW melee weapon that has range to the target. The attack roll is automatically boosted. If the warbeast moved at least 3˝ during the charge, the attack is a charge attack and its damage roll is boosted. A frenzied warbeast cannot make Assault ranged attacks or additional attacks. After resolving this attack the warbeast's activation immediately ends.
5. At the end of the warbeast’s frenzy activation, it is no longer frenzied, and you can remove any number of fury points from it.
If two or more models are closest to the warbeast when it frenzies, randomly determine which of those models it charges.
Because a frenzied warbeast activates during the Control Phase, it cannot activate during its controller’s Activation Phase that turn. During the frenzy activation, a frenzied warbeast can only take its Normal Movement and Combat Action as described above. It cannot be forced, cast its animus, or make special actions. If a frenzied warbeast cannot immediately activate or if it cannot charge, it loses its activation and is no longer frenzied, and you can remove any number of fury points from it.
GargantuansThe gargantuans are the largest and most powerful warbeasts ever to stride the battlefield. As a result of their great size and raw power, there are a number of special rules that apply to gargantuans but not to smaller warbeasts.
A gargantuan is a huge-based (120 mm) warbeast.
Controlling a GargantuanGargantuans must be assigned to a battlegroup. Your opponent can never take control of your gargantuan.
Gargantuan MovementA gargantuan can only advance during it Normal Movement. A gargantuan can never be placed.
Great BeastA gargantuan can never gain Advance Deployment, Incorporeal, or Stealth .
MassiveA gargantuan cannot be pushed, knocked down, or made stationary. A gargantuan is never affected by the rule of least disturbance. A gargantuan cannot be moved by a slam or throw. A gargantuan cannot be affected by the Grievous Wounds special rule. If a gargantuan would require another huge-based model to move through the rule of least disturbance, instead, the moving gargantuan is moved backward along its most recent line of movement until it can be legally placed.
CustomizationSome warjacks are customizable. See Warbeast Customization, p. 52 for details.
MERCENARY WARBEASTSRemember, Mercenary warbeasts can be controlled only by Mercenary warlocks. Likewise, a Mercenary warlock can control only Mercenary warbeasts.
43
SPELLS, SPELLCASTING &
ANIMIRULES FOR CASTING SPELLS & ANIMI
Some models have the ability to cast spells during their activations. Models with the ARC stat, like warcasters and warlocks, cast spells by paying the spell’s COST in focus or fury points. Models with Magic Ability (p. 30) cast spells by making a special action or special attack.
A spell’s point of origin (p. 21) is the model casting the spell or the model through which the spell is channeled (p. 44).
Spell TargetingWhen a spell is cast, declare its target. A spell can target any model in the spellcaster’s line of sight. Non-offensive spells with a numeric RNG can also target the spell’s point of origin.
Many spells can target only certain types of models, such as warjacks or enemy troopers. Such restrictions are noted in the spell’s description. To abbreviate these targeting restrictions, when a spell’s description mentions an effect against a “target X,” the spell can be cast only on that type of model.
EXAMPLE: Lieutenant Sara Brisbane’s Open Fire spell states, “Target warjack in this model’s battlegroup that is in its control range can immediately make one basic ranged attack. A model can be targeted by Open Fire only once per turn.” Therefore, when Brisbane casts this spell, it can target only a warjack in her battlegroup.
Casting a Spell with Magic AbilityThe spells a model with the Magic Ability special rule can cast are listed in its entry under Magic Ability. Magic Ability special attacks are arcane attacks (p. 30).
Casting a Spell with Focus or FuryA model with the ARC stat can cast any number of spells during its activation for which it can pay the COST. A spell can be cast multiple times per activation if the COST can be paid.
A model can cast spells by spending focus or fury points at any time during its activation. Additionally, because a model can cast a spell at any time, it can cast a spell before moving, after moving, before making an attack, or after resolving an attack but not while moving or attacking (see “Use of ‘Any Time’ Special Rules,” p. 3).
EXAMPLE: A warcaster or warlock could cast a spell, move, use its Combat Action to make a melee attack, cast two more spells, and then spend another focus point to make an additional melee attack.
AnimiWarbeasts have dormant arcane spells called animi that can be tapped by the warlocks who control them. A warbeast can be forced to cast its animus, or the warlock whose battlegroup the warbeast is part of can treat the animus as if it were one of its own spells while the warbeast is in its control range.
A warbeast can be forced to cast its animus only once per activation at any time. Additionally, because a warbeast can be forced to cast its animus at any time, it can be forced to cast its animus before moving, after moving, before making an attack, or after resolving an attack but not while moving or attacking (see “Use of ‘Any Time’ Special Rules,” p. 3).
Instead of gaining only 1 fury point when it is forced to cast its animus, the warbeast gains a number of fury points equal to the COST of the animus. A warbeast cannot exceed its FURY in fury points as a result of casting its animus. If the fury points gained by casting its animus would cause a warbeast’s fury point total to exceed its FURY, it cannot cast the animus.
Remember that a model that casts an animus, whether it is a warbeast or a warlock, is considered to be casting a spell, so if a rule prohibits a model from casting a spell, that model also cannot
SPELLCASTERSWhen a spell’s description references “the spellcaster,” it refers to the model that cast the spell.
Measuring the Range of a SpellMeasure the range (RNG) of a spell from the edge of the point of origin’s base to the target, up to the maximum range of the spell. If the nearest edge of the target model’s base is within the maximum range of the spell, the target is in range.
If the target is in range and the spell is not an offensive spell, apply the spell’s effects. If the target is beyond maximum range, the spell does not take effect.
If the target is in range and the spell is an attack, make an arcane attack roll. If the target is beyond maximum range, the spell automatically misses.
44
be forced to cast an animus.
A model or unit can have only one friendly animus in play on it at any time. If another friendly animus is cast on the same model or unit, the older friendly animus expires and is replaced by the new one when the affected model is affected by the animus. The older friendly animus expires even if only a single model in the unit is affected by the new friendly animus.
If an animus affecting a unit expires on one model in the unit, it expires on all models in the unit.
Spell & Animus StatisticsAnimi and spells cast using focus or fury points are defined by the following six statistics. If a stat is listed as “*,” the spell does not use the stat in a normal way and contains special rules relating to that aspect of the spell.
COST—The number of focus or fury points that must be spent to cast the spell or the number of fury points a warbeast gains by being forced to cast its animus.
RNG, Range—The maximum distance in inches from the spell’s point of origin to its target (see “Measuring the Range of a Spell,” p. 43). A RNG of “SELF” indicates the spell can target only the model casting it. A RNG of “CTRL” indicates the spell can target any model in the spellcaster ’s control range. Remember, the spellcaster needs line of sight to a model to target it.
AOE, Area of Effect—When resolving a direct hit with an offensive spell with an AOE, this determines how many inches away from the target that other models will suffer blast damage. It also determines the potential number of models that can suffer blast damage from the attack. (See p. 29 for detailed rules on AOE attacks.)
Any spell with an AOE of “CTRL” is centered on the spellcaster and affects models in its control range.
POW, Power—The POW forms the basis of the spell’s damage roll. This damage is magical. A spell with POW “—” does not inflict damage. When resolving a direct hit with an offensive spell with an AOE, the number after the “/” is the POW of blast damage inflicted by the weapon. (See p. 29 for detailed rules on AOE attacks.)
Duration—Determines how long the spell effect remains in play. Spells generally have a duration of one turn (TURN) or one round (RND), are upkeep spells (UP), or have no duration past the resolution of their effect. Spells with a duration of “—” remain in play only long enough to resolve their effects. An upkeep spell remains in play if its spellcaster spends 1 focus point to maintain it during its controller’s Control Phase.
OFF, Offensive (Yes/No)—Determines whether the spell is an arcane attack (p. 30).
Upkeep SpellsUpkeep spells are spells that can be maintained from round to round. During your Control Phase, your models can spend focus or fury to keep their upkeep spells in play. Each upkeep
spell requires 1 focus or fury point for its upkeep every round. A model can maintain an upkeep spell even if the spell’s effects are outside that model’s control range. If focus or fury is not spent to maintain one of your upkeep spells during your Control Phase, the spell expires.
Remember, a spellcaster can have only one instance of each specific upkeep spell in play at a time, but it can maintain any number of different upkeep spells simultaneously if it spends enough focus points to do so. A model or unit can have only one friendly and one enemy upkeep spell in play on it at a time. If another upkeep spell is cast on a model or unit that already has one from the same side—friendly or enemy—the older upkeep spell expires and is replaced by the newer one when the affected model is hit by the spell. For a unit, the older upkeep spell expires even if only a single model in the unit is affected by the new upkeep spell. Likewise, an upkeep spell on one model expires if any model in its unit is affected by a new upkeep spell from the same side.
Pay particular attention to this restriction when casting upkeep spells with a target of “SELF.”
EXAMPLE: If Major Anson Wolfe has Lightning Tendrils upkept on another friendly model in play, casting Lightning Tendrils on himself would cause the previously upkept Lightning Tendrils to expire.
EXAMPLE: A unit of Shock Trooper Pikemen has the Iron Flesh spell in play on it. The Khador player decides it would be more beneficial to have the Weald Secrets spell affecting the unit instead and casts it, and the Iron Flesh spell is removed when he pays Weald Secrets’ COST. During the Orgoth player’s turn, Sabbreth, The Eternal Annihilation casts Crippling Grasp on the unit. This does not remove the Weald Secrets spell because an enemy upkeep spell does not replace a friendly one.
A model can recast any of its upkeep spells already in play. If this happens, the spell’s previous casting expires when the COST of the new casting is paid.
If an upkeep spell affecting a unit expires on one model in the unit, it expires on all models in the unit. However, upkeep spells on a unit will not expire as a result of a model being removed from the table until the last model in the unit is removed from the table.
When a spellcaster is destroyed or removed from play, its upkeep spells expire.
ChannelingSome models, known as channelers, can act as passive relays for spells and extend their effective range. The most common channelers are warjacks with the Arc Node advantage. A spellcaster can cast spells through any channeler in its battlegroup that is also within its control range. The spellcaster is still the model casting the spell and, if the spell is offensive, the attacker, but the channeler becomes the spell’s point of origin (p. 21). This means that eligible targets and the spell’s range are measured from the channeler and that the channeling model must have line
45
of sight to the spell’s target. Channeling a spell does not require the spellcaster to have line of sight to either the channeler or the spell’s target. There is no additional focus cost for channeling a spell.
A channeler that is stationary, knocked down, or engaged by an enemy model cannot channel spells. A channeler can be the target of a non-offensive spell it channels, but a spell with a RNG of “SELF” cannot be channeled. A channeler cannot be the target of an offensive spell channeled through it.
Make an arcane attack for a channeled offensive spell normally. The spellcaster can spend focus to boost die rolls.
Remember, the channeler is just a relay. Channeling a spell has no impact on the channeler’s own activation, for example. A channeling warjack’s focus points cannot be used to pay the spell’s COST or boost its rolls, for example. Nor can a channeling
warbeast be forced to pay the spell’s COST or boost its rolls.
Multiple Spell EffectsAlthough it is not possible to have more than one friendly upkeep spell and one enemy upkeep spell on a model or unit at a time, it is possible for a model or unit to be affected by more than one spell or animus at a time. Regardless of how many upkeep spells are affecting a model or unit, it can be affected by any number of non-upkeep spells and up to one friendly animus at the same time.
EXAMPLE: Lieutenant Sara Brisbane casts Open Fire on a Stryker warjack already under the effects of Arcane Shield. Arcane Shield does not expire when Open Fire is cast, because Open Fire is not an upkeep spell.
46
ADDITIONAL RULES’JACK MARSHALING, CAVALRY & MORE
’Jack Marshals ’Jack marshals are models with the ’Jack Marshal advantage. They are specialists who command their warjacks through a combination of gestures and commands shouted across the battlefield. Though not as efficient or as powerful as a warcaster’s, a ’jack marshal’s skills can guide a warjack to perform maneuvers it normally would not be able to manage on its own.
’Jack marshals can begin the game controlling warjacks. These warjacks are not part of any warcaster’s battlegroup. A ’jack marshal can control up to one Faction warjack at a time. Mercenary ’jack marshals can control and reactivate (see p. 52) only Mercenary warjacks.
If a ’jack marshal is destroyed or removed from the table, its warjack becomes autonomous (p. 38) but does not become inert.
A ’jack marshal can reactivate inert friendly Faction warjacks (see p. 32 for details). The reactivated warjack comes under the ’jack marshal’s control unless the ’jack marshal already controls a warjack; in that case, the reactivated warjack becomes autonomous. A ’jack marshal can also take control of an autonomous friendly Faction warjack (see p. 38 for details) if the ’jack marshal is not already controlling another warjack.
If an effect causes your ’jack marshal to fall under your opponent’s control, while your ’jack marshal is controlled by your opponent, the warjack under its control remain under your control and becomes autonomous. If you regain control of your ’jack marshal, the ’jack marshal resumes control of the warjack unless another model has already taken control of it. If an effect causes your ’jack marshaled warjack to fall under your opponent’s control, when you regain control of your ’jack, the ’jack marshal resumes control of it unless the ’jack marshal has already taken control of another warjack. In that case, the warjack becomes autonomous.
Battle EnginesBattle engines are powerful weapons of war. Battle engines are independent models with huge bases (120 mm). Battle engines are not warrior models. Most battle engines have the Construct advantage and are not living models.
MassiveA battle engine cannot be pushed, knocked down, or made stationary. A battle engine cannot be moved by a slam or throw. A battle engine is never affected by the rule of least disturbance. A battle engine cannot be affected by the Grievous Wounds special rule. If a battle engine would require another huge-based model to move through the rule of least disturbance, instead, the moving battle engine is moved backward along its most recent line of movement until it can be legally placed.
Cavalry Cavalry are models with the Cavalry advantage. In addition to all the standard rules for models of their types, cavalry models have the following additional rules in common.
Cavalry ChargeCavalry models gain boosted charge attack rolls.
DragoonsDragoons are models with a mounted stat card and a dismounted stat card. They begin the game mounted but can become dismounted during play.
When a mounted dragoon suffers damage, apply that damage to its mounted dragoon damage boxes. When all these damage boxes are marked, the dragoon becomes dismounted instead of disabled. Damage points in excess of the mounted dragoon’s remaining unmarked damage boxes are not applied to its dismounted damage boxes. If a dragoon becomes dismounted during its activation, its activation ends. Remove the mounted dragoon and replace it with the dismounted dragoon model (see “Replacing Models,” p. 17). Apply effects that were on the mounted dragoon to the dismounted dragoon. When the dismounted form replaces the mounted form, the dismounted form is not considered to have entered an area and does not trigger effects triggered by entering that area. Once this replacement is complete, any further damage the dragoon suffers will be applied to its dismounted dragoon damage boxes. The dragoon is disabled when all its dismounted damage boxes have been marked.
Flight Models with the Flights advantage can soar above the battlefield, greatly adding to their manueverability.
Moving Through Terrain & other ModelsA flying model model treats all non-impassable terrain as open terrain (p. 53) while advancing. It can advance through obstructions and other models if it has enough movement to move completely past them.
While charging, slam power attacking, or trample power attacking, this model does not stop its movement when it contacts an obstacle, an obstruction, or another model. This model ignores intervening models when declaring its charge target.
Knocked DownWhile knocked down or stationary, this model loses Flight.
Incorporeal Incorporeal models are spirits, wraiths, and shadows that roam the battlefield in a spectral form.
47
An incorporeal model does not count as an intervening model. An incorporeal model is immune to continuous effects and non-magical damage. An incorporeal model cannot be moved by a push, slam, or throw.
Moving Through Terrain & other ModelsAn incorporeal model treats all non-impassable terrain as open terrain (p. 53) while advancing. It can move through obstructions and through other models if it has enough movement to move completely past them.
While charging, slam power attacking, or trample power attacking, this model does not stop its movement when it contacts an obstacle, an obstruction, or another model. Other models, including slammed, pushed, or thrown models, can move through this model without effect if they have enough movement to move completely past it.
Engaging & DisengaGing an Incorporeal ModelAn incorporeal model does not have to forfeit its Combat Action when it advances or is placed out of one or more enemy models’ melee ranges during its Normal Movement. An enemy model does not have to forfeit its Combat Action when it advances or is placed out of an incorporeal enemy model’s melee range (see “Disengaging,” p. 23).
AttackingWhen an incorporeal model makes a melee or ranged attack, before the attack roll is made, it loses Incorporeal until the start of its next activation.
StructuresStructures represent fortifications, large and immobile artillery, sacred shrines, and other fixed positions that lend support to an army on the battlefield. Structures are independent models and are not warrior models.
Fixed PositionA structure cannot be moved or placed and has no Normal Movement. A structure is never affected by the rule of least disturbance. Because it has no Normal Movement, a structure cannot aim. A structure cannot engage or be engaged. A structure is never considered to be in melee.
A structure cannot become knocked down or be made stationary. A structure never suffers Blind.
A structure is automatically hit by melee attacks. A structure never gains the DEF bonus from concealment or cover. A structure cannot gain Incorporeal or Stealth .
A structure cannot be affected by the Grievous Wounds special rule.
Huge-Based ModelsStructures are considered to be huge base-models (120 mm) whether or not they are actually on bases.
48
PREPARING FOR WARSET UP, DEPLOYMENT & STARTING THE GAME
Games are typically played on a 4˝× 4˝ battlefield, sometimes referred to as “the table.”
To start a game of WARMACHINE, perform the following steps in order:
• Determine the scenario to be played. A scenario is a specific mission that adds unique rules and victory conditions to a game. A player wins a scenario by achieving the outlined victory conditions, not necessarily by eliminating the opponent’s forces or warcaster. Each scenario will have specific guidelines for deployment, scoring, deployment zones, and victory conditions. Scenarios can be found on p. 57.
• Unless dictated by the scenario, players should decide on whether they are using the Assassination or the Execution Mode rules for the game (see below).
• Players decide on the size of game they will play and build their armies and select their Command Cards accordingly. Note that some scenarios have recommended game sizes they are best suited to.
• Players set up the battlefield, placing terrain and marking zones, flags, and objectives as defined by the scenario (see p. 57).
• If one or more players are playing with a warcaster that can rack additional spells, they do so now (see p. 36). If both players have the option to rack spells, they should reveal their spell selections simultaneously.
• Players make a starting roll, with each rolling a d6 to determine who will be the first player and who will be the second player. The player who rolls the higher number chooses which player will be the first player and which will be the second.
• The second player chooses an edge of the battlefield to deploy to.
• The first player deploys their models first on the table edge opposite the one chosen by the second player, placing them completely within a deployment zone determined by the scenario. Deploy units so that every model in the unit is within 3” of every other model in the unit. If the scenario being played makes use of the Advance Deployment rules, models with Advance Deployment do not have to be deployed at this time.
• The second player deploys their models on their chosen side of the battlefield, placing them completely within an area determined by the scenario, following the same guidelines.
• If the scenario being played makes use of the Advance Deployment rules, the first player now deploys any of their models with Advance Deployment that they did not place in step 8, deploying models up to 3 ̋ beyond their deployment zone.
• If the scenario being played makes use of the Advance
Deployment rules, the second player deploys any of their models with Advance Deployment that they did not place in step 9, following the same guidelines.
• After all forces have been deployed, models/units with the Prey special rule select their prey.
• The first game round begins with the first player taking the first turn. Players then alternate taking turns for the rest of the game. This is the turn order. Once established, the turn order remains set for the rest of the game. Game rounds continue until one side achieves its victory conditions and wins the game.
Assassination vs. Execution ModesMost games of WARMACHINE end when one player ’s Commander model is destroyed. In the case of the destruction of one player’s Commander model, the player with the last Commander model in play wins the game. There are, however, two different modes to play WARMACHINE, and players should decide which they are playing with after determining the scenario they intend to play.
In Assassination Mode, Commander models are potent but still vulnerable to destruction by any attacks and damage they suffer during play. Assassination Mode has no additional special rules, and Commander models suffer damage and can be destroyed just like other models in the game.
In Execution Mode, a Commander model can only be destroyed by an attack made by another Commander model.
The designers recommend that new players play using Execution Mode rules when first learning the game.
Execution Mode RulesWhen playing in Execution Mode, only a Commander can destroy another Commander model. When a Commander model would be destroyed as a result of damage suffered from any source other than an attack made by an enemy Commander model, instead of being destroyed, it becomes Vulnerable. If a Commander model is destroyed by damage inflicted by an attack made by an enemy Commander model, instead of becoming Vulnerable, it is destroyed normally.
When a Commander model becomes Vulnerable, its upkeep spells immediately expire, but the Vulnerable model remains in play with 0 damage boxes. A Vulnerable model cannot suffer damage from any source other than from an attack made by an enemy Commander model. If a Vulnerable model suffers any additional damage from an attack made by an enemy Commander model, it is immediately destroyed.
While Vulnerable, a Commander model cannot have damage removed from it and cannot make attacks.
49
At the start of the Vulnerable model’s controller ’s next turn, remove 1 damage point from the Vulnerable model and it ceases to be Vulnerable.
Rapid HealingWhile playing Execution Mode, when a Commander model spends one or more focus or fury points during its activation to remove damage from itself, such as a result of a warcaster’s Power Field special rule or a warlock’s Healing special rule, instead of just removing 1 damage point for each focus or fury point spent, the Commander model can remove 5 damage points. Rapid Healing only affects damage removed from the Commander model and does not, for instance, affect warbeasts healed by a warlock during its activation.
DeploymentWhen players place their models on the table at the start of a game, they deploy them to a deployment zone. When deploying their models, players must place them completely within their deployment zones. When deploying units, place them so that every model in the unit is within 3˝ of every other model in the unit.
While some scenarios have specific rules for deployment, generally the first player’s deployment zone is defined as the 7˝ area forward of the table edge opposite the one chosen by the second player. The second player’s deployment is generally defined as the 10˝ area forward of the table edge selected by that player.
ADVANCE DEPLOYMENT & AMBUSH
After initial deployments, players will then usually take turns deploying their models with the Advance Deployment advantage up to 3˝ beyond the established deployment zones, beginning with the first player.
Models/units with the Ambush special rule are not required to be deployed at the start of the game. Instead, you can choose to put any of these models/units into play at the end of any of your Control Phases after your first turn. When you do, choose any table edge except the back of your opponent’s deployment zone. Place the models/units completely within 3˝ of the chosen table edge. When placing Ambushing units, place them so that every model in the unit is within 3˝ of every other model in the unit.
Advance Deployment and Ambush are options, and players can choose to deploy any or all of these models/units during their initial deployment if they wish. Note, however, that some scenarios do not allow for Advance Deployment and Ambush or have modified rules for their use.
Starting Focus & FuryEvery warcaster and other model with the Focus Manipulation special rule begins the game with a number of focus points equal to its ARC stat.
Every warlock and other model with the Fury Manipulation special rule begins the game with a number of fury points equal to its ARC stat.
50
ARMYCONSTRUCTION
ENCOUNTER LEVELS, COMMAND CARDS & BUILDING YOUR ARMY
Before building their armies, players must first decide on the size of game they intend to play. This is generally determined by selecting an encounter level that sets the number of army points each player is allowed when building their army. Some scenarios have a recommended game size that presets the encounter level for the game. The more army points in a game, the larger the armies and the longer the game.
Once the encounter level has been determined, both players make their armies and prepare for battle.
Army points can be spent on both models and on Command Cards (p. 52). When building your army, you need to spend every point available and cannot exceed the set number of army points.
SkirmishArmy Points: 50
A skirmish is a battle between warcasters and a few trusted companions. This encounter level is perfect for players just beginning to play and for experienced players looking for a faster game.
When playing a skirmish-scale game, your Commander ’s battlegroup must include at least one warjack or warbeast. Battle engines, colossals, and gargantuans are not allowed in skirmish-scale games.
Pitched BattleArmy Points: 75
Pitched battles are sizeable conflicts between significant forces.
When playing a pitched battle, your Commander’s battlegroup must include at least two warjacks or warbeasts.
Grand MeleeArmy Points: 100
A grand melee is a battle between large forces under the direction of individual commanders.
When playing a grand melee, your Commander’s battlegroup must include at least three warjacks or warbeasts.
Total WarArmy Points: 100
A total war-scale game adds a proliferation of huge-based models to each player’s army.
When playing a total war-scale game, your Commander ’s battlegroup must include at least three warjacks or warbeasts.
Each player can add 1 to 3 colossals, gargantuans, and battle engines to their army free of cost. Before building their armies, both players should agree on the number of colossal, gargantuans, and battle engines they will each add to their armies. Additional colossal, gargantuans, and battle engines can be added to the
army by spending army points as normal.
Building Your ArmyThe first step to building an army is to choose a Faction. Each Faction presents its own visual aesthetic and variety of play styles and tactics, but all Factions make for fun and strategically interesting games. An army can include only models from one Faction and the Mercenaries that will work for that Faction.
Once you have selected your Faction, you must then choose a Commander, generally a warcaster or warlock, depending on your Faction, to lead your army. An army is always led by a single Commander.
PRIME AND UNLIMITED ARENAS The MKIV edition includes two Arenas of play: Unlimited, which will allow all existing Legacy and new MKIV models to be playable; and Prime, which will provide limited model options in building armies from the pre-existing catalog, as well as incorporating all new MKIV releases.
Army Construction FlowchartStep 1 - Choose your Faction.
Step 2 - Choose an Army from within the faction.When playing in the Unlimited Arena, you will also have the option to choose ‘Custom Army’, which allows you to build an army from all available Legacy models in the faction.
Step 3 - Choose a Commander for your army.
Step 4 - Select the spells for your Commander’s Rack if you are playing a MkIV Commander.
Step 5 - Spend Army Points to construct your force from the models available to your Army.If Cadre or Mercenary models are available to your army, they will appear in your available model list
Step 6 - Select Five Command Cards.
51
Point CostsAll non-Commander models/units have a point cost that indicates how many army points you must spend to include these models in your army. Each army will include a single Commander model that is free of cost.
Field AllowanceField allowance (FA) is the maximum number of models or units of a given type that can be included in an army.
A field allowance of “C” means the model or unit is a character (see “Characters” below).
Some solos are purchased in groups. In these cases, field allowance determines the number of groups of these models a player can include in an army rather than the number of individual models.
CharactersSome models represent unique individuals from the Iron Kingdoms. These personalities carry proper names and are identified as characters. Characters follow the rules for their basic model type as well as the rules for characters.
Characters have FA C, and an army can include only one instance of each named character, whether the character is a warcaster, a warlock, a solo, part of a unit, a unit attachment, or so on. Many characters have evolved throughout the developing storyline, and as a result you can choose from several versions of the same characters to include in your armies. Each version of the same character will have the same name on its stat profile followed
by a numeral denoting the incarnation of that character. You can include only one character model with the same stat profile name in your army.
BattlegroupsEach warcaster in an army controls a group of warjacks and each warlock in an army controls a group of warbeasts. A warcaster and the warjacks they control and a warlock and the warbeasts they controls are collectively referred to as battlegroups. There is no limit to the number of models that can be fielded in either a warcaster’s or a warlock’s battlegroup.
Warjacks must begin the game controlled by a ’jack marshal (p. 46) or assigned to a battlegroup controlled by a model with the Focus Manipulation special rule (p. 35).
Warbeasts must begin the game assigned to a battlegroup controlled by a model with the Fury Manipulation special rule (p. 39).
Because a warcaster can allocate focus points only to warjacks in its battlegroup and only warjacks in a battlegroup power up, it is important to distinguish which warjacks are controlled by each warcaster and which warjacks are controlled by each ’jack marshal. When composing your army, specify the controller for each of the warjacks in your army. For more information on battlegroups, see “Warcasters & Focus,” p. 35.
Likewise, because a warlock can leech fury points only from warbeasts in its battlegroup, it is important to distinguish which warbeasts are controlled by each warlock. When composing your army, specify the controller for each of the warbeasts in your army. For more information on warlock battlegroups, see “Warlocks & Fury,” p. 39.
Warjack CustomizationSome warjacks are customizable. These warjacks have a number of head, weapon, and potentially other options available to them that a player can select from to customize the loadout of the warjack. These options are represented by Hardpoints, which determine how many customization options each warjack can have and where they can be placed. Different warjacks have different numbers and configurations of Hardpoints, and these are listed on the warjack’s card.
Weapons and other gear are designed to fit into certain Hardpoints on a warjack, such as the head, right, or left arm. The options available to one of a warjack’s Hardpoints cannot be added to other locations. For example, a weapon designed for a right arm Hardpoint cannot be assigned to a warjack’s left arm Hardpoint and vice versa.
Each Hardpoint customization option has an army point cost associated with it and customization takes place when a player builds their army—once a warjack’s loadout is determined, it cannot change during a game. Essentially, the warjack “costs” a number of points equal to the Harpoint options selected. When you are adding a customizable warjack to your army, you must select one option for each Hardpoint. For example, you cannot choose to add a warjack to your army without selecting a head for it if the warjack has a head Hardpoint.
SAMPLE ARMYHere is a sample Cygnar Storm Legion army
built for a 50-point game.
Warcaster Point CostCaptain Athena di Baro 0
Battlegroup1 Courser Warjack (Shield Guard Head, HeavyStormthrower,ElectrifiedShield) 91 Stryker Warjack (Advanced Optics Head, Electro Bombard, Heavy Mag-Bolter) 18
Units and Solos1 Stormblade Legionnaire Unit 61 Tempest Thunderer Unit 10 1 Arcane Mechaniks Unit 4 1LegionnaireOfficerSolo 3
Command CardsBlessing of the Gods 0Careful Reconnaisance 0Hit & Run 0Old Faithful 0Power Swell 0
Total 50
52
Note that some warjacks have predetermined loadouts and cannot be customized. These warjacks do not have Hardpoints.
Customizable HeadsCustomizable warjacks heads add special rules to the warjack. On the warjack’s damage grid, its head is represented by the (H), or Head system. If a warjack’s head system is crippled, it loses any special rules, including advantages, granted by its head (see “Crippling Systems,” p. 31).
EXAMPLE: Emmanuel adds a Jackal to his Orgoth army. The Jackal has Hardpoints in its head, right arm, and left arm, and Emmauel has to select an option for each. He equips the warjack’s head with an Arc Node (2 points), its right arm with the Hunter Rifle (5 points), and its left arm with an Assault Shield (3 points). Adding this warjack to Emmanuel’s army costs a total of 10 points.
Warbeast CustomizationSome warbeasts are customizable. These warbeasts have a number of animus, weapon, and potentially other options available to them that a player can select from to customize the loadout of the warbeast. These options are represented by Hardpoints, which determine how many customization options each warbeast can have and where they can be placed. Different warbeasts have different numbers and configurations of Hardpoints and these are listed on the warbeast’s card.
Weapons and other gear are designed to fit into certain Hardpoints on a warbeast, such as the head, right, or left arm. The options available to one of a warbeast’s Hardpoints cannot be added to other locations. For example, a weapon designed for a right arm Hardpoint cannot be assigned to a warbeast’s left arm Hardpoint and vice versa.
Each Hardpoint customization option has an army point cost associated with it and customization takes place when a player builds their army — once a warbeast’s loadout is determined, it cannot change during a game. Essentially the warbeast “costs” a number of points equal to the Harpoint options selected. When you adding a customizable warbeast to your army, you must select one option for each Hardpoint. For example, you cannot choose to add a warbeast to your army without selecting an animus for it if the warbeast has an animus Hardpoint.
Note that some warbeasts have predetermined loadouts and cannot be customized. These warbeasts do not have Hardpoints.
Customizable AnimiCustomizable warbeasts have a range options they can chose from in selecting their animus. See “Animi” on p. 43 for details.
Mercenaries Mercenaries are servants, soldiers, and heroes-for-hire that can be fielded or pressed into the service of a variety of Faction armies. When you are building your army, you can include Mercenary models that will work for your Faction. Each Mercenary’s rules list the Factions that model will work for. Additionally, you can field an army made up entirely of Mercenary models.
If the only warcasters in an army are Mercenaries, the army is
a Mercenary army and can include only Mercenary models. Mercenary armies can be composed of any Mercenary models, regardless of what Factions the models will work for.
Mercenary warjacks can be added to an army only as part of a Mercenary warcaster ’s battlegroup or under the control of a Mercenary ’jack marshal. During the game, inert (p. 32) Mercenary warjacks can be reactivated only by Mercenary warcasters and ’jack marshals, and Mercenary warcasters and ’jack marshals can control and reactivate only Mercenary warjacks. Mercenary warcasters can have only Mercenary warjacks in their battlegroups.
Mercenary warbeasts can be added to an army only as part of a Mercenary warlock’s battlegroup.
Command CardsEach player begins the game with a hand of five Command Cards that are selected while building your army. These cards can be played once each game for a special benefit and are discarded once they have been played.
The rules of each Command Card explain when the card can be played.
A player can play up to two cards each turn, and a model or unit can only have up to one Command Card played on it each turn.
Command Cards are not secret; a player can request to look at their opponent’s Command Cards at any time.
Selecting Command CardsA player must select five Command Cards while building their army. Some cards are available to any Faction, while others specify which Factions or armies can take them. A player can only select cards from those available to their Faction or army. A player can only include up to one copy of each Command Card in their hands.
While many Command Cards are free to add to a player’s hand, others have Army point costs (p. 50) associated with them that must be paid to add the card to the player’s hand.
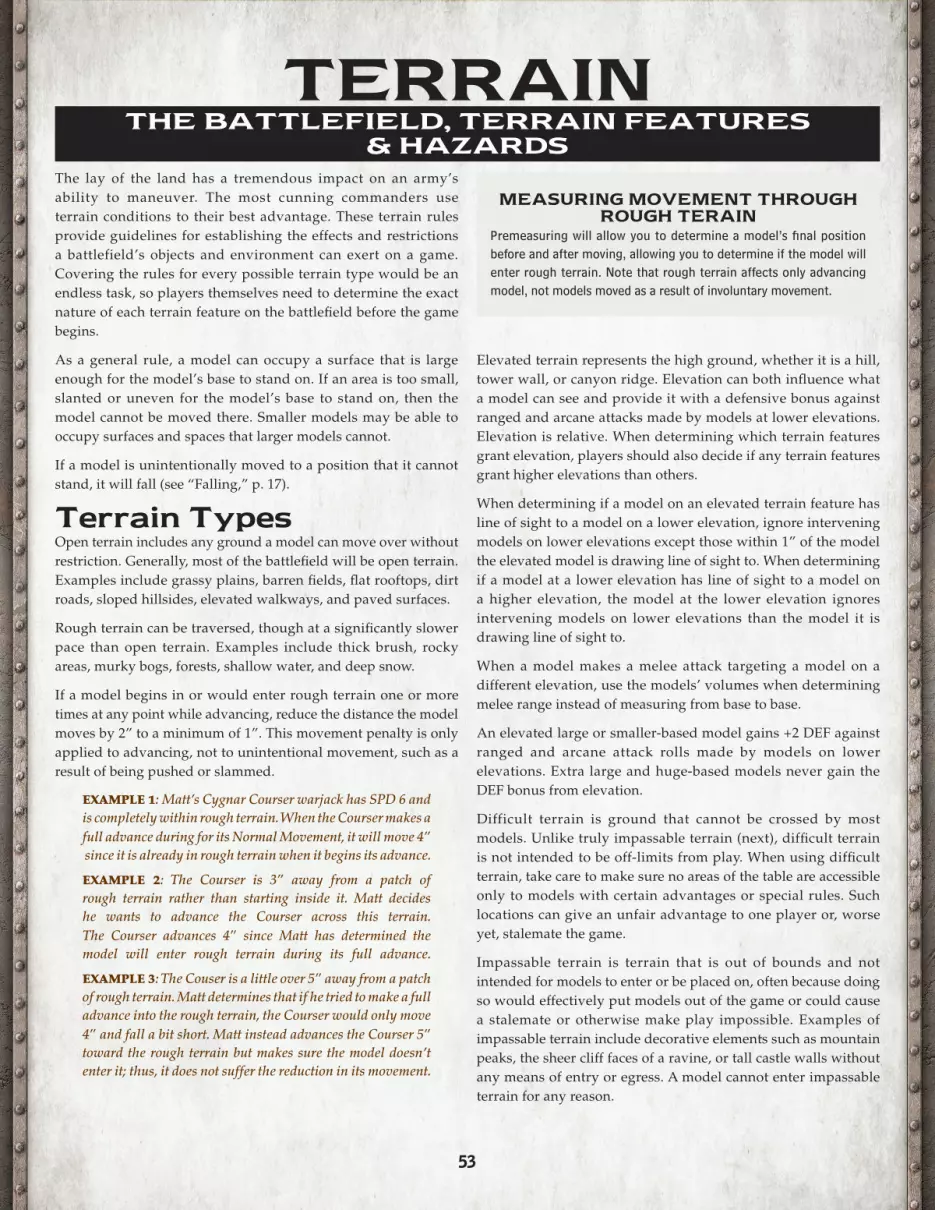
53
TERRAINTHE BATTLEFIELD, TERRAIN FEATURES
& HAZARDSThe lay of the land has a tremendous impact on an army’s ability to maneuver. The most cunning commanders use terrain conditions to their best advantage. These terrain rules provide guidelines for establishing the effects and restrictions a battlefield’s objects and environment can exert on a game. Covering the rules for every possible terrain type would be an endless task, so players themselves need to determine the exact nature of each terrain feature on the battlefield before the game begins.
As a general rule, a model can occupy a surface that is large enough for the model’s base to stand on. If an area is too small, slanted or uneven for the model’s base to stand on, then the model cannot be moved there. Smaller models may be able to occupy surfaces and spaces that larger models cannot.
If a model is unintentionally moved to a position that it cannot stand, it will fall (see “Falling,” p. 17).
Terrain TypesOpen terrain includes any ground a model can move over without restriction. Generally, most of the battlefield will be open terrain. Examples include grassy plains, barren fields, flat rooftops, dirt roads, sloped hillsides, elevated walkways, and paved surfaces.
Rough terrain can be traversed, though at a significantly slower pace than open terrain. Examples include thick brush, rocky areas, murky bogs, forests, shallow water, and deep snow.
If a model begins in or would enter rough terrain one or more times at any point while advancing, reduce the distance the model moves by 2” to a minimum of 1”. This movement penalty is only applied to advancing, not to unintentional movement, such as a result of being pushed or slammed.
EXAMPLE 1: Matt’s Cygnar Courser warjack has SPD 6 and is completely within rough terrain. When the Courser makes a full advance during for its Normal Movement, it will move 4” since it is already in rough terrain when it begins its advance.
EXAMPLE 2: The Courser is 3” away from a patch of rough terrain rather than starting inside it. Matt decides he wants to advance the Courser across this terrain. The Courser advances 4” since Matt has determined the model will enter rough terrain during its full advance.
EXAMPLE 3: The Couser is a little over 5” away from a patch of rough terrain. Matt determines that if he tried to make a full advance into the rough terrain, the Courser would only move 4” and fall a bit short. Matt instead advances the Courser 5” toward the rough terrain but makes sure the model doesn’t enter it; thus, it does not suffer the reduction in its movement.
Elevated terrain represents the high ground, whether it is a hill, tower wall, or canyon ridge. Elevation can both influence what a model can see and provide it with a defensive bonus against ranged and arcane attacks made by models at lower elevations. Elevation is relative. When determining which terrain features grant elevation, players should also decide if any terrain features grant higher elevations than others.
When determining if a model on an elevated terrain feature has line of sight to a model on a lower elevation, ignore intervening models on lower elevations except those within 1” of the model the elevated model is drawing line of sight to. When determining if a model at a lower elevation has line of sight to a model on a higher elevation, the model at the lower elevation ignores intervening models on lower elevations than the model it is drawing line of sight to.
When a model makes a melee attack targeting a model on a different elevation, use the models’ volumes when determining melee range instead of measuring from base to base.
An elevated large or smaller-based model gains +2 DEF against ranged and arcane attack rolls made by models on lower elevations. Extra large and huge-based models never gain the DEF bonus from elevation.
Difficult terrain is ground that cannot be crossed by most models. Unlike truly impassable terrain (next), difficult terrain is not intended to be off-limits from play. When using difficult terrain, take care to make sure no areas of the table are accessible only to models with certain advantages or special rules. Such locations can give an unfair advantage to one player or, worse yet, stalemate the game.
Impassable terrain is terrain that is out of bounds and not intended for models to enter or be placed on, often because doing so would effectively put models out of the game or could cause a stalemate or otherwise make play impossible. Examples of impassable terrain include decorative elements such as mountain peaks, the sheer cliff faces of a ravine, or tall castle walls without any means of entry or egress. A model cannot enter impassable terrain for any reason.
MEASURING MOVEMENT THROUGH ROUGH TERAIN
Premeasuring will allow you to determine a model’s final position before and after moving, allowing you to determine if the model will enter rough terrain. Note that rough terrain affects only advancing model, not models moved as a result of involuntary movement.
54
Any natural or man-made object on the battlefield is a terrain feature, sometimes referred to as a “piece of terrain.” Terrain features may limit visibility, restrict movement, grant a degree of protection, or even adversely affect models moving through it. Standard terrain features include forests, patches of dense fog, piles of rubble, obstacles and obstructions, shallow water, sloped hills, trenches, and other hazards; these are described at the end of this section.
Unless you are playing on a sculpted terrain table, most of the terrain on your table is likely to take the form of standard terrain features.
Standard Terrain FeaturesStandard terrain represents common terrain features players can use in their games. Instead of discussing the specific qualities of each piece of standard terrain, players simply declare the feature is of a common type described below.
It is also possible to create composite terrain features, which incorporate the rules of two or more standard terrain features. For example, a burning forest that incorporates both the rules of a forest and the burning earth hazard.
CraterA crater is a blast or tear in the earth. Craters are generally circular or irregularly shape and should not be greater than 5˝ in diameter.
A crater is rough terrain.
A model completely within the area of a crater has cover from attacks made by models that are not touching any part of the crater terrain feature the model is in. Models completely within a crater do not suffer blast damage unless the origin of damage is in a crater they are in. When drawing line of sight to a model not completely within a crater, ignore models that are completely within a crater, open grave template, or one or more trench templates (p. 55).
Dense FogPatches of dense fog or thick smoke limit visibility on the battlefield. Dense fog is represented by clusters of cloud effects (p. 33).
CLEARING FOGIf both players agree, you can play with randomly clearing patches of fog. Starting with the first player’s second turn, at the start of each player’s turn, roll a d6 for each dense fog cloud effect in play. On the roll of a 1, the fog clears and is removed from the table.
Dust DevilA dust devil represents a turbulent, confined knot of wind and debris. A dust devil can be represented by a 3˝ template or by another piece of terrain that simulates a vortex of wind.
When a model within the perimeter of a dust devil makes a ranged attack or is targeted by a ranged attack, the attack suffers –3 RNG to a minimum of 8˝.
ForestsA forest is generally considered to be a wooded area that is not so dense that models cannot move through it, but these rules can be applied to any terrain feature that hinders movement and makes a model inside it difficult to see.
A forest is rough terrain and provides concealment (p. 27) to a model completely inside its perimeter.
When drawing line of sight to or from a point within a forest, the line of sight can pass through up to 3˝ of forest without being blocked; anything more blocks it. When a model outside a forest attempts to draw line of sight to another point also outside that forest, the forest blocks line of sight to anything beyond it. Thus, a model can see 3˝ into or out of a forest but not completely through one regardless of how thick it is.
Forests do not block line of sight to huge-based models.
HillA hill is a terrain feature with a gentle rise or drop in elevation. A hill is open terrain, and models move up and down it normally. A hill provides elevation to models that are completely within its perimeter. Hills do not provide cover or concealment, but tall hills can block line of sight. A model moving off of a hill does not fall or suffer falling damage.
ObstructionsAn obstruction is a terrain feature 1˝ tall or greater—such as a building, high wall, rock formation, or other feature. Obstructions are difficult terrain. Only models with Flight or Incorporeal can move through obstructions.
Models with Flight can move onto obstructions large enough to accommodate their bases. Some structures can be climbed upon using ladders, stairs, or elevators (see below). An obstruction provides elevation to models that are completely within its perimeter.
A model with any portion of its base obscured from its attacker by an obstruction gains +2 DEF against melee attack rolls and may gain a DEF bonus against ranged and arcane attacks for concealment, cover, or elevation depending on the nature of the terrain.
When resolving a slam or throw, remember to add an additional die to the damage roll when the slammed (p. 16) or thrown (p. 17) model contacts an obstruction.
LADDERS, STAIRS & ELEVATORSA model moving within 1˝ of a ladder, stairs, or elevator can choose to move up or down the ladder, stairs, or elevator. Doing so takes ˝ of the model’s movement. A model cannot, however, move up or down the same ladder, stairs, or elevator more than once during the same movement. Additionally, a model cannot move up or down a ladder, stairs, or elevator when it is being moved involuntarily, such as a result of a slam.
When a model moves up or down a ladder, stairs, or elevator, reposition it anywhere large enough for its base to completely stand on within 1˝ of the ladder, stairs, or elevator it moved up or down. The model can continue its movement from this location.
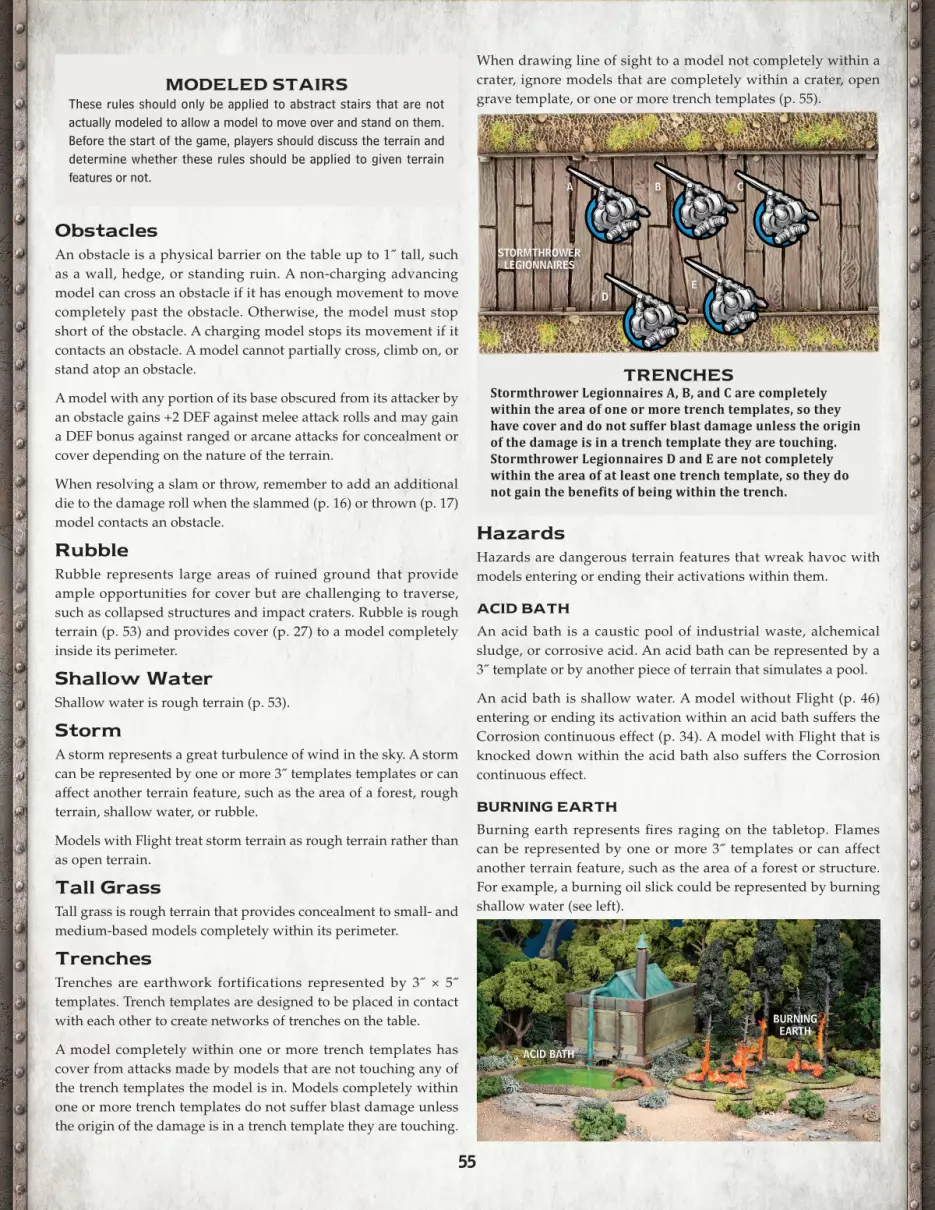
55
TRENCHESStormthrower Legionnaires A, B, and C are completely within the area of one or more trench templates, so they have cover and do not suffer blast damage unless the origin of the damage is in a trench template they are touching.Stormthrower Legionnaires D and E are not completely within the area of at least one trench template, so they do not gain the benefits of being within the trench.
When drawing line of sight to a model not completely within a crater, ignore models that are completely within a crater, open grave template, or one or more trench templates (p. 55).
MODELED STAIRSThese rules should only be applied to abstract stairs that are not actually modeled to allow a model to move over and stand on them. Before the start of the game, players should discuss the terrain and determine whether these rules should be applied to given terrain features or not.
ObstaclesAn obstacle is a physical barrier on the table up to 1˝ tall, such as a wall, hedge, or standing ruin. A non-charging advancing model can cross an obstacle if it has enough movement to move completely past the obstacle. Otherwise, the model must stop short of the obstacle. A charging model stops its movement if it contacts an obstacle. A model cannot partially cross, climb on, or stand atop an obstacle.
A model with any portion of its base obscured from its attacker by an obstacle gains +2 DEF against melee attack rolls and may gain a DEF bonus against ranged or arcane attacks for concealment or cover depending on the nature of the terrain.
When resolving a slam or throw, remember to add an additional die to the damage roll when the slammed (p. 16) or thrown (p. 17) model contacts an obstacle.
RubbleRubble represents large areas of ruined ground that provide ample opportunities for cover but are challenging to traverse, such as collapsed structures and impact craters. Rubble is rough terrain (p. 53) and provides cover (p. 27) to a model completely inside its perimeter.
Shallow WaterShallow water is rough terrain (p. 53).
StormA storm represents a great turbulence of wind in the sky. A storm can be represented by one or more 3˝ templates templates or can affect another terrain feature, such as the area of a forest, rough terrain, shallow water, or rubble.
Models with Flight treat storm terrain as rough terrain rather than as open terrain.
Tall GrassTall grass is rough terrain that provides concealment to small- and medium-based models completely within its perimeter.
TrenchesTrenches are earthwork fortifications represented by 3˝ × 5˝ templates. Trench templates are designed to be placed in contact with each other to create networks of trenches on the table.
A model completely within one or more trench templates has cover from attacks made by models that are not touching any of the trench templates the model is in. Models completely within one or more trench templates do not suffer blast damage unless the origin of the damage is in a trench template they are touching.
HazardsHazards are dangerous terrain features that wreak havoc with models entering or ending their activations within them.
ACID BATH
An acid bath is a caustic pool of industrial waste, alchemical sludge, or corrosive acid. An acid bath can be represented by a 3˝ template or by another piece of terrain that simulates a pool.
An acid bath is shallow water. A model without Flight (p. 46) entering or ending its activation within an acid bath suffers the Corrosion continuous effect (p. 34). A model with Flight that is knocked down within the acid bath also suffers the Corrosion continuous effect.
BURNING EARTH
Burning earth represents fires raging on the tabletop. Flames can be represented by one or more 3˝ templates or can affect another terrain feature, such as the area of a forest or structure. For example, a burning oil slick could be represented by burning shallow water (see left).
ACID BATH
BURNING EARTH
A B C
DE
STORMTHROWER LEGIONNAIRES
56
A model without Flight (p. 46) entering or ending its activation within a burning earth terrain feature suffers the Fire continuous effect (p. 34). A model with Flight that is knocked down within the area of a burning earth terrain feature also suffers the Fire continuous effect. Burning earth terrain features are cloud effects (p. 33).
Flames can go out unpredictably at any time. At the end of each player’s turn, starting with the end of the second player’s first turn, roll a d6 for each burning template in play. On a 1 or 2, the flames go out, and the area is no longer considered to be on fire. If the burning earth terrain feature was represented by a 3˝ template, that template is removed from the table.
QUICKSAND
Quicksand is rough terrain. Quicksand terrain features are generally circular or irregularly shape and should not be greater than 5˝ in diameter.
Models with Pathfinder do not treat quicksand as open terrain. When a model touching quicksand is knocked down, it suffers 1 damage point.
Placing Terrain FeaturesTerrain is a key element in WARMACHINE games and should be relatively balanced on a table. As a general rule, an average table should have six to eight pieces of terrain placed closely enough to eliminate large open areas without unduly constricting movement. The size of terrain pieces is also important. No piece should be insignificantly small or extremely large; pieces from 3˝ to 6˝ in length and width are generally best.
When placing terrain, players should strive for a visually appealing and tactically challenging battlefield. Discuss the terrain setup and agree on the characteristics for different terrain features prior to deploying the armies. Decide which terrain features grant cover or concealment, which provide elevation, which are impassable, and so on. It is vital to understand the rules for all terrain features in play before the start of the game; developing the habit of discussing terrain before the game will help you avoid unnecessary disagreements and misunderstandings during play.
Terrain placement is a non-competitive portion of the game. While a good player will take advantage of the terrain, players should not strategically place terrain features in a manner that unfairly aids or penalizes a specific army.
Use the amount of terrain that suits the type of game you wish to play. A table with few terrain features favors ranged attacks and swift movement, while using more terrain features shifts the emphasis toward melee combat.
Guidelines for Terrain PlacementThe following guidelines should be followed when placing terrain:
Avoid placing terrain pieces within 6˝ of any table edge.
Terrain features should not be placed within 3˝ of any other terrain piece. Trenches, however, can be placed in contact with other trenches.
When placing terrain within scenario zones or near flags and objectives, take care not to accidently block off important sections of the battlefield from models with huge bases.
Each table should contain a minimum of two line of sight blocking terrain pieces such as forests, dense fog, or obstructions.
Methods of Placing TerrainBelow are two suggested methods of setting up terrain. Cluster Method (recommended number of terrain pieces: 7)
Both players should agree on a piece of line of sight blocking terrain to place within 1˝ of the center of the table.
One player should then place one piece of terrain within 6˝ of the center of the table and of the first terrain piece placed.
• The other player should then place one piece of terrain within 6˝ of both the terrain piece placed in step 1 and the last terrain piece placed.
• Players should then take turns each placing one additional piece of terrain within 6˝ of both the terrain piece placed in step 1 and the last terrain piece placed.
• Each player then places one additional piece of terrain within 6˝ of any terrain piece on the table, but not within 8˝ of any other terrain piece.
Quadrant Method (recommended number of terrain pieces: 8)
• Divide the table into four 24˝ × 24˝ quadrants.
• Players then take turns each placing four pieces of terrain. Terrain must be placed completely within a quadrant, and each player can place one piece of terrain in each quadrant.
57
SCENARIOSTHE RULES OF ENGAGEMENT
Games of WARMACHINE are played with a variety of scenarios. There are as many reasons for war as there are wars themselves. Sides seldom clash only to eliminate one another. A battle could be a skirmish over boundaries, a fight over resources, or an attempt to hold important strategic ground, but establishing a context for your conflicts can greatly enhance your WARMACHINE gaming experiences.
Scenarios dictate the victory conditions players must achieve to win their games and will often include special rules for deployment, terrain placement, and game effects. While most scenarios are designed to be balanced and competitive, some are more challenging with the odds stacked against one player, and others are narrative, telling a story that unfolds during play.
The following scenarios are intended to be played on a 4˝× 4˝ table.
Scenario RulesEach scenario consists of the following elements:
Game Size: This lists the optimal game size for the scenario. Many scenarios are balanced for play at any game size, while others are intended for smaller or larger armies.
Set-Up: Any scenario elements, such as objectives, that must be placed on the battlefield. This section will often include a small map that shows the exact placement of any flags, objectives, and zones. Additionally, any changes to initial deployment or army composition are indicated here.
Special Rules: Any additional rules associated with this mission.
Scoring: The rules that indicate how a player scores Victory Points (VPs) in this scenario.
Victory Conditions: These are the rules that determine how and when a player achieves victory in a scenario. Whether using the Assassination or the Execution Mode (p. 48), most scenarios also end when one player loses their last Commander model. In this circumstance, the player with the last Commander model remaining in play wins the game.
FlagsA flag is a scenario marker on a 40 mm base. A flag, however, is not a model. Models cannot end their movement on flags or be placed on them for any reason. A model can move through a flag if it has enough movement to move completely past it.
A player controls a flag if one or more of their Commander models or solos are B2B with the flag and and none of their opponent’s models contests it.
A flag is contested if one or more of your opponent’s non-Commander models are within 4˝ of it. Commander models can control flags but cannot contest them. Remember that objectives (see below) are models and can contest flags. Inert warjacks and wild warbeasts cannot contest flags.
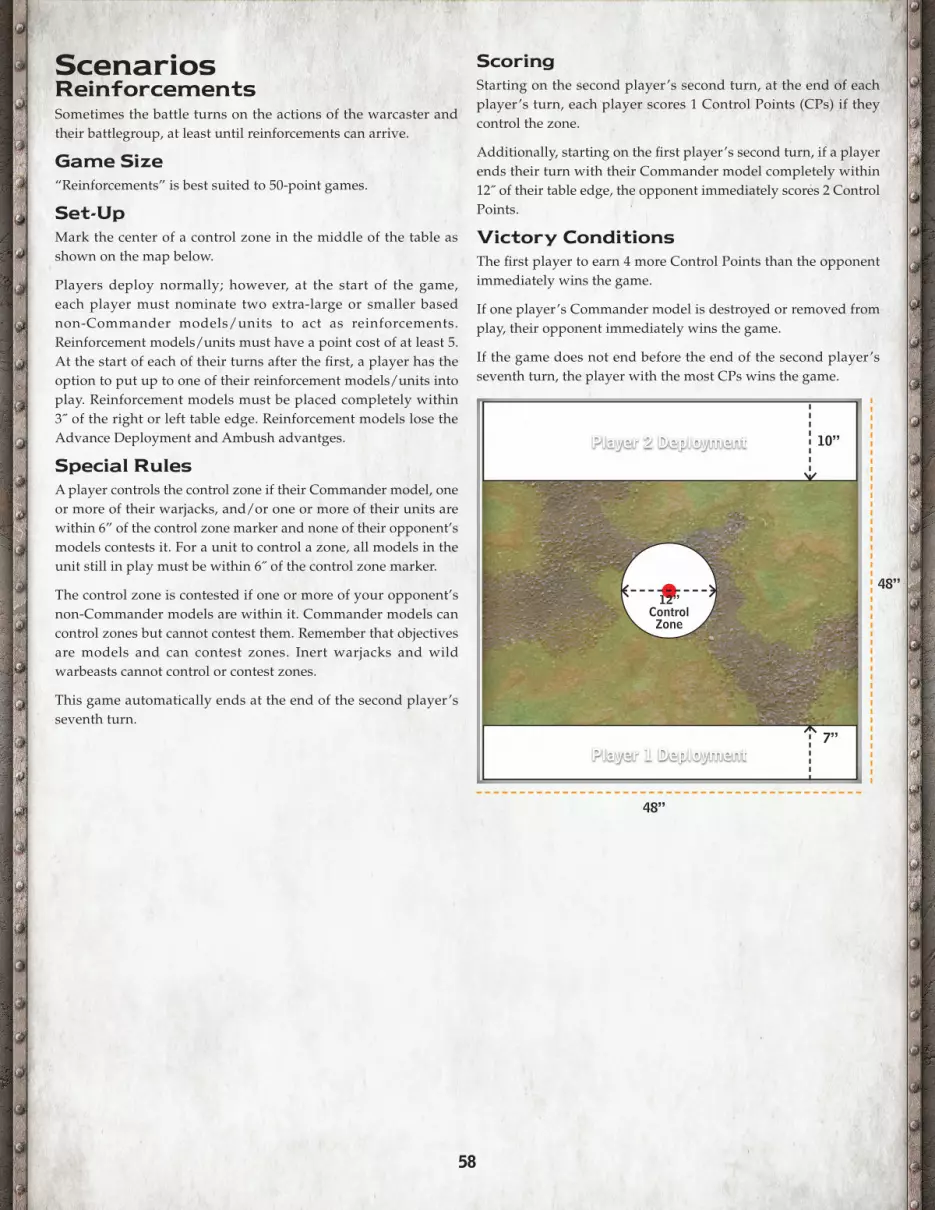
58
ScenariosReinforcementsSometimes the battle turns on the actions of the warcaster and their battlegroup, at least until reinforcements can arrive.
Game Size“Reinforcements” is best suited to 50-point games.
Set-UpMark the center of a control zone in the middle of the table as shown on the map below.
Players deploy normally; however, at the start of the game, each player must nominate two extra-large or smaller based non-Commander models/units to act as reinforcements. Reinforcement models/units must have a point cost of at least 5. At the start of each of their turns after the first, a player has the option to put up to one of their reinforcement models/units into play. Reinforcement models must be placed completely within 3˝ of the right or left table edge. Reinforcement models lose the Advance Deployment and Ambush advantges.
Special RulesA player controls the control zone if their Commander model, one or more of their warjacks, and/or one or more of their units are within 6” of the control zone marker and none of their opponent’s models contests it. For a unit to control a zone, all models in the unit still in play must be within 6˝ of the control zone marker.
The control zone is contested if one or more of your opponent’s non-Commander models are within it. Commander models can control zones but cannot contest them. Remember that objectives are models and can contest zones. Inert warjacks and wild warbeasts cannot control or contest zones.
This game automatically ends at the end of the second player’s seventh turn.
ScoringStarting on the second player’s second turn, at the end of each player’s turn, each player scores 1 Control Points (CPs) if they control the zone.
Additionally, starting on the first player’s second turn, if a player ends their turn with their Commander model completely within 12˝ of their table edge, the opponent immediately scores 2 Control Points.
Victory ConditionsThe first player to earn 4 more Control Points than the opponent immediately wins the game.
If one player’s Commander model is destroyed or removed from play, their opponent immediately wins the game.
If the game does not end before the end of the second player’s seventh turn, the player with the most CPs wins the game.
48”
10”Player 2 Deployment
48”
7”Player 1 Deployment
12”Control Zone
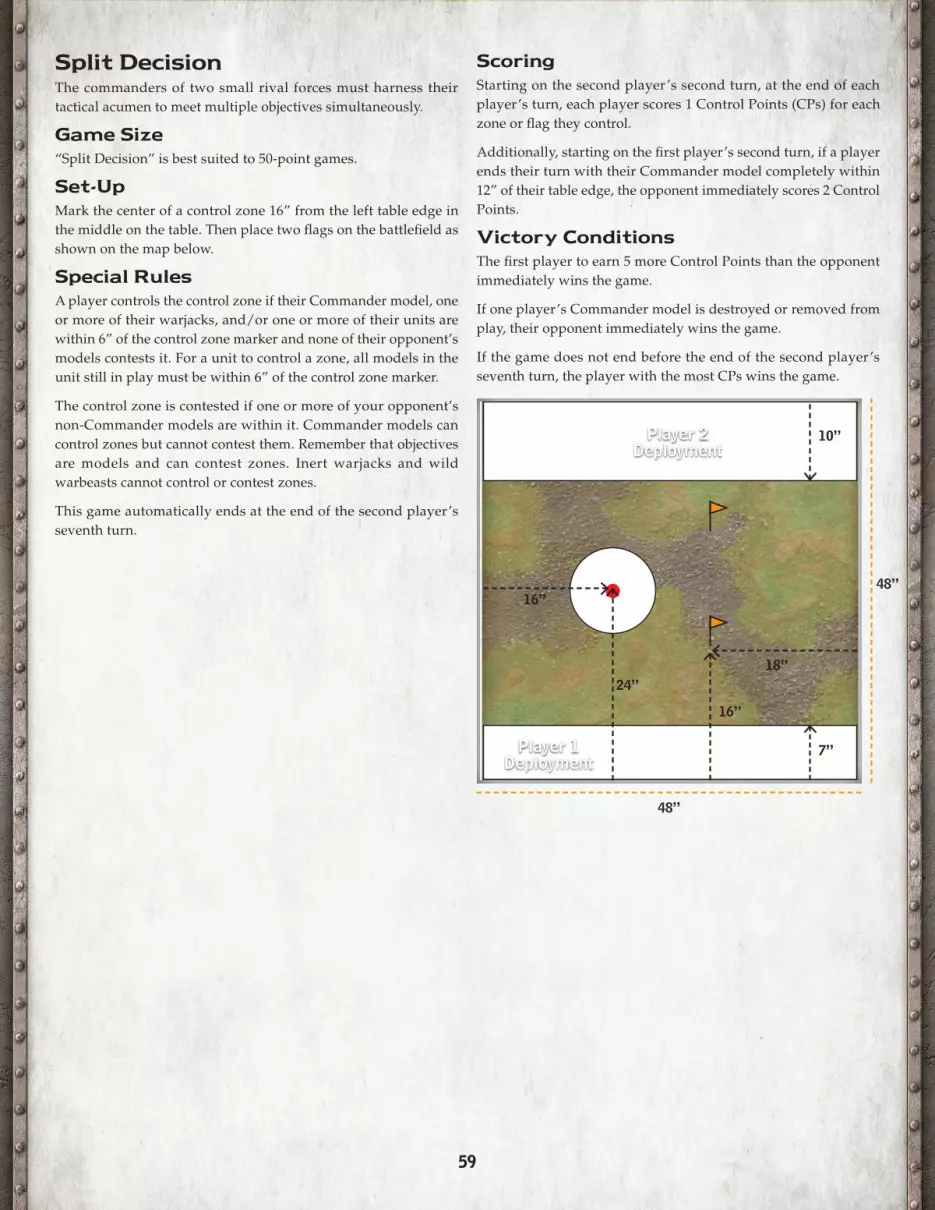
59
Split DecisionThe commanders of two small rival forces must harness their tactical acumen to meet multiple objectives simultaneously.
Game Size“Split Decision” is best suited to 50-point games.
Set-UpMark the center of a control zone 16” from the left table edge in the middle on the table. Then place two flags on the battlefield as shown on the map below.
Special RulesA player controls the control zone if their Commander model, one or more of their warjacks, and/or one or more of their units are within 6” of the control zone marker and none of their opponent’s models contests it. For a unit to control a zone, all models in the unit still in play must be within 6” of the control zone marker.
The control zone is contested if one or more of your opponent’s non-Commander models are within it. Commander models can control zones but cannot contest them. Remember that objectives are models and can contest zones. Inert warjacks and wild warbeasts cannot control or contest zones.
This game automatically ends at the end of the second player’s seventh turn.
ScoringStarting on the second player’s second turn, at the end of each player’s turn, each player scores 1 Control Points (CPs) for each zone or flag they control.
Additionally, starting on the first player’s second turn, if a player ends their turn with their Commander model completely within 12” of their table edge, the opponent immediately scores 2 Control Points.
Victory ConditionsThe first player to earn 5 more Control Points than the opponent immediately wins the game.
If one player’s Commander model is destroyed or removed from play, their opponent immediately wins the game.
If the game does not end before the end of the second player’s seventh turn, the player with the most CPs wins the game.
48”
10”Player 2 Deployment
48”
7”Player 1 Deployment
24”18”
16”
16”
60
APPENDIX 1: TIMINGSTEP-BY-STEP ATTACKS, DAMAGE &
ACTIVATIONSEvery triggered special rule or effect has conditions dictating when it begins and ends. Situations in which multiple effects resolve at the same time are not uncommon, and the following tables help explain the order in which effects resolve. In most cases, the sequence shown here is more detailed than you will need. Remember, when they apply, the rules of individual models take precedence over the timing sequence.
Activation Timing1. Resolve effects that occur at the start of activation.
2. Resolve all required forfeitures of Normal Movement and Combat Action. You cannot use “at any time” abilities or forfeit your Normal Movement or Combat Action voluntarily before this step is resolved.
3. Resolve effects that occur before Normal Movement.
4. The model makes its Normal Movement.
5. Resolve effects that occur at the end of Normal Movement.
6. The model makes its Combat Action.
7. Resolve effects that occur at the end of a model’s Combat Action.
8. If activating a unit, repeat steps 7 and 8 for each trooper, then resolve effects that occur at the end of the unit’s Combat Action.
Spellcasting SequenceModels cannot use “at any time” abilities while resolving the spellcasting sequence or while resolving triggered effects.
1. Declare the spell being used and pay its COST (by spending focus or fury, being forced to use an animus, using the model’s combat action to perform a special action, etc.).
2. Declare the spell’s target.
3. Resolve effects that occur when a model is targeted by a spell.
4. If the spell is not an Offensive spell, check the range to the target. If the target is in range, it is affected by the spell. If the spell is an Offensive spell, resolve the spell using the Attack Sequence timing beginning with “Check range to the target.”
5. If the spell is not an Offensive spell, the spell is now resolved. If the spell is an Offensive spell, it is resolved when you reach “The attack is now resolved“ during the Attack Sequence timing.
Attack Main SequenceModels cannot use “at any time” abilities while resolving the attack sequence or while resolving triggered effects, including between new attacks triggered by the previous attack.
1. Declare the attack and its target.
2. Resolve effects that occur when a model is targeted by an attack.
3. Check the range to the target. If the target is out of range, the attack automatically misses; do not make any attack rolls, and go to step 6.
4. Resolve effects that cause an attack to hit or miss automatically.
5. Make all attack rolls as dictated by the type of attack and its special rules. For example, a spray attack or Thresher special attack must go through the attack roll sequence for each model potentially hit before proceeding to step 6.
Attack Rolla. Resolve effects that change the number of dice rolled,
such as boosting the roll.
b. Roll the dice.
c. Resolve effects that remove dice from the roll.
d. Determine if the model would be hit or missed by the attack roll against it.
e. Resolve effects that cause the attack roll to be rerolled. Return to step b if needed. When returning to step b, add all dice removed in step c back to the roll.
6. Resolve effects that cause the attack to automatically hit a model other than the target.
7. Resolve all other effects triggered by hitting or missing.
8. Make all damage rolls resulting from the attack.
Damage Rolla. Resolve effects that change the number of dice rolled,
such as boosting the roll.
b. Roll the dice.
c. Resolve effects that remove dice from the roll.
d. Determine if the roll would damage the model.
e. Resolve effects that cause the damage roll to be rerolled. Return to step b if needed. When returning to step b, add all dice removed in step c back to the roll.
f. Resolve effects triggered by a damage roll that fails to exceed the ARM of a model hit.
g. Resolve effects that trigger when a model “would suffer damage” such as damage transference.
10. Apply all damage.
61
Damage ApplicationIf an attack damaged more than one model, choose one model, follow the damage application sequence below, then repeat for each other damaged model.
a. Resolve effects triggered by a model suffering damage.
b. If all of a model’s damage boxes are marked, the model is disabled. Resolve effects triggered by the model becoming disabled.
c. If the model is still disabled, it becomes boxed. Resolve effects triggered by the model becoming boxed.
d. If the model is still boxed, it is destroyed. Resolved effects triggered by a model being destroyed.
e. Remove the destroyed model from the table, then return to the main sequence.
11. The attack is now resolved.
12. Resolve active player effects that trigger “after the attack is resolved” that do not involve making another attack.
13. Resolve all inactive player effects that trigger “after the attack is resolved.”
14. Resolve active player effects that trigger “after the attack is resolved” that involve making an attack.
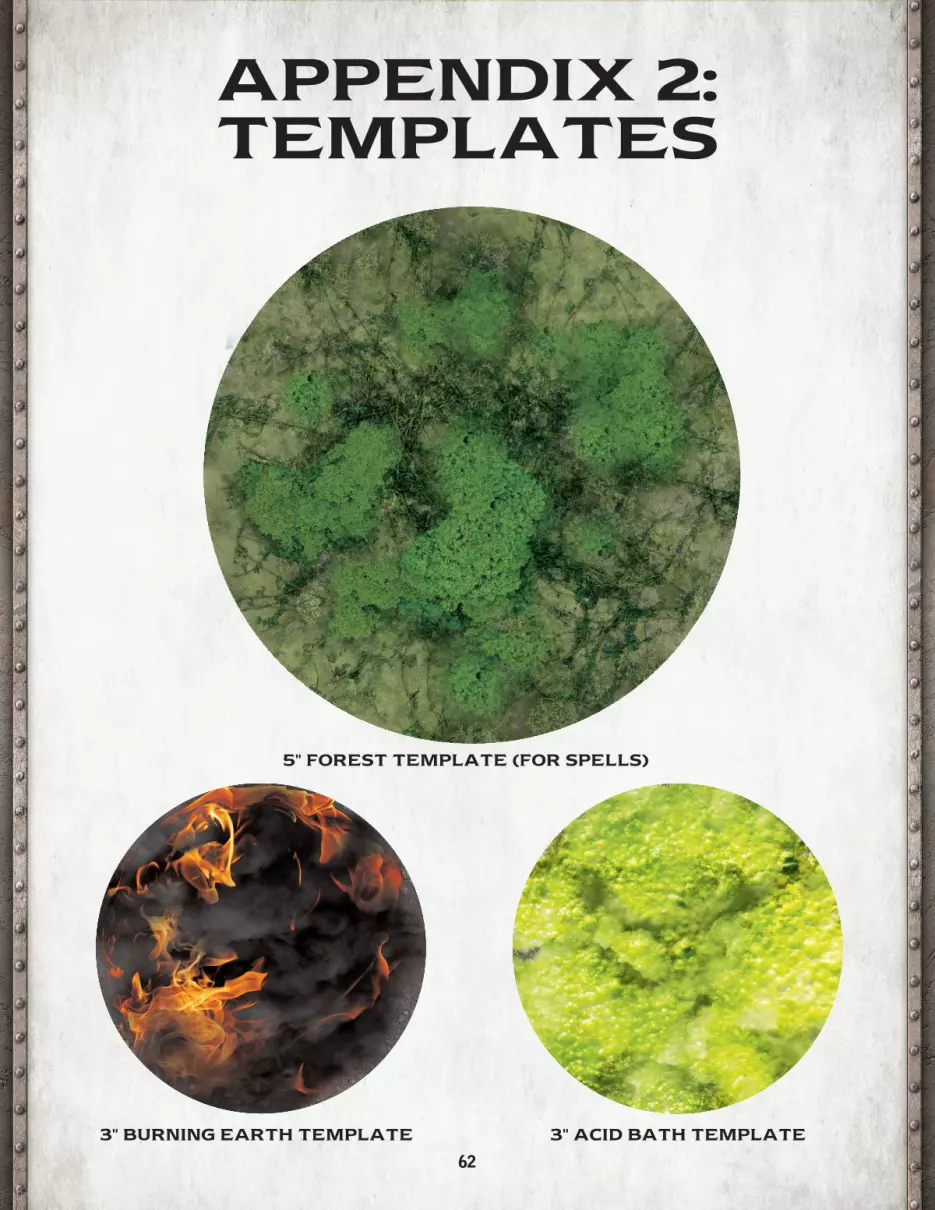
62
APPENDIX 2: TEMPLATES
3" ACID BATH TEMPLATE3" BURNING EARTH TEMPLATE
5" FOREST TEMPLATE (FOR SPELLS)
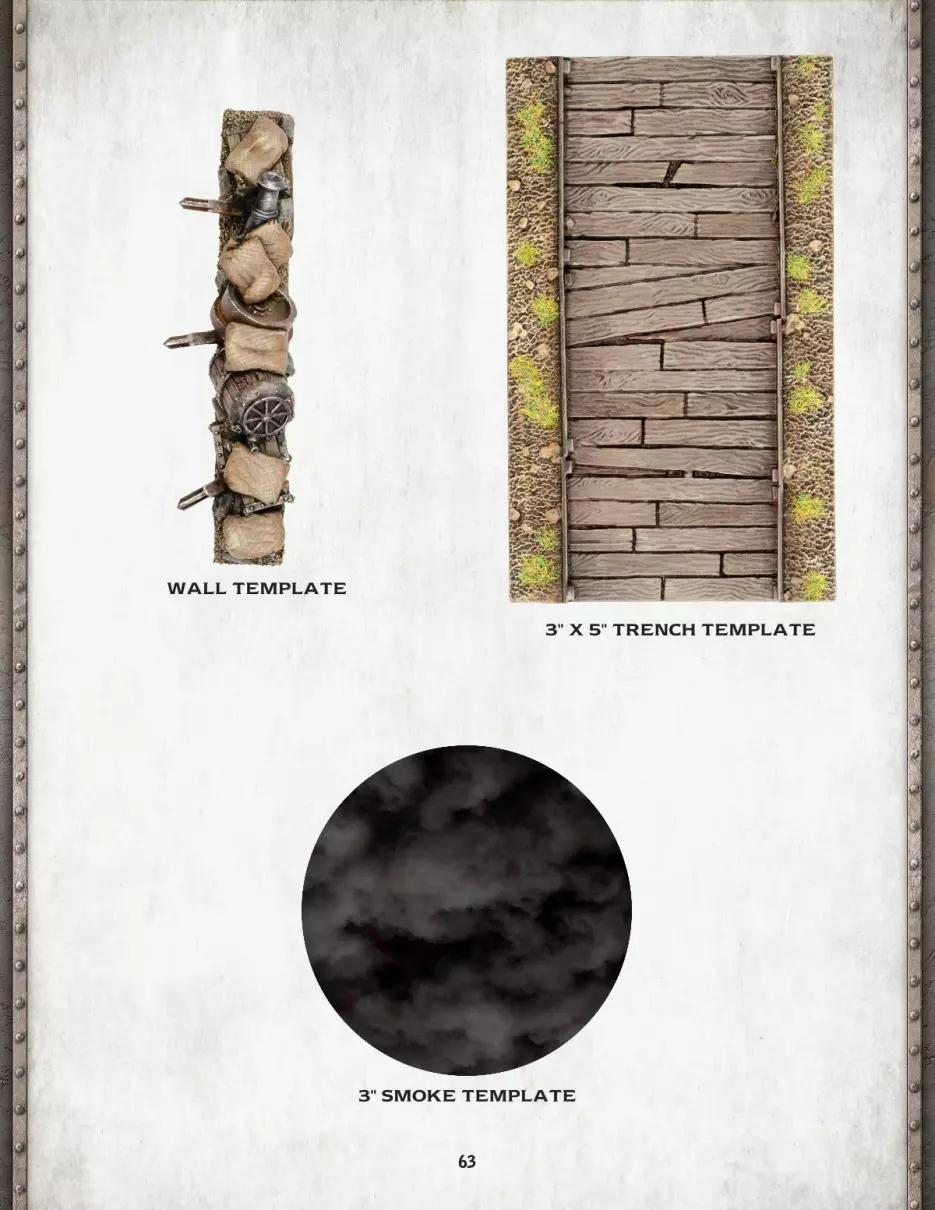
63
3" X 5" TRENCH TEMPLATE
WALL TEMPLATE
3" SMOKE TEMPLATE


